


3pcs XH-W1321 0.1 Digital thermostat Mini Embedded Red Digital Display Switch Temperature Controller with Waterproof NTC Sensor Meter
$30.89
Shipping:Standard Shipping about 10-25 business days
Secure Payment:Paypal,VISA,MasterCard
Specifications
Product Name:Miniature embedded digital display thermostat
Product Model:XH-1321
Material:ABS
Case Color:White
LED Color:Red
Input Voltage:DC12V
Temperature Measurement Range:-50-110→
Temperature Control Range:-50-110→
Control Accuracy:0.1→
Display Accuracy:0.1→
Measuring Input:NTC10K Waterproof Probe L=1 Meter
Output Type:Relay Output(Output Switch)
Output Capacity:10A
Size (Length x Width x Height):about 56 x 38 x 32mm (2.17 x 1.50 x 1.26 Inch )
Opening hole size:46 x 34mm
Key Function
SET:Press once during normal use, directly enter the stop temperature setting state, use the up and down keys to set the required stop temperature, long press to enter the internal setting menu.
UP:After long press the setting button to enter the internal setting, increase the value setting by the up button.
DOWN:After long press the setting button to enter the internal setting, use the up button to decrease the value setting.
Code:Description:Setting range (method):Factory settings
P0:Operating mode:H/C:C
P1:Backlash setting:0.1-50:2
P2:Temperature correction:-9.9~+9.9°C:0
P3:Delayed start:0-9:0
Detailed Code Descriptions
P0:Working mode:This value must be set when the thermostat is used for the first time. If it is used for heating heating, set to H, if it is used for cooling cooling, set to C.
P1:Hypothesis setting:Press and hold the setting button for 3 seconds to enter the internal menu, select P1, and press the setting button again to enter the hysteresis value setting state. The hysteresis is the difference required when the thermostat reaches the set temperature and stops working again. For example, it is set to the heating mode. When it is heated to 40 degrees, it stops at 35 degrees and starts to return. The difference is 5
P2:Temperature correction:Press and hold the setting button for 3 seconds to enter the internal menu. Press the up and down keys to select P2, press the setting button again, and set the required calibration temperature by the up and down keys. In the setting, if the detected temperature value is 0.5 °C larger than the actual temperature value, the calibration temperature to be set is -0.5 °C. If the detected temperature value is 1 °C smaller than the actual temperature value, the calibration temperature to be set is 1 °C, and the detection temperature +-calibration temperature = actual temperature.
P3:Delay start:Press and hold the setting button for 3 seconds to enter the internal menu, select P3 by the up and down keys, press the setting button again, and set the required delay time (minutes) by the up and down keys. The delay start is generally used for compressor refrigeration. If it is used in the refrigerator freezer, this value needs to be set. According to the compressor back pressure, the set value is usually 3-6 minutes, if it is not used to control the compressor or no delay. Function, skip this item directly.
Instructions
Set the difference back:Why set the backlash setting When you control the device, the temperature will rise or fall back. How many degrees does the temperature change If you want the temperature to change by 10°, the device needs to set the difference back to 10. By setting the difference back, the device can cycle through the temperature range.
Set the stop temperature:press the set button once in the normal display state to stop the temperature value flashing. You can set the desired stop temperature value by using the up and down keys.
How to set factory settings are restored:Press and hold the up and down keys while the power is on, the digital tube display 888 will then automatically jump to the detection temperature.
Heating mode setting method
Setup steps
The first step is to set P0=H
The second step sets the stop temperature
The third step sets the hysteresis value
Setting method
1. Press and hold the setting button to enter the internal menu and set P0 to H.
2. Press the setting button to stop the temperature flashing, and the up and down keys to set the temperature.
3. Press and hold the setting button to enter the internal menu and set the P1 hysteresis setting.
Use Cases
Control the water heater, heat it to 65 ° C to stop, the temperature drops back to 50 ° C and start heating again, how to set
Step 1:Determine the working mode as heating mode and set P0 to H
Step 2:Press the setting button to stop the temperature flashing. Set the starting temperature to 50 °C with the up and down keys.
The third step:stop at 65 °C, start again at 50 °C, so the return difference needs to be set to 65-50=15, enter the internal menu and set P1 to 15, the heating case is set!
Cooling mode setting mode
Setup steps
The first step is to set P0=C
The second step sets the stop temperature
The third step sets the hysteresis value
Setting method
Press and hold the setting button to enter the internal menu and set P0 to C.
Press the setting button to stop the temperature flashing, and the up and down keys to set the temperature.
Long press the setting button to enter the internal menu, set the P1 backlash setting
Use Cases
Control the farm, ventilate to 26 ° C to stop, the temperature rises to 28 ° C to start the refrigeration again, how to set up
The first step:determine the working mode is cooling mode, set P0 to C
Step 2:Press the SET button to stop the temperature flashing. Set the stop temperature to 28 °C with the up and down keys.
The third step:stop at 26 ° C, start again at 28 ° C, so the return difference needs to be set to 28-26 = 2, enter the internal menu to set P1 to 2, the cooling case is set!
Package includes
3 x Miniature embedded digital display thermostat
| Weight | 0.138 kg |
|---|
Related products
10pcs thermal Sensor Module Temperature Switch thermistor Sensor Board
$10.88Sensor & Detector ModuleAdd to cartUsesTemperature detection, temperature control sensors , ambient temperature detectionFeatures1. Using the NTC thermistor sensor, good sensitivity2. The comparator output signal is clean, good waveform, driving ability, more than 15mA.3. Adjust the temperature distribution position detection threshold4. The working voltage 3.3V-5V5. The output format:digital switching outputs ( 0 and 1 )6. Fixed bolt holes for easy …
10pcs thermal Sensor Module Temperature Switch thermistor Sensor BoardRead More
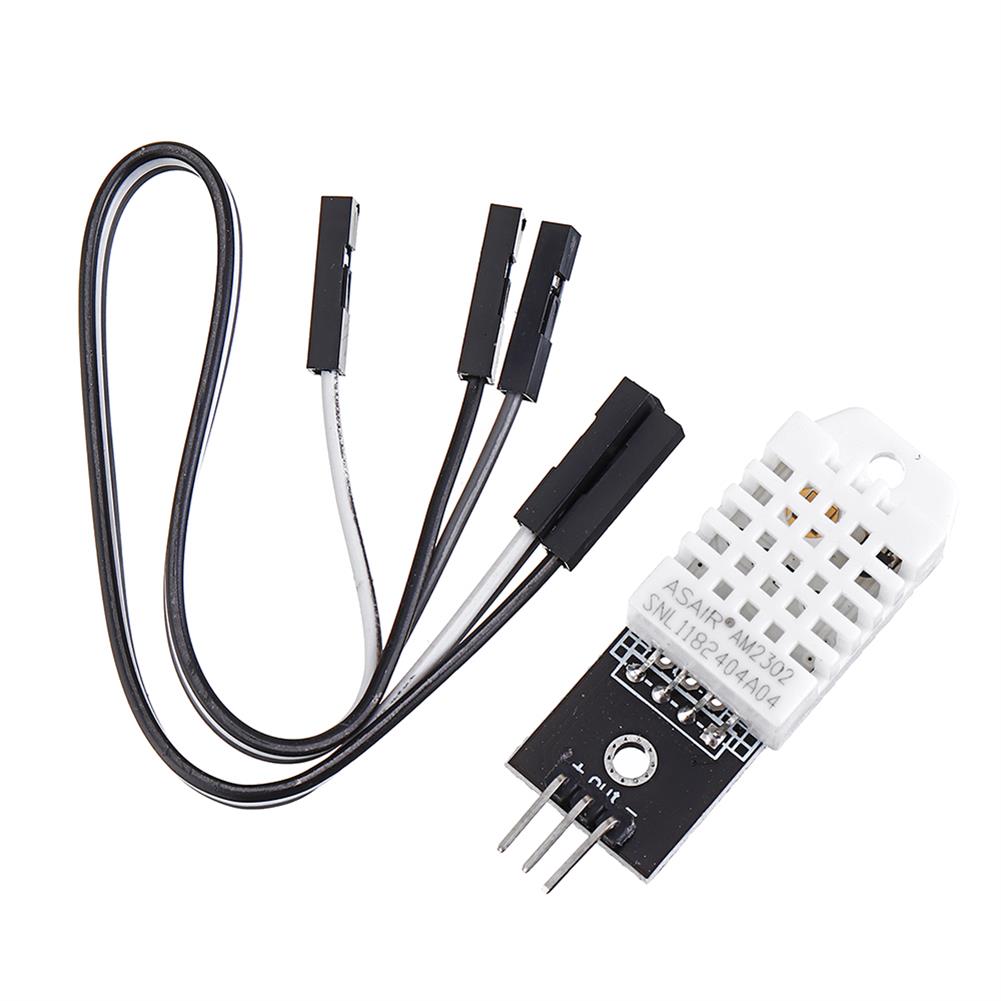
DHT22 Single-bus Digital Temperature and Humidity Sensor Module Electronic Building Blocks AM2302 3.3V-5V DC
$13.11Sensor & Detector ModuleAdd to cartSpecificationsWorking voltage:3 V – 5.5 VSignal output form:digital signalTemperature measurement range:- 40°c to 80°cMeasuring accuracy:0.5°cThe humidity measuring range:0-100% RHMeasuring accuracy:2% RHResolution:16With fixed screw holes, convenient installation and fixation. Diameter of 2.6 mmSize:28.2 x 13.1×10 mm Pininch+inch:positiveinch-inch:the power of anodeinchOutinch:the microcontroller IO portPackage Included1 x DHT22 Temperature Humidity Module1 x Cable
3pcs 6mA 3-100CM Adjustable infrared Digital Obstacle Avoidance Sensor Module
$20.45Sensor & Detector ModuleAdd to cartSpecificationsWorking voltage:DC 3.8V-5.5VWorking current (5V):typical current 6mAInput and output signals (3 lines):GND, VCC is power, and VCC is 3.8V-5.5VObstacle detection time (range from obstacle-free to obstacle-free or obstacle-free to obstacle-free)Working Principle:Sensors actively emit infrared light, according to reflected light detection, if detected obstacles, OUT foot output 0, otherwise 1.Detection distance (test environment, indoor, maximum power, …
3pcs 6mA 3-100CM Adjustable infrared Digital Obstacle Avoidance Sensor ModuleRead More
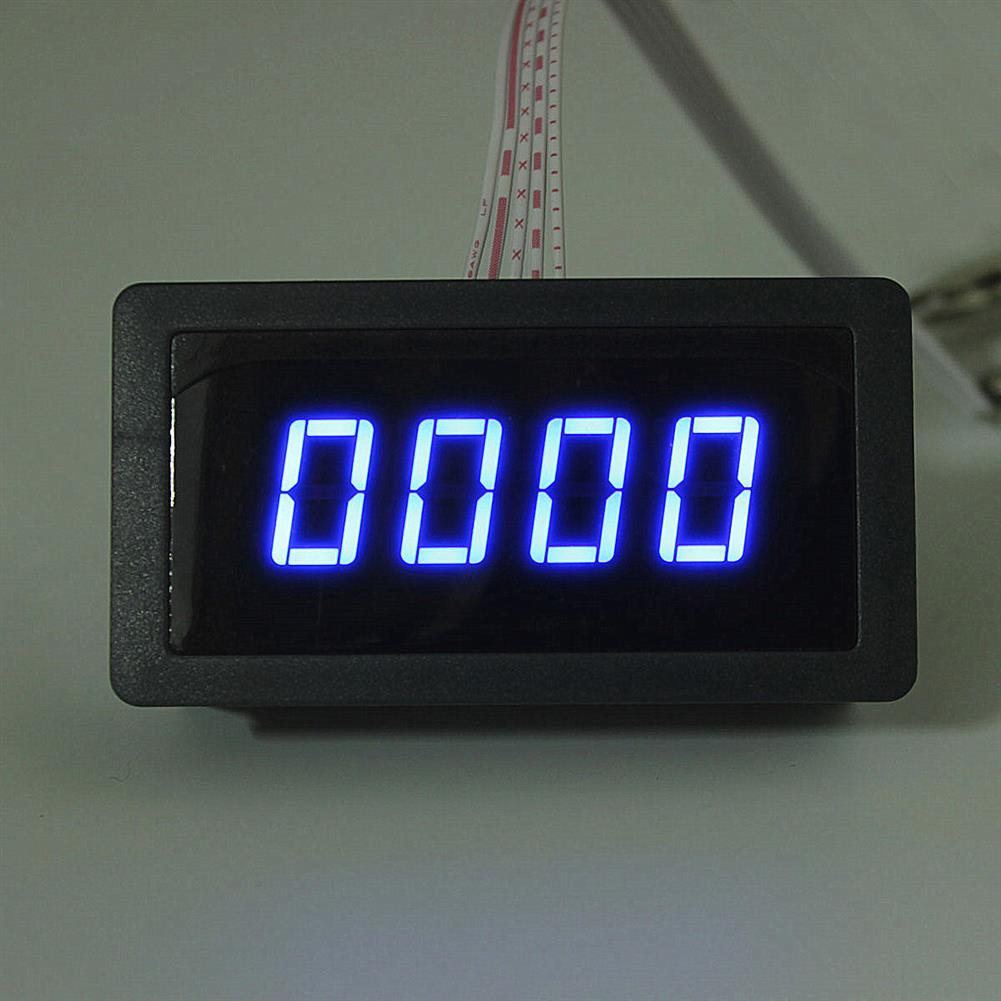
4 Digital LED Tachometer RPM Speed Meter + Proximity Switch Sensor NPN
$26.23Sensor & Detector ModuleAdd to cartSpecificationsWorking power supply:DC8-24v 40 mAMeasure range:5-9999 RPMDisplay:Blue LED 67*32mmSign:Pusle signal, Hall NPN 3 wires normally openHall proximity model:NJK-5002CAppearance:M12mm cylinderDetection range:10mmDetected objects:MagnetResponse frequency:100HZOperating temperature:0 to 50°CPackage included1 x Proximity switch1 x Tachometer


Customers Also Viewed
12pcs DC3-6V Dual Axis L-Type TT Motor DC Geared Motor for Car
$43.70Smart Robot & Solar PanelAdd to cartSpecificationsRatio of 1:120Working voltage:3V ~ 6VNo-load current voltage:6V ≤250mA , 3V ≤160mA No-load speed:250 ± 10% rpm @ 6V , 110 ± 10% rpm @ 3VWith dual axisPackage Included12 x TT motor
13Pcs 100R-1M Each 1 3362 Potentiometer Package 3362P Adjustable Resistor
$6.55Electronic Accessories & SuppliesAdd to cartDescription3362 potentiometer package Adjustable resistance package 100R-1M Each of 13 total.100R (101)200R (201)500R (501)1k (102)2k (202)5K (502)10K (103)20K (203)50K (503)100K (104)200K (204)500K (504)1M (105)Package included13 x 100R-1M 3362 Potentiometer
GT-24 Digital Wireless Module 2.4G NRF24L01 PA LNA industrial Grade 1100M Long Distance with Welding
$10.92Smart ModuleAdd to cartSpecificationModel:GT-24Module size:30.3 * 14.5mm (including PCB antenna)Operating frequency band:2.4GHz ~ 2.525GHz (adjustable, 1MHz step)Interface mode:1*8*1.27mm/2*4*2.54mm (The patch can also be used with the universal board and DuPont line)Supply voltage:DC 2.0-3.6V (Note:above 3.6V, the module will be permanently damaged)Communication level:0.7VCC ~3.3V (VCC refers to the module supply voltage)Measured distance:1000m (clear open space, maximum power, height 2m, …
Full SMD Welding Practice Board Kit SMD Lucky Turntable Flow Lamp DIY Soldering Skill Training Parts
$46.53DIY Electronic KitsAdd to cartFeaturePower supply voltage:5V DCBoard size:80*60mm Board thickness:1.6mmBoard material:Standard plate, all pads are tinned, fireproof and anti-powder materials, can be disassembled repeatedly.Net weight:24gNoteThis product is a spare part, and the buyer needs to weld and assemble it by himself. (instruction not includes)Package includes1 x DIY KIT
HBV-1822 8 Million Pixel Camera Module 8MP Auto Focus Lens USB Camera Board with UY2/MJPEG Output format
$71.06Other Module BoardAdd to cartSpecificationsModel No.:HBVCAM-1822Model Size:38mm ≠ 38mm ≠ 6.75mm÷0.2MMTemperature (Operation):-30C to 70CTemperature (Stable Image):0C to 50CAssembly technique:SMT (ROSH)Focus:AutoObject distance:30CM-infinitResolution:800LW/PH (Center)PCB printing ink:Blackinterface:USB 2.0Power supply:USB bus powersupply voltage:DC 5V÷5%Maximum Power consumption:1000 mWOperating system request:Win XP/win 7,8 / vista /android 4.0/ mac /Linuxwith uvc Sensor:IMX179 (1/3.2” )Seneor Package:CSP,Bare DieMaximum resolution:3264*2448Sensitivity:700mv /(lux-sec)Pixel Size:1.4┢m x 1.4┢m Maximum Image Transfer Rate:MJPEG 640×480 …
TPA3255 2.0 Digital Amplifier Board DC50V Strong High Power 300W + 300W Class D Digital Amplifier Board
$109.31Amplifier BoardAdd to cartProduct DescriptionModel:TPA3255Work:Class DQuiescent current:60mAWork efficienc:more than 90%DC 35-50V (can not exceed 50V)The current need more than 7.5AFrequency response:20Hz to 20KHzDynamic range:more than 100 dBSignal to noise ratio:(SNR) more than 111dBOutput Power315W / 4 ohm, distortion 10%185W / 8 ohm, distortion 10%260W / 4 ohm, distortion 1%150W / 8 ohm, distortion 1%Operating voltage:DC 50VColour:picture colorMaterial:ABSSize:149 x …
0.36 inch 4-digit LED Display Module TM1637 Driver Tube
$6.55LED BoardAdd to cartFeatureThe 4-digit LED Display Module integrates a 0.36′ 4-Digit 7-Segment Display Common Anode with 12 pins. It uses the driver chip TM1637.The module has 4 control pins of 2.54mm pitch, which can direct connect to microcontroller with jumper wires.So it’s very easy to control the matrix without tons of wiring. Available to make microcontroller control …
0.36 inch 4-digit LED Display Module TM1637 Driver TubeRead More


Recently Viewed Products
-
 25mm Air intake Filter Silencer for Dometic Eberspacher Webasto Diesel Heater $22.26
 -
 10pcs DC 5V To 35V 5A Mini Motor PWM Speed Controller Ultra Small LED Dimmer Speed Switch Governor $39.84
 -
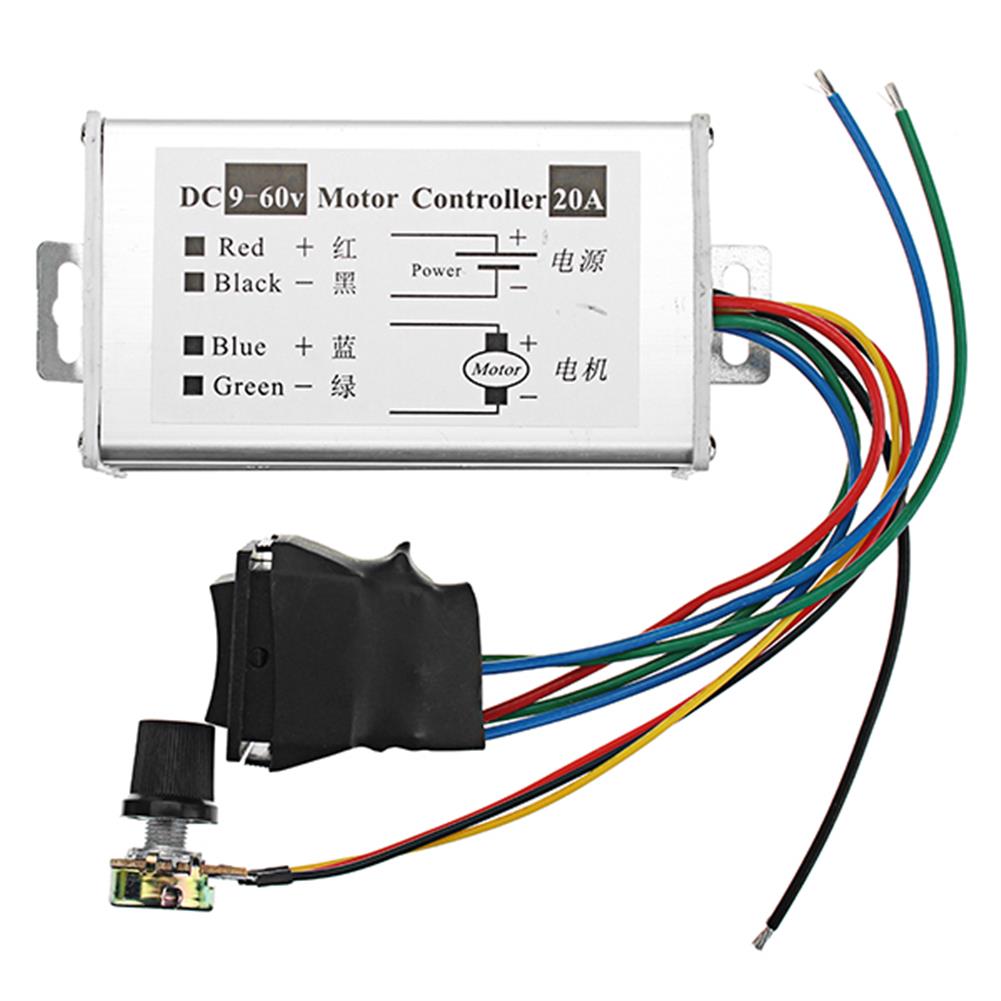 DC 9-60V 20A 1200W High Power DC Brush Motor Speed Regulator Speed Controller Pulse Width Modulator PWM Control Switch Adjustable Speed Driver Board $20.66
 -
 5Pcs 220V 5*12MM Neon Bubble Tube Neon Bubble Lamp Neon Bubble indicator $5.43
 -
 Keyes YX5200 MP3 Decoder Mini DFPlayer Audio Voice Module with TF Card Slot $10.92
 -
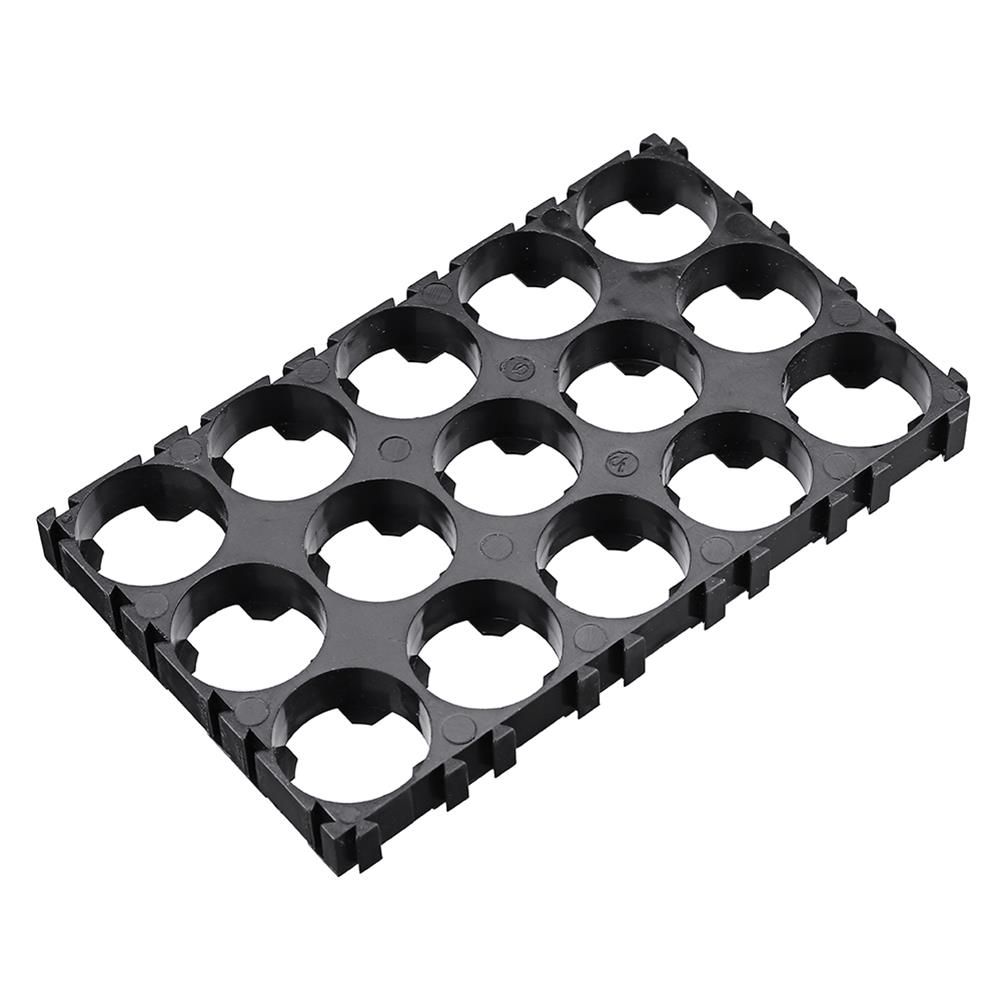 10pcs 3x5 Battery Spacer Plastic Holder 18650 Lithium Battery Support Combination Fixed Bracket with Bayonet $16.20
 -
 HX-3S-A01 3S 10A 11.1V 12.6V 18650 Lithium Battery Protection Board Overcharge and Overdischarge Protection $4.85
 -
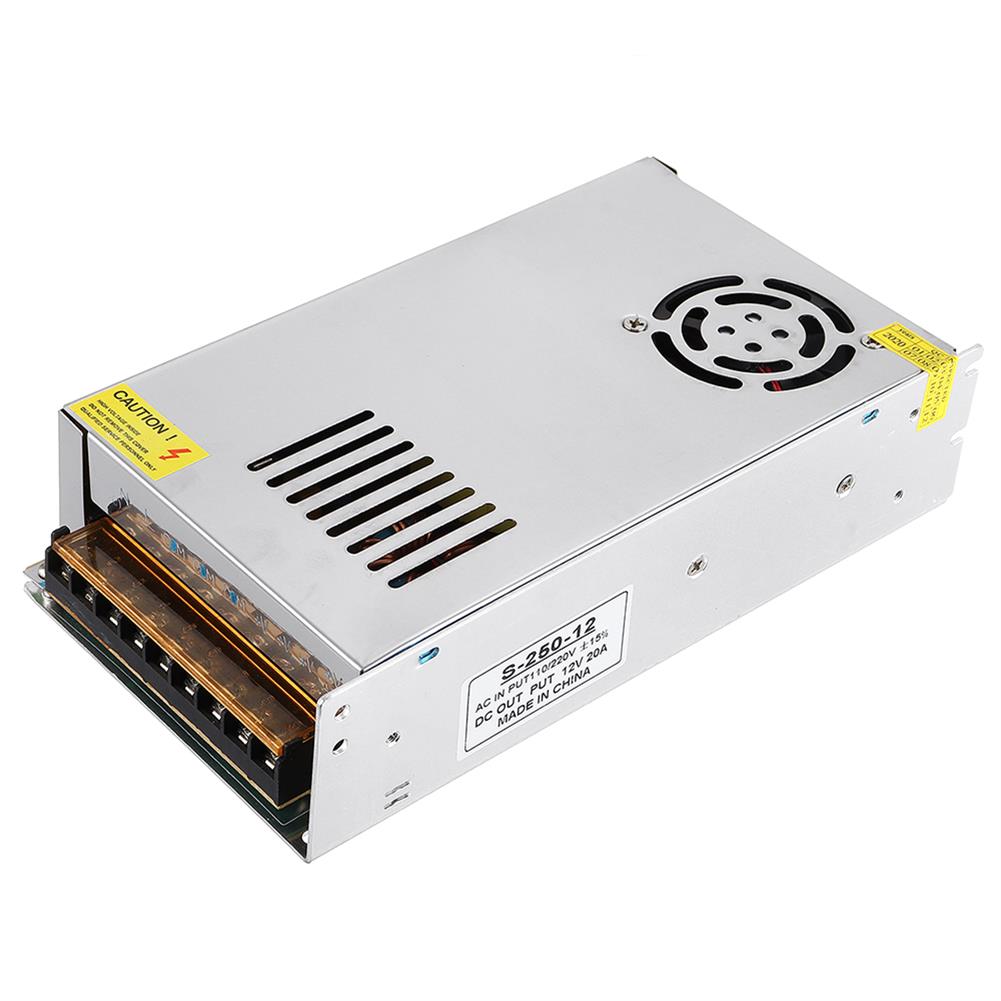 AC110V/220V to DC12V 20A 250W with Fan Switching Power Supply 200*110*50mm $45.91
 -
 3pcs Single Button GPS Membrane Sensor Switch 1 Button with Light MCU Extended Keyboard PVC Panel DIY Accessories $7.07
 -
 DL4S 4S 12V 18650 BMS Battery Protection Board 15A 20A 30A 40A 50A 60A Waterproof BMS for Rechargeable Lifepo4 Battery Lithium Battery $19.67
Reviews
There are no reviews yet.