


3pcs XH-W1321 0.1 Digital thermostat Mini Embedded Red Digital Display Switch Temperature Controller with Waterproof NTC Sensor Meter
$30.89
Shipping:Standard Shipping about 10-25 business days
Secure Payment:Paypal,VISA,MasterCard
Specifications
Product Name:Miniature embedded digital display thermostat
Product Model:XH-1321
Material:ABS
Case Color:White
LED Color:Red
Input Voltage:DC12V
Temperature Measurement Range:-50-110→
Temperature Control Range:-50-110→
Control Accuracy:0.1→
Display Accuracy:0.1→
Measuring Input:NTC10K Waterproof Probe L=1 Meter
Output Type:Relay Output(Output Switch)
Output Capacity:10A
Size (Length x Width x Height):about 56 x 38 x 32mm (2.17 x 1.50 x 1.26 Inch )
Opening hole size:46 x 34mm
Key Function
SET:Press once during normal use, directly enter the stop temperature setting state, use the up and down keys to set the required stop temperature, long press to enter the internal setting menu.
UP:After long press the setting button to enter the internal setting, increase the value setting by the up button.
DOWN:After long press the setting button to enter the internal setting, use the up button to decrease the value setting.
Code:Description:Setting range (method):Factory settings
P0:Operating mode:H/C:C
P1:Backlash setting:0.1-50:2
P2:Temperature correction:-9.9~+9.9°C:0
P3:Delayed start:0-9:0
Detailed Code Descriptions
P0:Working mode:This value must be set when the thermostat is used for the first time. If it is used for heating heating, set to H, if it is used for cooling cooling, set to C.
P1:Hypothesis setting:Press and hold the setting button for 3 seconds to enter the internal menu, select P1, and press the setting button again to enter the hysteresis value setting state. The hysteresis is the difference required when the thermostat reaches the set temperature and stops working again. For example, it is set to the heating mode. When it is heated to 40 degrees, it stops at 35 degrees and starts to return. The difference is 5
P2:Temperature correction:Press and hold the setting button for 3 seconds to enter the internal menu. Press the up and down keys to select P2, press the setting button again, and set the required calibration temperature by the up and down keys. In the setting, if the detected temperature value is 0.5 °C larger than the actual temperature value, the calibration temperature to be set is -0.5 °C. If the detected temperature value is 1 °C smaller than the actual temperature value, the calibration temperature to be set is 1 °C, and the detection temperature +-calibration temperature = actual temperature.
P3:Delay start:Press and hold the setting button for 3 seconds to enter the internal menu, select P3 by the up and down keys, press the setting button again, and set the required delay time (minutes) by the up and down keys. The delay start is generally used for compressor refrigeration. If it is used in the refrigerator freezer, this value needs to be set. According to the compressor back pressure, the set value is usually 3-6 minutes, if it is not used to control the compressor or no delay. Function, skip this item directly.
Instructions
Set the difference back:Why set the backlash setting When you control the device, the temperature will rise or fall back. How many degrees does the temperature change If you want the temperature to change by 10°, the device needs to set the difference back to 10. By setting the difference back, the device can cycle through the temperature range.
Set the stop temperature:press the set button once in the normal display state to stop the temperature value flashing. You can set the desired stop temperature value by using the up and down keys.
How to set factory settings are restored:Press and hold the up and down keys while the power is on, the digital tube display 888 will then automatically jump to the detection temperature.
Heating mode setting method
Setup steps
The first step is to set P0=H
The second step sets the stop temperature
The third step sets the hysteresis value
Setting method
1. Press and hold the setting button to enter the internal menu and set P0 to H.
2. Press the setting button to stop the temperature flashing, and the up and down keys to set the temperature.
3. Press and hold the setting button to enter the internal menu and set the P1 hysteresis setting.
Use Cases
Control the water heater, heat it to 65 ° C to stop, the temperature drops back to 50 ° C and start heating again, how to set
Step 1:Determine the working mode as heating mode and set P0 to H
Step 2:Press the setting button to stop the temperature flashing. Set the starting temperature to 50 °C with the up and down keys.
The third step:stop at 65 °C, start again at 50 °C, so the return difference needs to be set to 65-50=15, enter the internal menu and set P1 to 15, the heating case is set!
Cooling mode setting mode
Setup steps
The first step is to set P0=C
The second step sets the stop temperature
The third step sets the hysteresis value
Setting method
Press and hold the setting button to enter the internal menu and set P0 to C.
Press the setting button to stop the temperature flashing, and the up and down keys to set the temperature.
Long press the setting button to enter the internal menu, set the P1 backlash setting
Use Cases
Control the farm, ventilate to 26 ° C to stop, the temperature rises to 28 ° C to start the refrigeration again, how to set up
The first step:determine the working mode is cooling mode, set P0 to C
Step 2:Press the SET button to stop the temperature flashing. Set the stop temperature to 28 °C with the up and down keys.
The third step:stop at 26 ° C, start again at 28 ° C, so the return difference needs to be set to 28-26 = 2, enter the internal menu to set P1 to 2, the cooling case is set!
Package includes
3 x Miniature embedded digital display thermostat
| Weight | 0.138 kg |
|---|
Related products
4 Digital LED Tachometer RPM Speed Meter + Proximity Switch Sensor NPN
$26.23Sensor & Detector ModuleAdd to cartSpecificationsWorking power supply:DC8-24v 40 mAMeasure range:5-9999 RPMDisplay:Blue LED 67*32mmSign:Pusle signal, Hall NPN 3 wires normally openHall proximity model:NJK-5002CAppearance:M12mm cylinderDetection range:10mmDetected objects:MagnetResponse frequency:100HZOperating temperature:0 to 50°CPackage included1 x Proximity switch1 x Tachometer
Tilt Angle Sensor Module with Cable STM32 AVR
$4.36Sensor & Detector ModuleAdd to cartTilt Angle Sensor Module With Cable For STM32 AVR Raspberry Pi Specification Working Voltage:3.3V ~ 12V Location hole diam:3.1mm PCB board size:16 x 14mm With 2pcs 20cm cable Package included 1 x Tilt angle sensor module 2 x 20cm cable
30pcs thermal Sensor Module Temperature Switch thermistor Sensor Board
$27.45Sensor & Detector ModuleAdd to cartUsesTemperature detection, temperature control sensors , ambient temperature detectionFeatures1. Using the NTC thermistor sensor, good sensitivity2. The comparator output signal is clean, good waveform, driving ability, more than 15mA.3. Adjust the temperature distribution position detection threshold4. The working voltage 3.3V-5V5. The output format:digital switching outputs ( 0 and 1 )6. Fixed bolt holes for easy …
30pcs thermal Sensor Module Temperature Switch thermistor Sensor BoardRead More


Customers Also Viewed
ESP8266 Development Kit with Display Screen TFT Show Image Or Word By Nodemcu Board DIY Kit
$32.79Smart ModuleAdd to cartDescriptionThis product kit can be used for some of the functions of the application of things, for example, display temperature and humidity, weather data display.TFT screen informationTFT screen and NodeMCU connection diagramPackage included1 x NodeMCU1 x 1.44 inch TFT screen8 x DuPont line
Band Pass RF Filter Band Pass 1420MHz BPF SMA-K
$93.91RF amplifierAdd to cartFeature1) Operating frequency:1420÷50MHz2) Insertion loss:1.8db3) Out-of-band suppression:40dB@50MHz4) Input impedance:50 ohm5) Output impedance:50 ohms6) Maximum input signal strength:13dbm (20mw)7) Input interface:SMA-K (SMA female)8) Output interface:SMA-K (SMA female)9) Dimensions:35*22*11mm10) Product weight:22gPackage includes1 x Band Pass RF Filter Band Pass 1420MHz BPF
XH-M548 2x120W Power Bluetooth Dual Channel Digital Amplifier Module TPA3116D2 Audio Amplifier Board
$28.42Amplifier BoardAdd to cartDescriptionThis product is a built-in TPA3116D2 chip with the power of 2*120W Bluetooth channel digital power amplifier board.SpecificationsParameterValueChipTPA3116D2Supply voltageDC12-24VOutput power120W*2 Supply currentMore than 3APower ratioMore than 90%Bluetooth moduleBTM835/CRS8635 (4.0 version)Transmission distanceMax 10M( without interfere)Vocal tract number2 channel (High bass control)switching frequency1.2MHzAppearance size98*80*18mmModels that support Bluetooth connectivityAndroid seriesIOS seriesWindows series Bluetooth connection methodTake mobile phone as …
3Pcs J03 LED Digital Time Delay Relay DC 6-30V on off Trigger Delay Timming Timer Switch Micro USB Power Supply 5V 12V
$32.79Relay ModuleAdd to cartFeatures1. Wide voltage power supply (6 ~ 30V), supports microUSB 5.0V power supply, easy to use;2. The interface is clear and simple, powerful, easy to understand, meet almost all your needs;3. The emergency stop function (“STOP’key);With reverse polarity protection, reverse polarity will not burn the product.4. Increase the sleep mode, if this mode is enabled, …
50pcs Scotch Lock Quick Splice 22-18 AWG Wire Connector Red
$8.99Terminal BlocksAdd to cartDescription50pcs Scotch Lock Quick Splice 22-18 AWG Wire Connector RedFeaturesEasy crimping with normal tool.Quick installation without striping wire job.Safety insulator tap.Suitable for Conductors in the rangeConductor CSA (Cross Sectional Area) 0.5 – 1.0mm², AWG (American Wire Gauge) 22 -18.Make Quick Connections without stripping.Easy crimping with normal tool, squeeze down the metal insert with pliers and …
50pcs Scotch Lock Quick Splice 22-18 AWG Wire Connector RedRead More
Excellway PCT-2 50pcs 2Pin Colorful Docking Connector Electrical Connectors Wire Terminal Block Universal Electrical Wire Connector
$54.66ConnectorsAdd to cart50pcs 2Pins Colorful Docking Connector Reusable Spring Terminal Block Electric Cable Wire Connector Main Features Wire connector. No wire loose, the risk of crisp tape, transparent and safe to see. With a test hole, measuring voltage, without removing the tape. Direct plug, insert the wrong can be pulled out, re-connected. Each contact point at the …
RIDEN 7 in 1 33V 10A Multifunction White OLED Digital Electrical Parameter Tester Ammeter
$26.23Power Supply ModuleAdd to cartSupport function:Voltage, Current, Time, Power, Temperature, Capacity, Energy, Run TimeFeatureOLED:WhiteVoltage:33VCurrent:10ANote:The measurement range are for reference match only, please check the value according to the voltage and current.Package includes1 x 33V 10A Electrical Parameter Tester


Recently Viewed Products
-
 Robotdyn Opto Coupler Optical End-stop Module for 3D and CNC Machine $8.73
 -
 20pcs WEAH-252 2-way Divider Frequency Speaker Crossover Home Audio High and Low Sound Quality Improvement $42.07
 -
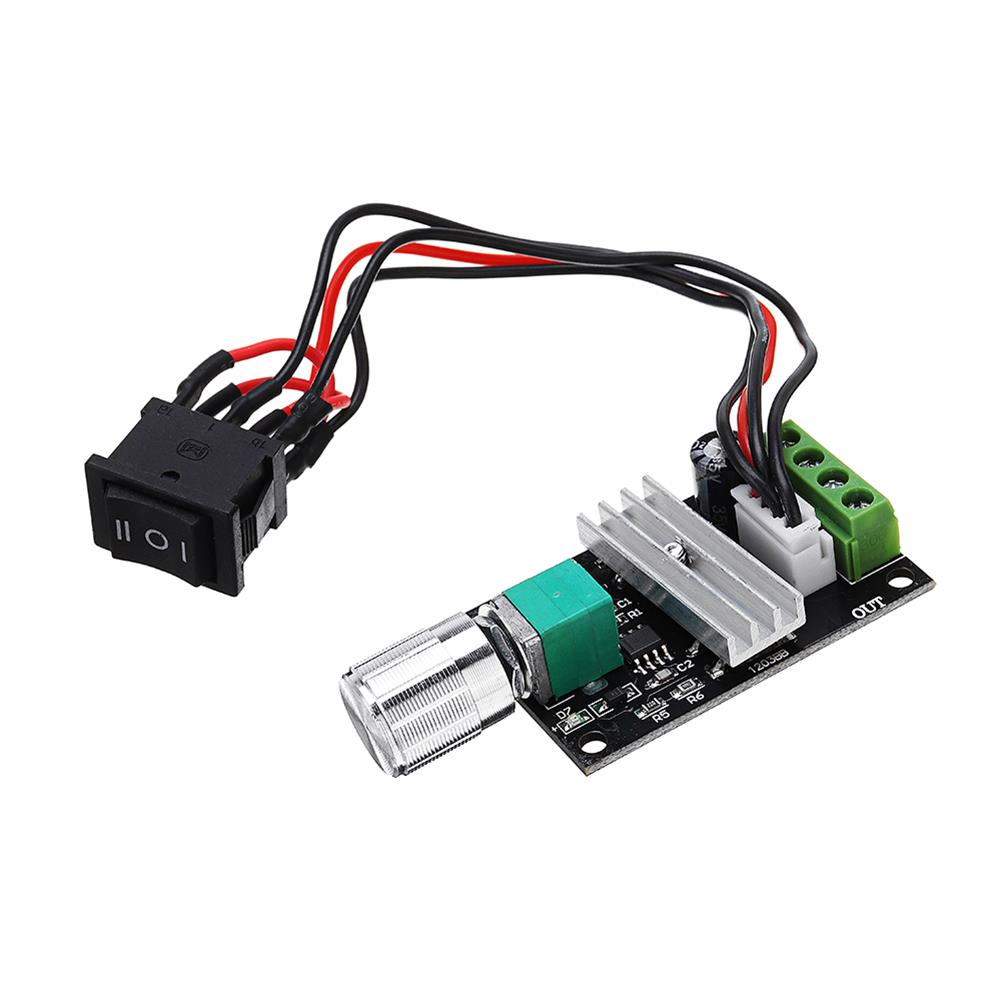 DC 6V/12V/24V/28V 3A 80W PWM Motor Speed Controller Regulator Adjustable Reversible Motor Driver Swi $10.92
 -
 50W*2 TPA116D2 2-channel Stereo bluetooth 5.0 Audio Power Amplifier Board Module Aluminum Alloy Shell USB AUX ZK-502D Hi-Fi Wireless Amplifier $37.17
 -
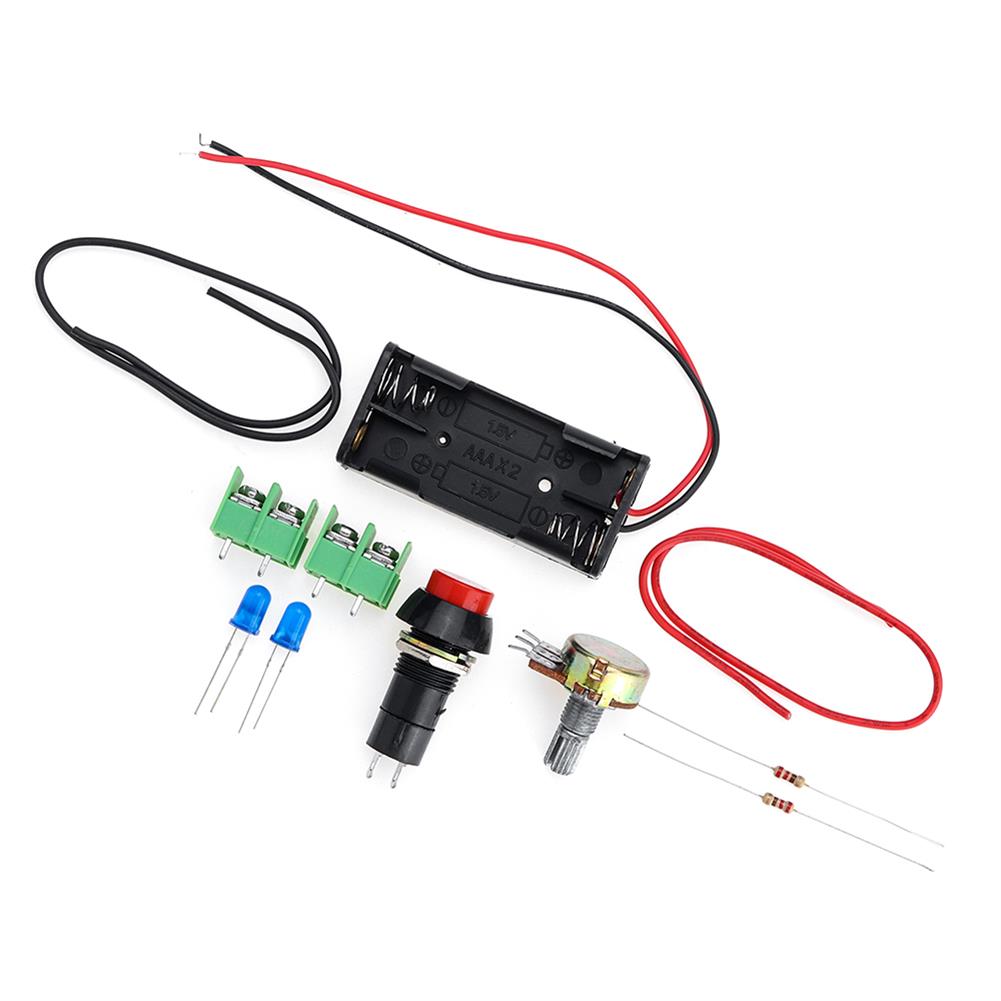 3pcs Electronic DIY LED Dimming Lights Series and Parallel Circuit Technology Small Production Kit $10.56
 -
 PVC Fish Pond Liner Garden Ponds Membrane Reinforced Landscaping Pool $53.58
 -
 120W 18V Monocrystalline Silicon Semi-flexible Solar Panel for Car Boat Battery Charge with 40A Solar Controller $275.39
 -
 New Halloween Party Masks Glow LED Masks Light Up for Festival Cosplay Costume Funny Election DJ Party Decor Horror Rave Mask $16.16
 -
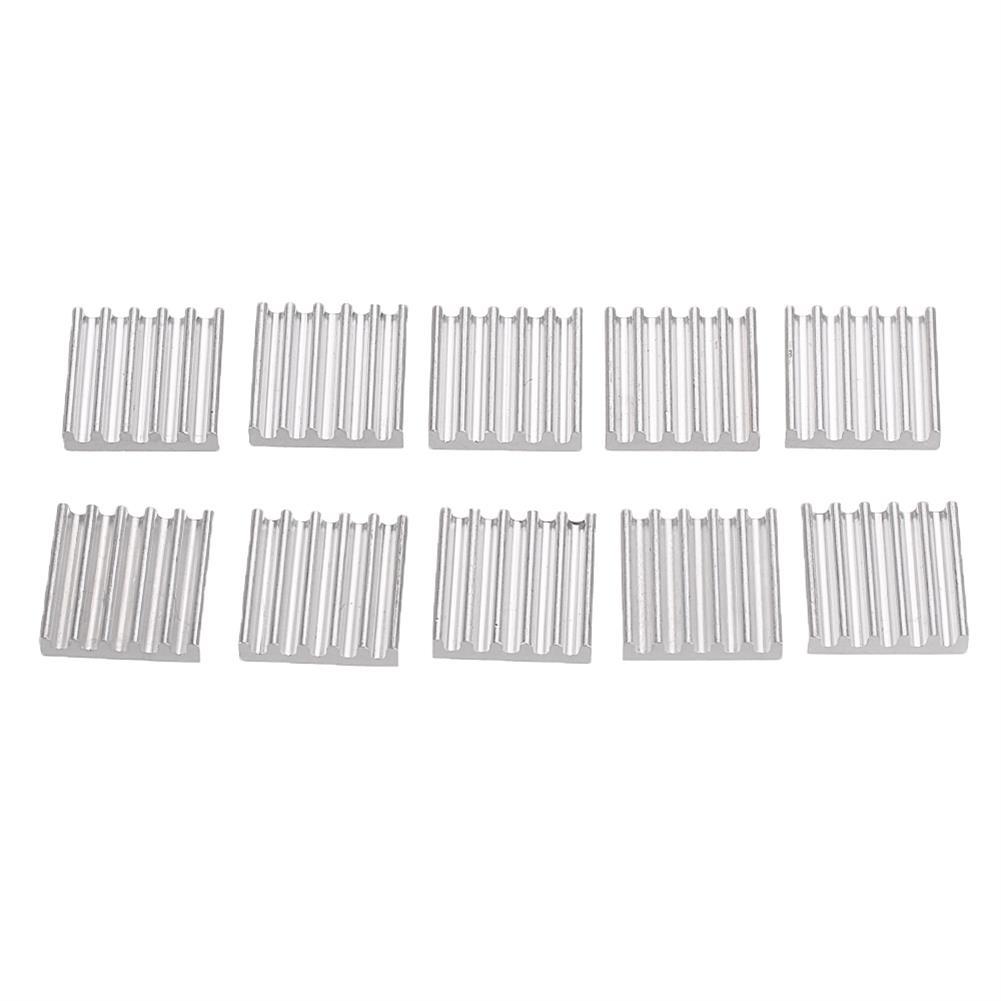 50Pcs 13*13mm Aluminum Heat Sink CPU Radiator Chip for Raspberry Pi $15.19
 -
 2M Exhaust Gas Temp Sensor EGT K Type thermocouple Probe Exhaust Temperature Sensor $21.86
Reviews
There are no reviews yet.