


5pcs XH-W1321 0.1 Digital thermostat Mini Embedded Blue Digital Display Switch Temperature Controller with Waterproof NTC Sensor Meter
$48.34
Shipping:Standard Shipping about 10-25 business days
Secure Payment:Paypal,VISA,MasterCard
Specifications
Product Name:Miniature embedded digital display thermostat
Product Model:XH-1321
Material:ABS
Case Color:White
LED Color:Blue
Input Voltage:DC12V
Temperature Measurement Range:-50-110→
Temperature Control Range:-50-110→
Control Accuracy:0.1→
Display Accuracy:0.1→
Measuring Input:NTC10K Waterproof Probe L=1 Meter
Output Type:Relay Output(Output Switch)
Output Capacity:10A
Size (Length x Width x Height):about 56 x 38 x 32mm (2.17 x 1.50 x 1.26 Inch )
Opening hole size:46 x 34mm
Key Function
SET:Press once during normal use, directly enter the stop temperature setting state, use the up and down keys to set the required stop temperature, long press to enter the internal setting menu.
UP:After long press the setting button to enter the internal setting, increase the value setting by the up button.
DOWN:After long press the setting button to enter the internal setting, use the up button to decrease the value setting.
Code:Description:Setting range (method):Factory settings
P0:Operating mode:H/C:C
P1:Backlash setting:0.1-50:2
P2:Temperature correction:-9.9~+9.9°C:0
P3:Delayed start:0-9:0
Detailed Code Descriptions
P0:Working mode:This value must be set when the thermostat is used for the first time. If it is used for heating heating, set to H, if it is used for cooling cooling, set to C.
P1:Hypothesis setting:Press and hold the setting button for 3 seconds to enter the internal menu, select P1, and press the setting button again to enter the hysteresis value setting state. The hysteresis is the difference required when the thermostat reaches the set temperature and stops working again. For example, it is set to the heating mode. When it is heated to 40 degrees, it stops at 35 degrees and starts to return. The difference is 5
P2:Temperature correction:Press and hold the setting button for 3 seconds to enter the internal menu. Press the up and down keys to select P2, press the setting button again, and set the required calibration temperature by the up and down keys. In the setting, if the detected temperature value is 0.5 °C larger than the actual temperature value, the calibration temperature to be set is -0.5 °C. If the detected temperature value is 1 °C smaller than the actual temperature value, the calibration temperature to be set is 1 °C, and the detection temperature +-calibration temperature = actual temperature.
P3:Delay start:Press and hold the setting button for 3 seconds to enter the internal menu, select P3 by the up and down keys, press the setting button again, and set the required delay time (minutes) by the up and down keys. The delay start is generally used for compressor refrigeration. If it is used in the refrigerator freezer, this value needs to be set. According to the compressor back pressure, the set value is usually 3-6 minutes, if it is not used to control the compressor or no delay. Function, skip this item directly.
Instructions
Set the difference back:Why set the backlash setting When you control the device, the temperature will rise or fall back. How many degrees does the temperature change If you want the temperature to change by 10°, the device needs to set the difference back to 10. By setting the difference back, the device can cycle through the temperature range.
Set the stop temperature:press the set button once in the normal display state to stop the temperature value flashing. You can set the desired stop temperature value by using the up and down keys.
How to set factory settings are restored:Press and hold the up and down keys while the power is on, the digital tube display 888 will then automatically jump to the detection temperature.
Heating mode setting method
Setup steps
The first step is to set P0=H
The second step sets the stop temperature
The third step sets the hysteresis value
Setting method
1. Press and hold the setting button to enter the internal menu and set P0 to H.
2. Press the setting button to stop the temperature flashing, and the up and down keys to set the temperature.
3. Press and hold the setting button to enter the internal menu and set the P1 hysteresis setting.
Use Cases
Control the water heater, heat it to 65 ° C to stop, the temperature drops back to 50 ° C and start heating again, how to set
Step 1:Determine the working mode as heating mode and set P0 to H
Step 2:Press the setting button to stop the temperature flashing. Set the starting temperature to 50 °C with the up and down keys.
The third step:stop at 65 °C, start again at 50 °C, so the return difference needs to be set to 65-50=15, enter the internal menu and set P1 to 15, the heating case is set!
Cooling mode setting mode
Setup steps
The first step is to set P0=C
The second step sets the stop temperature
The third step sets the hysteresis value
Setting method
Press and hold the setting button to enter the internal menu and set P0 to C.
Press the setting button to stop the temperature flashing, and the up and down keys to set the temperature.
Long press the setting button to enter the internal menu, set the P1 backlash setting
Use Cases
Control the farm, ventilate to 26 ° C to stop, the temperature rises to 28 ° C to start the refrigeration again, how to set up
The first step:determine the working mode is cooling mode, set P0 to C
Step 2:Press the SET button to stop the temperature flashing. Set the stop temperature to 28 °C with the up and down keys.
The third step:stop at 26 ° C, start again at 28 ° C, so the return difference needs to be set to 28-26 = 2, enter the internal menu to set P1 to 2, the cooling case is set!
Package includes
5 x Miniature embedded digital display thermostat
| Weight | 0.22 kg |
|---|
Related products
Tilt Angle Sensor Module with Cable STM32 AVR
$4.36Sensor & Detector ModuleAdd to cartTilt Angle Sensor Module With Cable For STM32 AVR Raspberry Pi Specification Working Voltage:3.3V ~ 12V Location hole diam:3.1mm PCB board size:16 x 14mm With 2pcs 20cm cable Package included 1 x Tilt angle sensor module 2 x 20cm cable
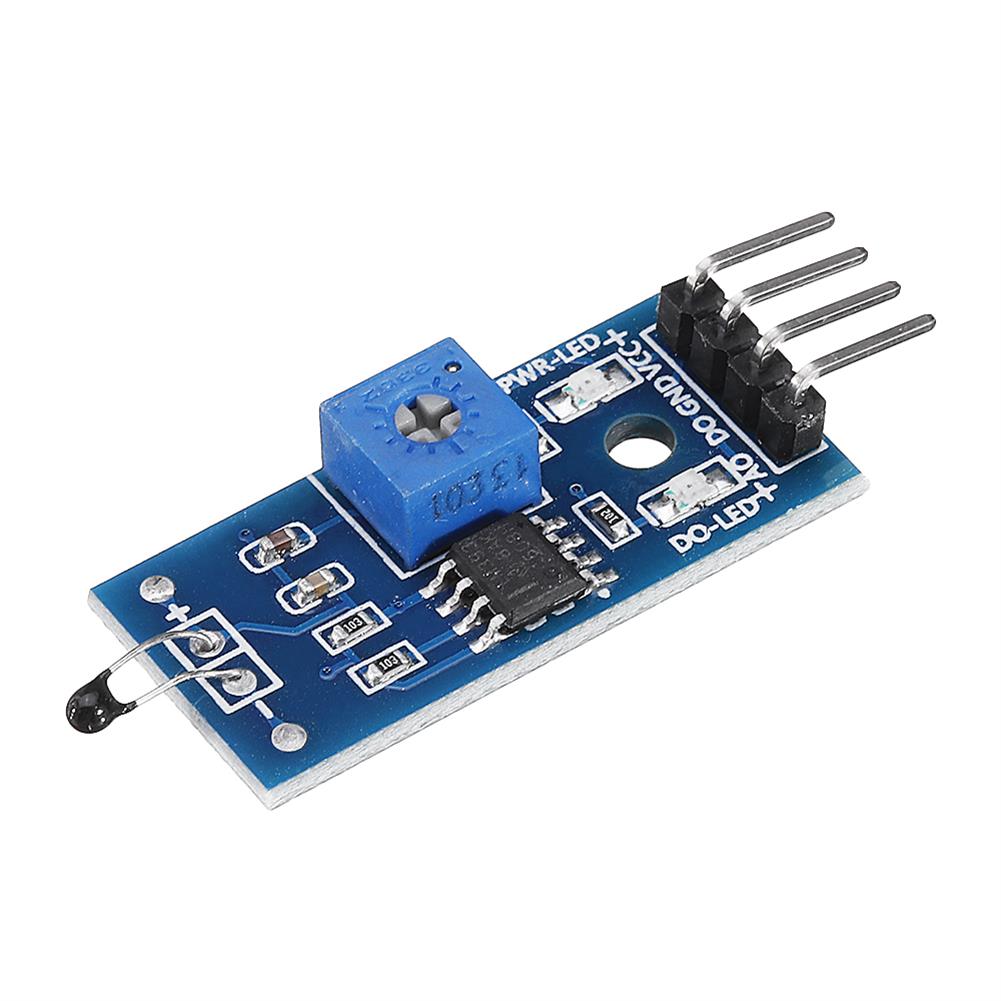
5pcs thermal Sensor Module Temperature Switch thermistor Sensor Board
$6.20Sensor & Detector ModuleAdd to cartUsesTemperature detection, temperature control sensors , ambient temperature detectionFeatures1. Using the NTC thermistor sensor, good sensitivity2. The comparator output signal is clean, good waveform, driving ability, more than 15mA.3. Adjust the temperature distribution position detection threshold4. The working voltage 3.3V-5V5. The output format:digital switching outputs ( 0 and 1 )6. Fixed bolt holes for easy …
5pcs thermal Sensor Module Temperature Switch thermistor Sensor BoardRead More
3pcs thermal Sensor Module Temperature Switch thermistor Sensor Board
$5.49Sensor & Detector ModuleAdd to cartUsesTemperature detection, temperature control sensors , ambient temperature detectionFeatures1. Using the NTC thermistor sensor, good sensitivity2. The comparator output signal is clean, good waveform, driving ability, more than 15mA.3. Adjust the temperature distribution position detection threshold4. The working voltage 3.3V-5V5. The output format:digital switching outputs ( 0 and 1 )6. Fixed bolt holes for easy …
3pcs thermal Sensor Module Temperature Switch thermistor Sensor BoardRead More
Keyes Brick Tilt Module Sensor(Pad hole) with Pin Header Digital Signal
$4.36Sensor & Detector ModuleAdd to cartSpecificationsWorking voltage:DC 3.3-5VPositioning hole size:3mm in diameterControl signal:digital signalSize:34 x 22 x 9mmPackage included1 x Module BoardWiring, the UNO board is not includes.


Customers Also Viewed
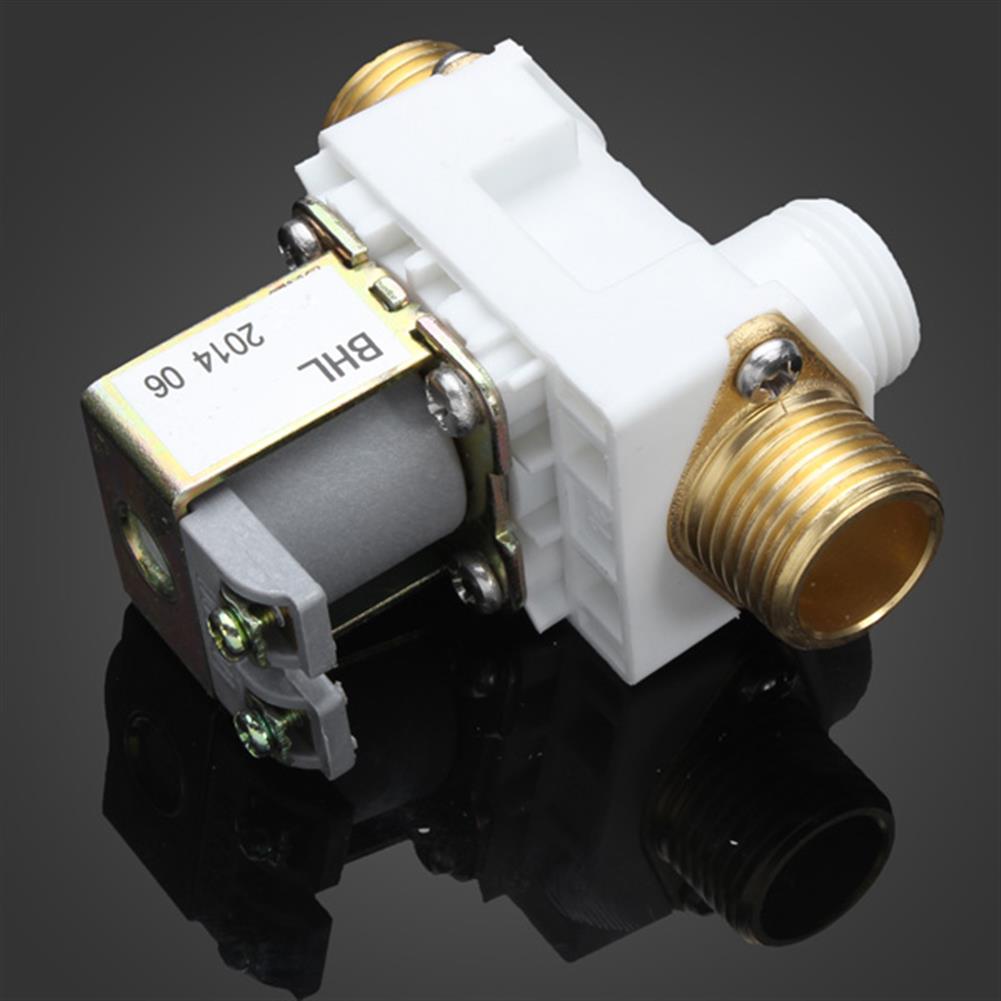
DC12V 0.02-0.8MPa Solenoid Valve for Solar Water Heater
$21.87Laboratory Heating EquipmentsAdd to cartDC12V 0.02-0.8MPa Solenoid Valve for Solar Water HeaterSpecificationsModel:SSG-2Type:Normally ClosedMaterials:Plastic & CopperDimension:83*90*49cmPipe Inside Diameter:1/2 inchNet Weight:(approx.) 190gFeaturesThis is a DC12V solenoid valve usually used for solar water heater.It can work with water from 1 to 100℃ (or some other liquid).Working Voltage Range:Rated Voltage ±10%Working Water Pressure:0.02 to 0.8MpaThe working water pressure would be too low/high to …
DC12V 0.02-0.8MPa Solenoid Valve for Solar Water HeaterRead More
650 Pcs Assorted Ring insulated Electrical Wire Terminals Crimp Connector Set Kit
$76.17Terminal BlocksAdd to cartDescription650 Pcs Assorted Ring Insulated Electrical Wire Terminals Crimp Connector Set KitSpecificationQuantity:650PcsMaterial:Copper + PVC+ TinplateInsulated crimp terminals.All are enclosed in plastic case for easy access.The assorted crimp terminals is including50 x Ring M3 Red50 x Ring M4 Red50 x Ring M5 Red50 x Ring M6 Red50 x Ring M8 Red50 x Ring M4 Blue50 x …
650 Pcs Assorted Ring insulated Electrical Wire Terminals Crimp Connector Set KitRead More
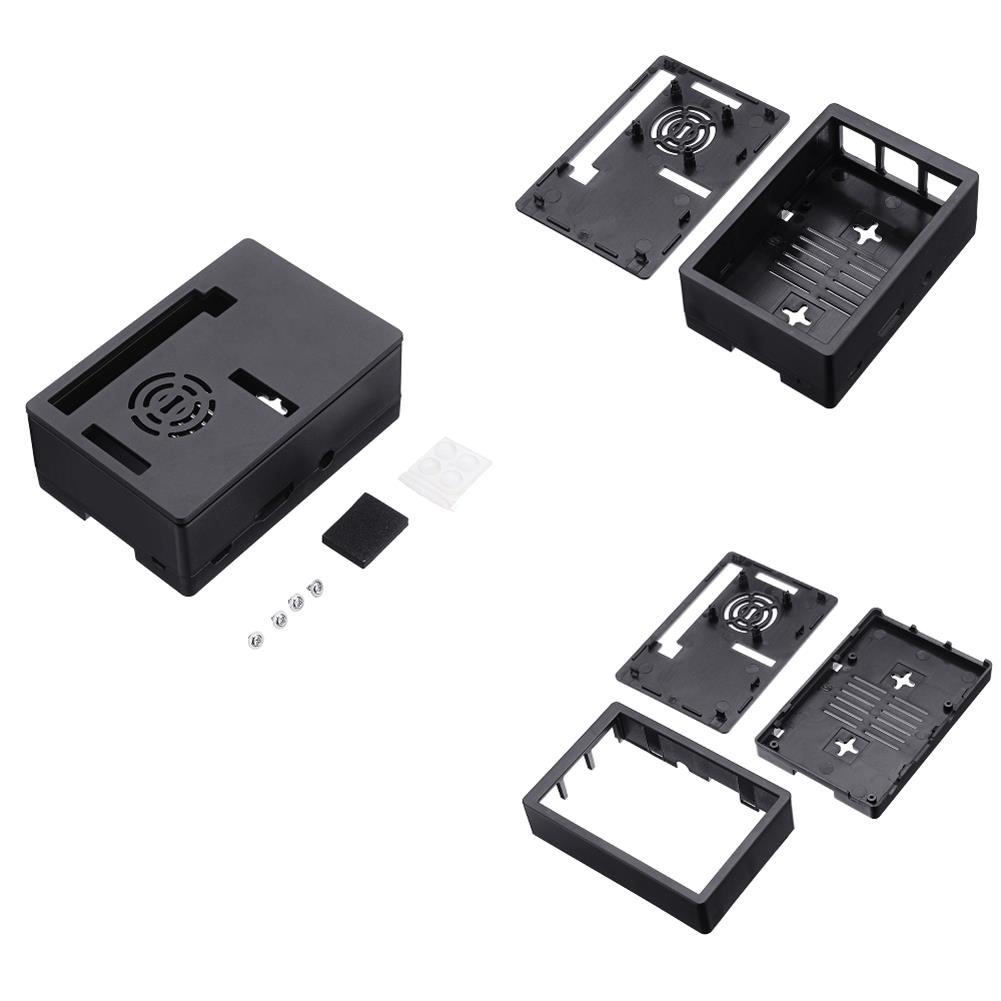
3.5 inch Protective Enclosure Case Support Dispaly Screen or Cooling Fan for Raspberry Pi
$9.26Raspberry Pi & Orange PiAdd to cartFeatures– Fully updated for Raspberry Pi 3B+/3B/2B– Can support 3.5 inch screen or cooling fan (notes:can not assemble them at the same time)– Heat sink openings for both CPU and LAN chip– High-gloss finish, surface mountableSpecificationsColor:BlackMaterial:ABSSuitable for Raspberry Pi 3B+/3B/2BWeight:45gSize:9cm*6.2cm*3.4cmPackage Included1x ABS Case4x Non-slip mat4x Screws
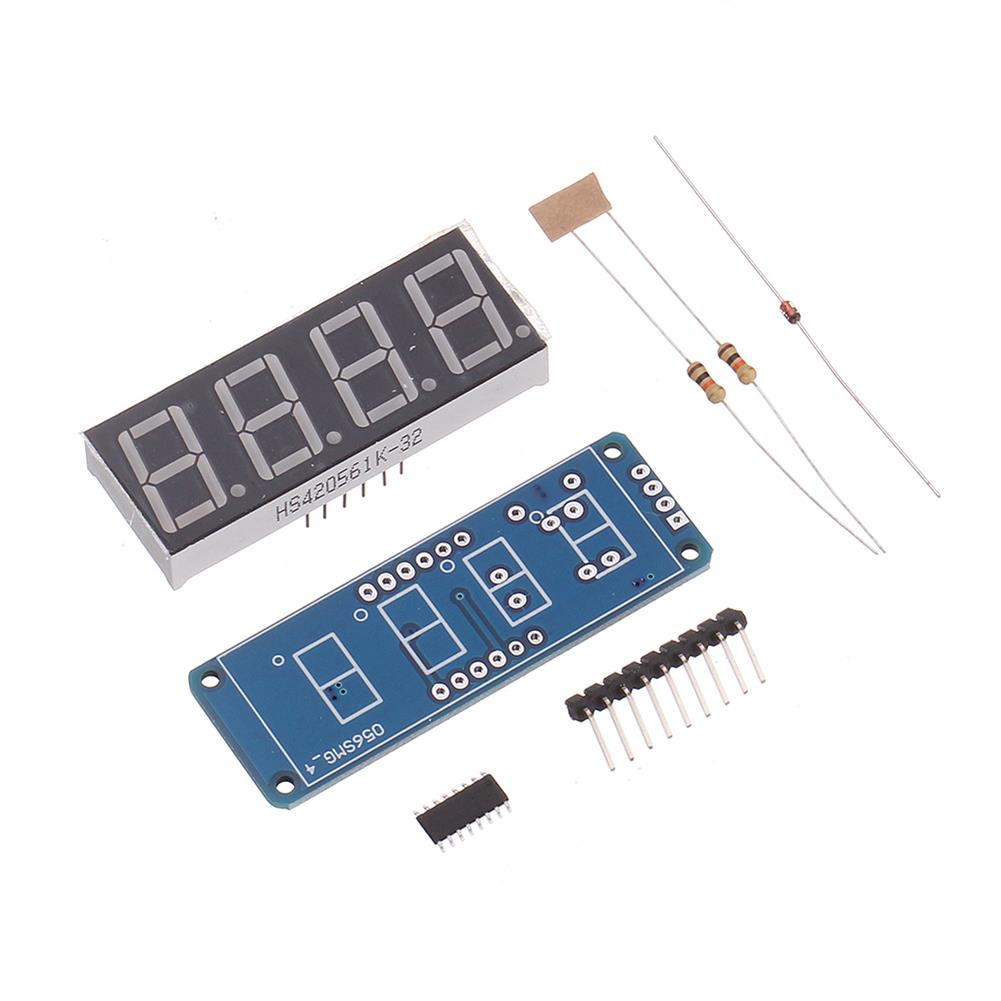
20pcs 0.56 inch Digital Tube DIY Kit TM1650 4-digit LED Digital Tube Display Module for
$47.25DIY Electronic KitsAdd to cartDescription1. Use TM1650 (compatible with AIP650) digital tube driver chip, support 8-level brightness adjustment, working voltage 3.3V ~ 5.5V2. IIC interface, only need 2 ordinary IO can drive, do not need to repeat scanning of MCU, saving MCU resources.3. 4 digit 0.56 inch red common negative digital tube with decimal point.4. 0.56 inch with four …
20pcs 0.56 inch Digital Tube DIY Kit TM1650 4-digit LED Digital Tube Display Module forRead More
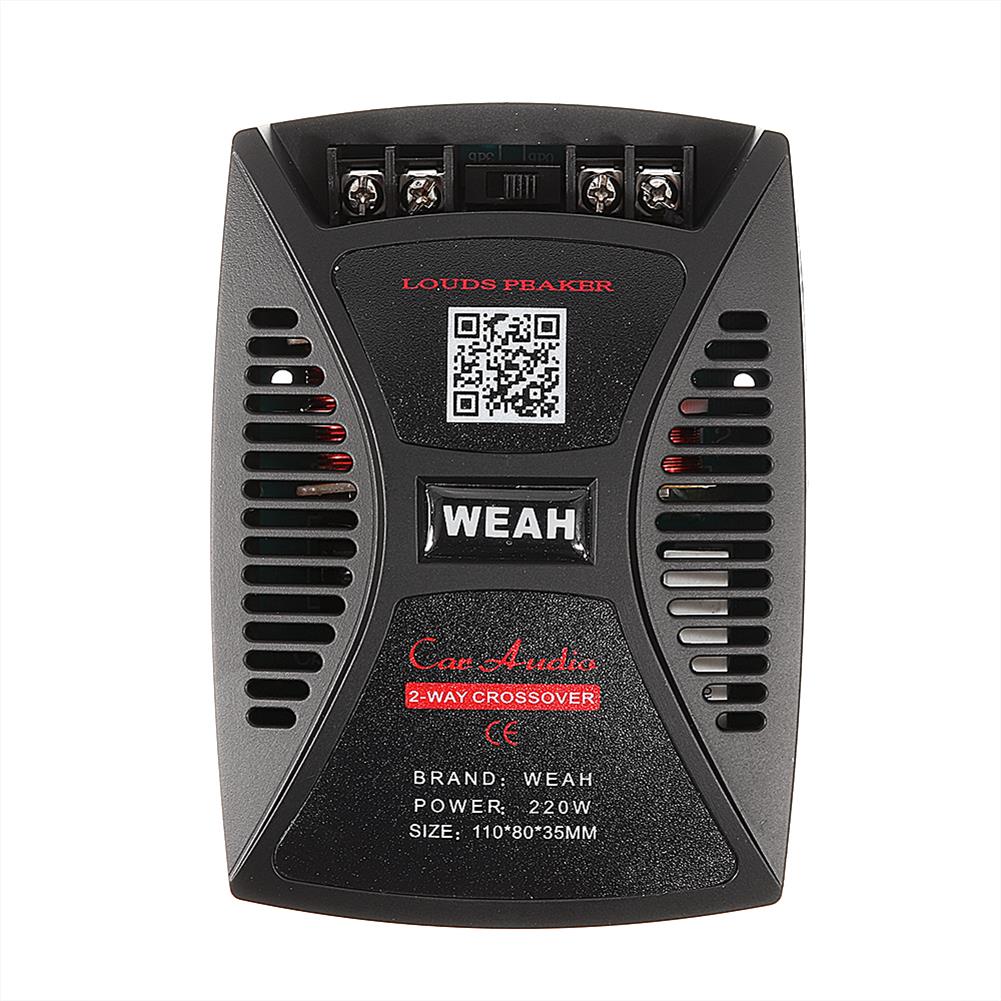
WEAH-81 Car Heavy Bass Frequency Divider High and Low 2-way 2 Bass Crossover Upgrade Tool
$33.09Amplifier BoardAdd to cartFeatureBrand:WEAHModel:81Power:100WApplicable impedance:4-8ohmFrequency response:100Hz ~ 45HzDimensions:133 x 95 x 44mmApplication environment:Car or home speaker DIYPackage includes1 x Bass Frequency DividerHow to Wire:
5pcs 8-36W intelligent Sensor LED Ceiling Light And Sound Control Power Supply Module Bulb Panel Light Built-in Power Driver
$21.42Power Supply ModuleAdd to cartDescriptionInput Voltage:AC185-265VOutput Current:0.22AOutput Voltage:24-108VEfficiency:90%Working Frequency:50/60HZOutput Power:8-24WSound Control:50-75dBLight control:7-20LuxDiameter:25.8mmFeature1. The combination of sound and light control, when the light is strong, does not work, the light intensity is lower than 12-15LUX, and the sound of the induction 27-36DB starts automatically.2. Delay 40-60S automatically extinguished, easy to install, compatible with ordinary switches, no additional wiring.3. Single trigger, …


Recently Viewed Products
-
 30pcs MQ-2B Sensor Gas Sensor CO CO2 Smoke Detecting MQ Sensor DIY for Safety Detection System $60.39
 -
 10Pcs Development Programmer Board for ATtiny85 / ATtiny13A / ATtiny25 $20.72
 -
 STM8S207RBT6 Development Board STM8S Minimum System Core Board $10.69
 -
 20pcs LM393 DC 5V Optoelectronic Sensor PIR Sensor Module with LED instruction Slot Single Signal $23.96
 -
 DC 12V/24V to AC 110V/220V 4000W Pure Sine Wave Power inverter LCD Display $475.86
 -
 CCM2NJ 3A DC 12V-40V DC Motor Speed Controller Reversible Stepless PWM Motor Speed Control Module $15.30
 -
 PN532 NFC Precise RFID IC Card Reader Module 13.56MHz 3.3V $19.67
 -
 5-1500MHz Gain 20dB High Frequency Broadband RF Amplifier Gain Module $19.75
 -
 WangDaTao HU-008 LED Music Spectrum Production Kit 2416 Rhythm Flashing Light Parts Light Cube DIY Soldering Parts $37.17
 -
 5Pcs 12x12mm Key Switch Module Touch Tact Switch Push Button Non-locking with Cap Red/Black/Yellow/Green/Blue $6.55
Reviews
There are no reviews yet.