


3pcs XH-W1321 0.1 Digital thermostat Mini Embedded Blue Digital Display Switch Temperature Controller with Waterproof NTC Sensor Meter
$30.89
Shipping:Standard Shipping about 10-25 business days
Secure Payment:Paypal,VISA,MasterCard
Specifications
Product Name:Miniature embedded digital display thermostat
Product Model:XH-1321
Material:ABS
Case Color:White
LED Color:Blue
Input Voltage:DC12V
Temperature Measurement Range:-50-110→
Temperature Control Range:-50-110→
Control Accuracy:0.1→
Display Accuracy:0.1→
Measuring Input:NTC10K Waterproof Probe L=1 Meter
Output Type:Relay Output(Output Switch)
Output Capacity:10A
Size (Length x Width x Height):about 56 x 38 x 32mm (2.17 x 1.50 x 1.26 Inch )
Opening hole size:46 x 34mm
Key Function
SET:Press once during normal use, directly enter the stop temperature setting state, use the up and down keys to set the required stop temperature, long press to enter the internal setting menu.
UP:After long press the setting button to enter the internal setting, increase the value setting by the up button.
DOWN:After long press the setting button to enter the internal setting, use the up button to decrease the value setting.
Code:Description:Setting range (method):Factory settings
P0:Operating mode:H/C:C
P1:Backlash setting:0.1-50:2
P2:Temperature correction:-9.9~+9.9°C:0
P3:Delayed start:0-9:0
Detailed Code Descriptions
P0:Working mode:This value must be set when the thermostat is used for the first time. If it is used for heating heating, set to H, if it is used for cooling cooling, set to C.
P1:Hypothesis setting:Press and hold the setting button for 3 seconds to enter the internal menu, select P1, and press the setting button again to enter the hysteresis value setting state. The hysteresis is the difference required when the thermostat reaches the set temperature and stops working again. For example, it is set to the heating mode. When it is heated to 40 degrees, it stops at 35 degrees and starts to return. The difference is 5
P2:Temperature correction:Press and hold the setting button for 3 seconds to enter the internal menu. Press the up and down keys to select P2, press the setting button again, and set the required calibration temperature by the up and down keys. In the setting, if the detected temperature value is 0.5 °C larger than the actual temperature value, the calibration temperature to be set is -0.5 °C. If the detected temperature value is 1 °C smaller than the actual temperature value, the calibration temperature to be set is 1 °C, and the detection temperature +-calibration temperature = actual temperature.
P3:Delay start:Press and hold the setting button for 3 seconds to enter the internal menu, select P3 by the up and down keys, press the setting button again, and set the required delay time (minutes) by the up and down keys. The delay start is generally used for compressor refrigeration. If it is used in the refrigerator freezer, this value needs to be set. According to the compressor back pressure, the set value is usually 3-6 minutes, if it is not used to control the compressor or no delay. Function, skip this item directly.
Instructions
Set the difference back:Why set the backlash setting When you control the device, the temperature will rise or fall back. How many degrees does the temperature change If you want the temperature to change by 10°, the device needs to set the difference back to 10. By setting the difference back, the device can cycle through the temperature range.
Set the stop temperature:press the set button once in the normal display state to stop the temperature value flashing. You can set the desired stop temperature value by using the up and down keys.
How to set factory settings are restored:Press and hold the up and down keys while the power is on, the digital tube display 888 will then automatically jump to the detection temperature.
Heating mode setting method
Setup steps
The first step is to set P0=H
The second step sets the stop temperature
The third step sets the hysteresis value
Setting method
1. Press and hold the setting button to enter the internal menu and set P0 to H.
2. Press the setting button to stop the temperature flashing, and the up and down keys to set the temperature.
3. Press and hold the setting button to enter the internal menu and set the P1 hysteresis setting.
Use Cases
Control the water heater, heat it to 65 ° C to stop, the temperature drops back to 50 ° C and start heating again, how to set
Step 1:Determine the working mode as heating mode and set P0 to H
Step 2:Press the setting button to stop the temperature flashing. Set the starting temperature to 50 °C with the up and down keys.
The third step:stop at 65 °C, start again at 50 °C, so the return difference needs to be set to 65-50=15, enter the internal menu and set P1 to 15, the heating case is set!
Cooling mode setting mode
Setup steps
The first step is to set P0=C
The second step sets the stop temperature
The third step sets the hysteresis value
Setting method
Press and hold the setting button to enter the internal menu and set P0 to C.
Press the setting button to stop the temperature flashing, and the up and down keys to set the temperature.
Long press the setting button to enter the internal menu, set the P1 backlash setting
Use Cases
Control the farm, ventilate to 26 ° C to stop, the temperature rises to 28 ° C to start the refrigeration again, how to set up
The first step:determine the working mode is cooling mode, set P0 to C
Step 2:Press the SET button to stop the temperature flashing. Set the stop temperature to 28 °C with the up and down keys.
The third step:stop at 26 ° C, start again at 28 ° C, so the return difference needs to be set to 28-26 = 2, enter the internal menu to set P1 to 2, the cooling case is set!
Package includes
3 x Miniature embedded digital display thermostat
| Weight | 0.132 kg |
|---|
Related products
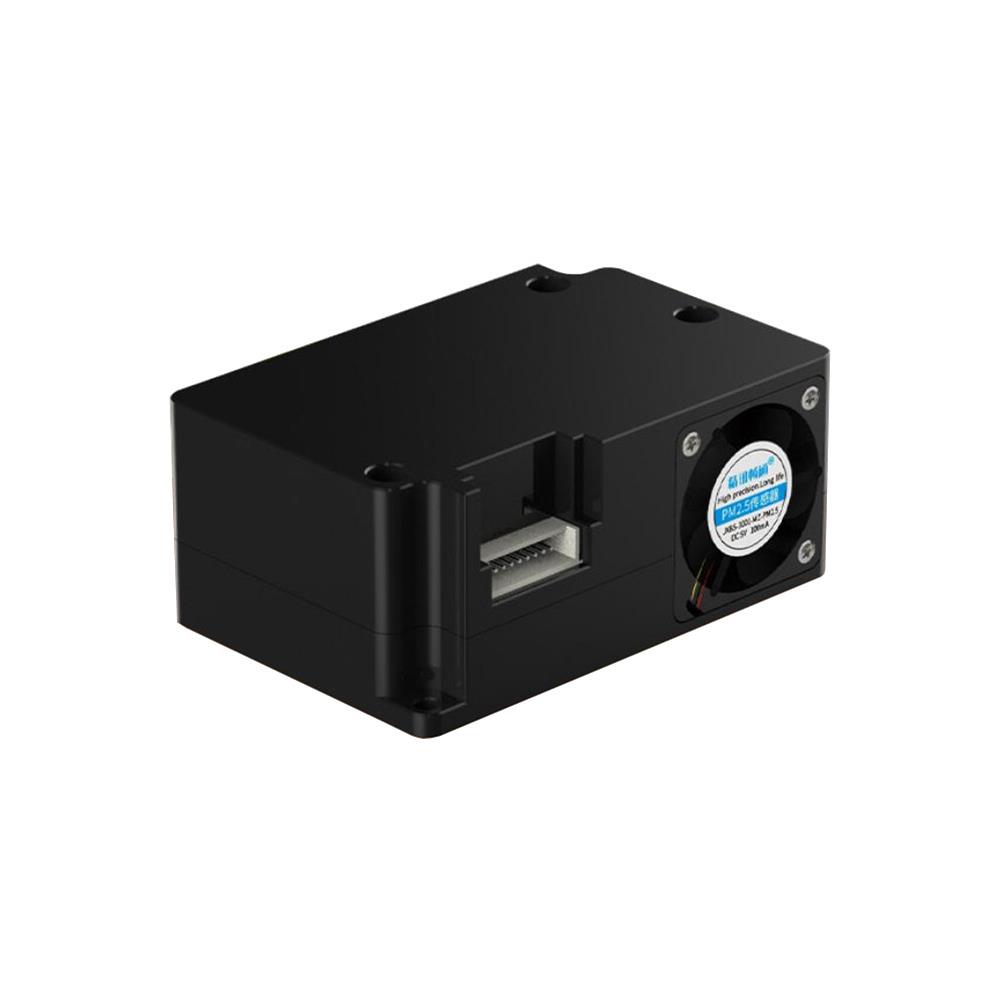
PM2.5 Laser Particulate Matter Sensor PM1.0 PM10 Air Quality Detection Sensor Monitoring Particulate Matter Sensor Module
$39.35Sensor & Detector ModuleAdd to cartTechnical ParametersPM2.5/PM10 measuring range:0-999ug/m3PM2.5/PM10 resolution:lug/m3PM2.5/PM10 accuracyConsistency of particle concentration:0-100ug/m3:÷10%;100-500ug/m3:÷10%Minimum detectable particle diameter:0.3umPower supply voltage:5V÷0.1VMaximum working current:100mAOperating temperature range:-10~60CWorking humidity range:0-95%RHStorage temperature:-30~70CResponse speedProduct appearance size:53x35x23mmApplication areasAir Purifier / Air Quality Detector / Fresh Air Ventilation SystemSupporting air-conditioning / cars with air purification function and consumer electronicsAgricultural greenhouse / environmental monitoring of outdoor breeding placesKitchen and bathroom …
30pcs thermal Sensor Module Temperature Switch thermistor Sensor Board
$27.45Sensor & Detector ModuleAdd to cartUsesTemperature detection, temperature control sensors , ambient temperature detectionFeatures1. Using the NTC thermistor sensor, good sensitivity2. The comparator output signal is clean, good waveform, driving ability, more than 15mA.3. Adjust the temperature distribution position detection threshold4. The working voltage 3.3V-5V5. The output format:digital switching outputs ( 0 and 1 )6. Fixed bolt holes for easy …
30pcs thermal Sensor Module Temperature Switch thermistor Sensor BoardRead More
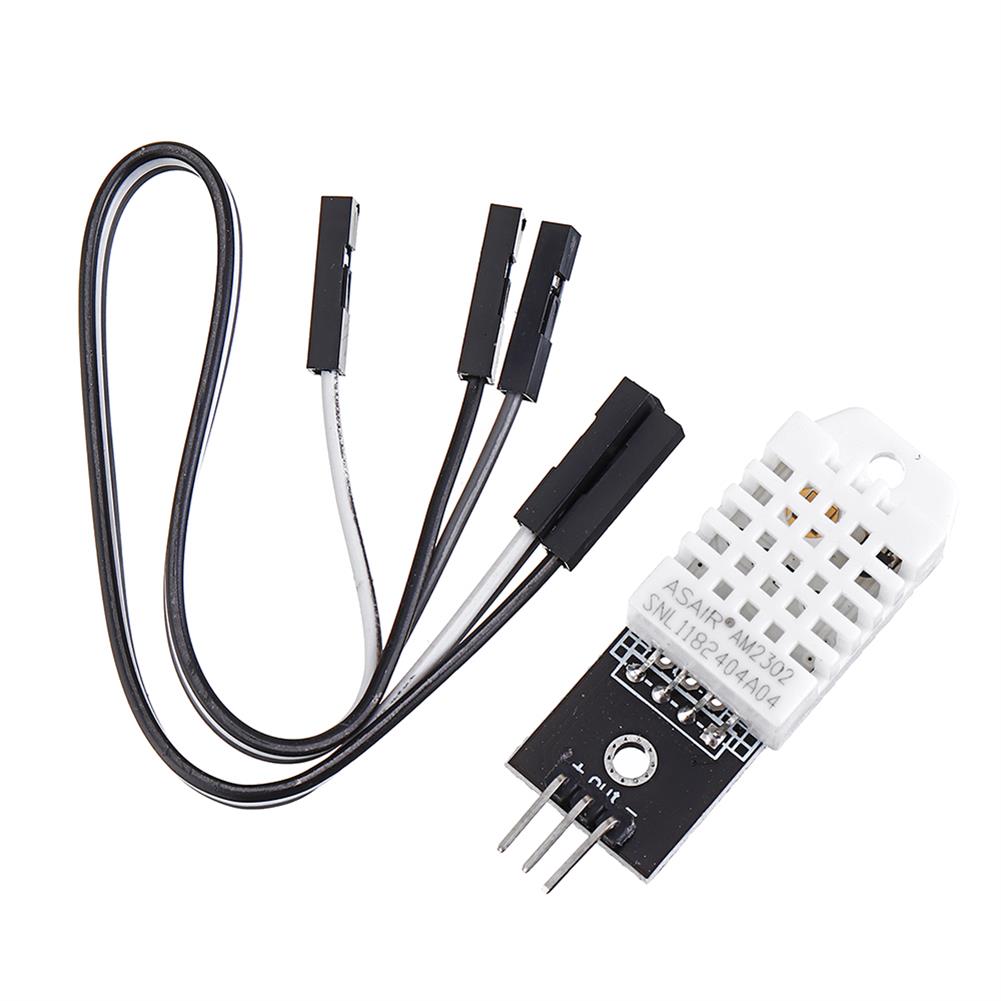
DHT22 Single-bus Digital Temperature and Humidity Sensor Module Electronic Building Blocks AM2302 3.3V-5V DC
$13.11Sensor & Detector ModuleAdd to cartSpecificationsWorking voltage:3 V – 5.5 VSignal output form:digital signalTemperature measurement range:- 40°c to 80°cMeasuring accuracy:0.5°cThe humidity measuring range:0-100% RHMeasuring accuracy:2% RHResolution:16With fixed screw holes, convenient installation and fixation. Diameter of 2.6 mmSize:28.2 x 13.1×10 mm Pininch+inch:positiveinch-inch:the power of anodeinchOutinch:the microcontroller IO portPackage Included1 x DHT22 Temperature Humidity Module1 x Cable
Tilt Angle Sensor Module with Cable STM32 AVR
$4.36Sensor & Detector ModuleAdd to cartTilt Angle Sensor Module With Cable For STM32 AVR Raspberry Pi Specification Working Voltage:3.3V ~ 12V Location hole diam:3.1mm PCB board size:16 x 14mm With 2pcs 20cm cable Package included 1 x Tilt angle sensor module 2 x 20cm cable


Customers Also Viewed
10pcs DC 12V 6A 3 String Battery Protection Board Panels Solar Street Lights
$29.51Other Module BoardAdd to cartDescriptionSize:56x45x3mmContinuous working current:Within 6ACharge current:Within 6ABalance charging:YesShort circuit protection:YesFunction:Prevent overcharge, overplay, circuit protectionSuitable assembly:Nominal 3.7V electric core / three stringsPackage Included10 x 12V Battery Protection Board
10Pcs Green LED Power Symbol Momentary Latching Switch LED Light Push Button SPST
$20.86Electronic Accessories & SuppliesAdd to cart10Pcs Green LED Power Symbol Momentary Latching Switch LED Light Push Button SPSTDecriptionLatching type:Push it– on, push it again — offLED color:GreenSize(H*D):1.4 x 1cm / 0.55inch x 0.39inch (approx)Quantity:10 pcsFunction:MomentaryLED light voltage:3.2VSwitch voltage:12VMaximum operating current:20mAWith led light, with power symbol, light touch switchEasy to use and installNote1. Please check the picture and part number carefully …
10Pcs Green LED Power Symbol Momentary Latching Switch LED Light Push Button SPSTRead More
XH-M572 High-power Digital Power Amplifier Board TPA3116D2 Chassis Dedicated to Plug-in 5-28V Output 120W
$12.31Amplifier BoardAdd to cartProduct parametersProduct name:digital power amplifier boardProduct model:XR-M572Chip model:TPA3116Input voltage:DC 8-28V (24V recommended)Output resistance group:4-8┯Appearance size:83*60*25MMProduct weight:65 gramsPackage includes1 x digital power amplifier board
YouLoop Magnetic Antenna Portable Passive Magnetic Loop Antenna for HF and VHF
$39.35Other Module BoardAdd to cartSpecificationHF Response:10kHz to 30 MHzVHF Response:up to 300 MHzMaximum Power:250 mWWeight:230gFeedline Length:6m (SMA male to male)Features-Passive design-No tuning required-Low-loss wide-band BALUN with 0.28 dB loss typ.Package Included-1 x T-shaped BALUN-1 x Phase Inverter-2 x 1m RG402 Coax Loop Cable-1 x 6m RG174 Coax FeedlineNoteThis antenna is not waterproof. If it is used outdoors, please do …
YouLoop Magnetic Antenna Portable Passive Magnetic Loop Antenna for HF and VHFRead More
M5Stack ATOM Matrix PICO ESP32 Development Board Kit IMU Sensor Python
$37.17Motherboard & Development BoardAdd to cartDescriptionATOM Matrix is the most compact development board in the M5Stack development kit series yet with a size of only 24 * 24mm. It provides more GPIO pins and is very suitable for handy and miniature embedded device development. The main control adopts the ESP32-PICO-D4 chip, which comes integrated with Wi-Fi and Bluetooth technologies and …
M5Stack ATOM Matrix PICO ESP32 Development Board Kit IMU Sensor PythonRead More
5Pcs DC-DC Buck Module 6-24V 12V/24V to 5V 3A USB Step Down Power Supply Charger Efficiency 97.5%
$17.46Boost & Buck ModuleAdd to cartFeaturesThe max output current 3A, long time use 2.1A, enough useNew design, 3 solid state ceramic capacitors(MCC), more safe and low rippleSynchronous rectification, High efficiency, 6.5V to 5V 0.7A can up to 97.5%, 12V to 5V 1A can up to 94%Flat copper inductor, improve conversion efficiencyWith output overvoltage protection. There is 1.5A fuse, output 5V …
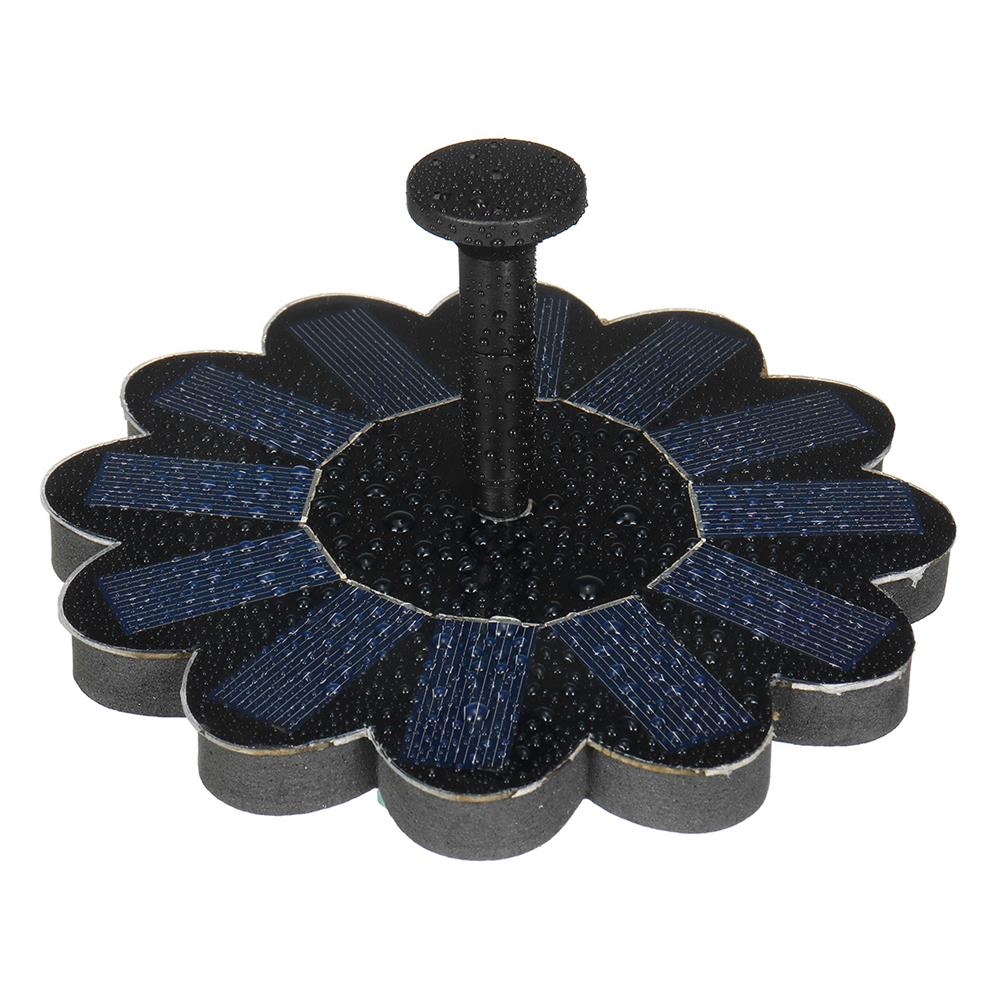
6V 180L/H Solar Power Floating Fountain Garden Landscape Water Pump 55-75cm Lifting
$36.44Electrical Pump & ValveAdd to cartSpecificationSolar panels:6V/1.4W Voltage:3.7-12 v Maximum flow rate:180L/HLift:55-75cmMaterial:monocrystalline siliconSize of the solar panel:160mmApplication scenario:outdoor, courtyardFeatures– This pump can be connected to a variety of different shapes of nozzles to spray different water types.-Uses high-efficiency solar panels and the new brushless water pump, which has the advantages of fast start-up, high efficiency and strong stability.-Can work as …
6V 180L/H Solar Power Floating Fountain Garden Landscape Water Pump 55-75cm LiftingRead More


Reviews
There are no reviews yet.