


HW-M543 DC12V~24V/AC220V intelligent Digital Display Temperature and Humidity Controller
$46.56
Shipping:Standard Shipping about 10-25 business days
Secure Payment:Paypal,VISA,MasterCard
Specification
Name:Digital Display Temperature and Humidity Controller
Brand:HW
Model:HW-M543
Control type:temperature and humidity
Working Voltage:DC 12V~24V/AC 220V
Output capacity:maximum 10A
Measurement object:air, water
Temperature range:-20~60 →
Temperature measurement error:÷0.1 →
Humidity range:0-100 %RH
Humidity measurement error:0.2 %
Installation type:Embedded
Dimensions:105*70*38 mm
Hole size:81*57 mm
Weight:About 154g
Package included
1 x Temperature and Humidity Controller
Setting instructions
1. Correctly connect the power supply and the temperature and humidity control equipment according to the wiring diagram, pay attention not to connect the temperature and humidity control equipment wrongly. When connecting the DC12~24V power supply, you must distinguish the positive and negative poles. AC220V does not divide the zero live wire.
2. Stop temperature setting
Press the set button (SET), when the red screen number starts to flash, press the up and down buttons to adjust and set the stop temperature you want; after setting, wait for 10 seconds without operation, the system automatically saves the data.
3. Heating or cooling mode setting
Long press the up button, when the red screen displays C-0, press the set button to enter the C-0 mode setting, press the up and down buttons to switch between the blue screen L and H, L stands for heating, H stands for cooling. (Note:The temperature control load you connect to at L must be a heating device, and at H, the load you connect must be a refrigerating device.) After setting, wait 10 seconds, the system automatically saves the data.
4. Temperature difference setting
Long press the up key, when the red screen shows C-0, press the up and down keys to switch to the C-1 temperature difference setting, press the setting key again to enter the temperature difference setting, and then press the up and down keys to adjust the setting you want Temperature difference value; wait 10 seconds after setting, the system automatically saves the data. (If the stop temperature is set to 35C, the mode is set to L heating mode, and the temperature difference is set to 5, then the start temperature is 35-5=30C and the temperature control range is between 30~35C. On the contrary, if the mode is set to H cooling mode , Then the starting temperature is 35 + 5=40C, and the temperature control range is between 35~40→)
5. Temperature calibration
Long press the up button, when the red screen displays C-0, press the up and down buttons to switch to the C-2 temperature correction mode, press the setting button once to enter the correction mode, and then press the up and down buttons to adjust and set the difference you want If the actual temperature is 28C and the probe detection temperature is 28.2C, then the correction difference can be set to -0.2; if the detection temperature is low, the correction difference can be adjusted higher. After setting, wait 10 seconds, the system will automatically save the data.
6. Stop humidity setting
Press the set button (SET), the red screen numbers start to flash, press the set button again to switch to the blue screen numbers flashing, and then press the up and down keys to adjust and set the stop humidity value you want; after setting, wait for 10 without operation Seconds, the system automatically saves the data.
7. Humidification or dehumidification mode setting
Long press the adjustment key, when the red screen displays H-0, press the set key to enter the H-0 mode setting, press the up and down keys to switch between the blue screen L and H, L stands for humidification, H stands for dehumidification. (Note:The humidity control load you connect to at L must be a humidifying device, and at H, the load you connect to must be a dehumidifying device.) After setting, wait 10 seconds, and the system automatically saves the data.
8. Humidity difference setting
Long press the adjustment key, when the red screen displays H-0, press the up and down keys to switch to the H-1 humidity difference setting, press the setting key to enter the humidity difference setting, press the up and down keys to adjust the setting you want After setting the difference, wait 10 seconds, the system automatically saves the data. (If the stop humidity is set to 50%RH, the mode is set to L humidification mode, the humidity difference is set to 5%RH, then the start humidity is 50-5=45%RH, and the humidity control range is between 45-50%RH, on the contrary If the mode is set to H dehumidification mode, then the starting humidity is 50 + 5 = 55%RH, and the humidity control range is between 50~55%RH)
9. Humidity calibration
Long press the adjustment key, when the red screen displays H-0, press the up and down keys to switch to the H-2 humidity correction mode, press the set key once to enter the correction mode, press the up and down keys to adjust the set difference; such as actual humidity It is 56%RH, the humidity detected by the probe is 56.2%RH, then the correction difference can be set to -0.2; if the detection temperature is low, the correction difference can be adjusted higher. After setting, wait 10 seconds, the system automatically saves the data.
CodeNamePredetermined areaDefault parameters
H-0Mode settingL:Humidify H:DehumidificationL:Heating mode
H-1 Humidity difference0.1-50%RH10%RH
H-2Humidity calibration-10 and 10%RH0.0%RH
10. Restore factory settings
Press the up and down keys at the same time for 5 seconds, when the screen displays 888, the factory restoration is complete.
| Weight | 0.132 kg |
|---|
Related products
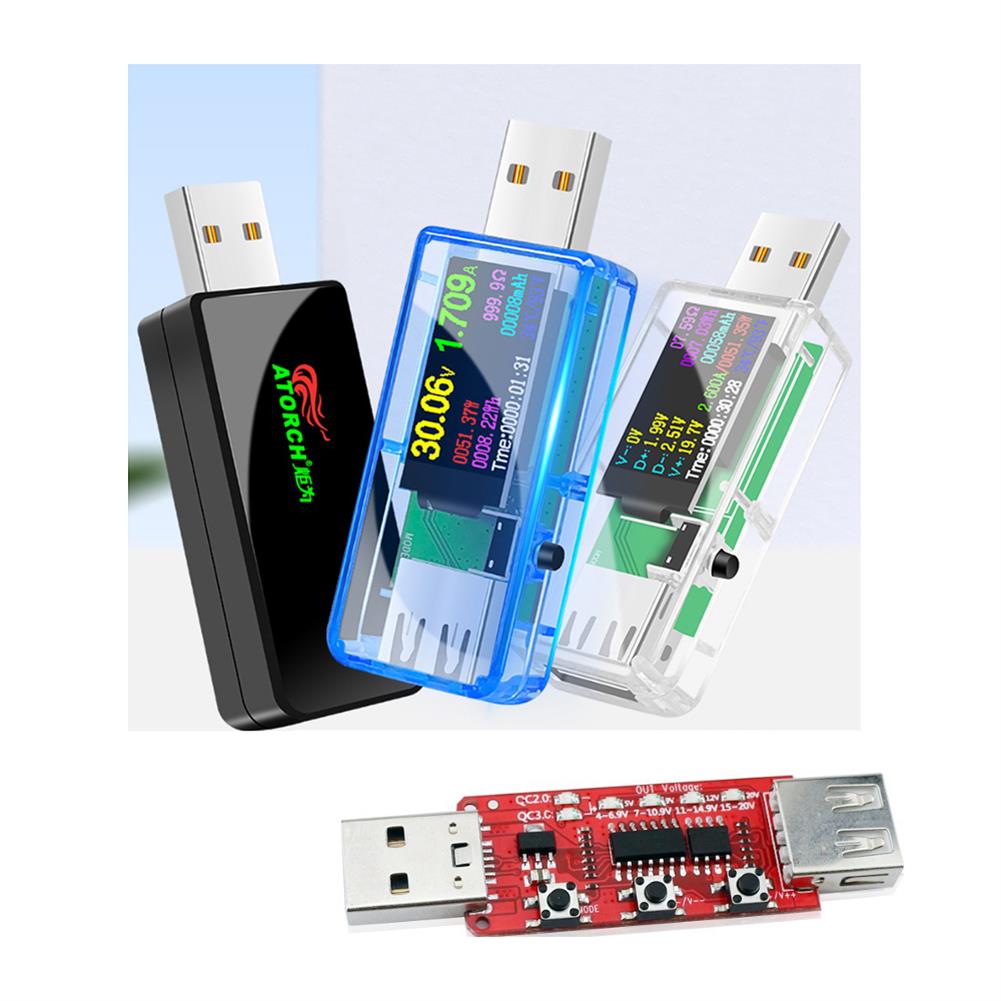
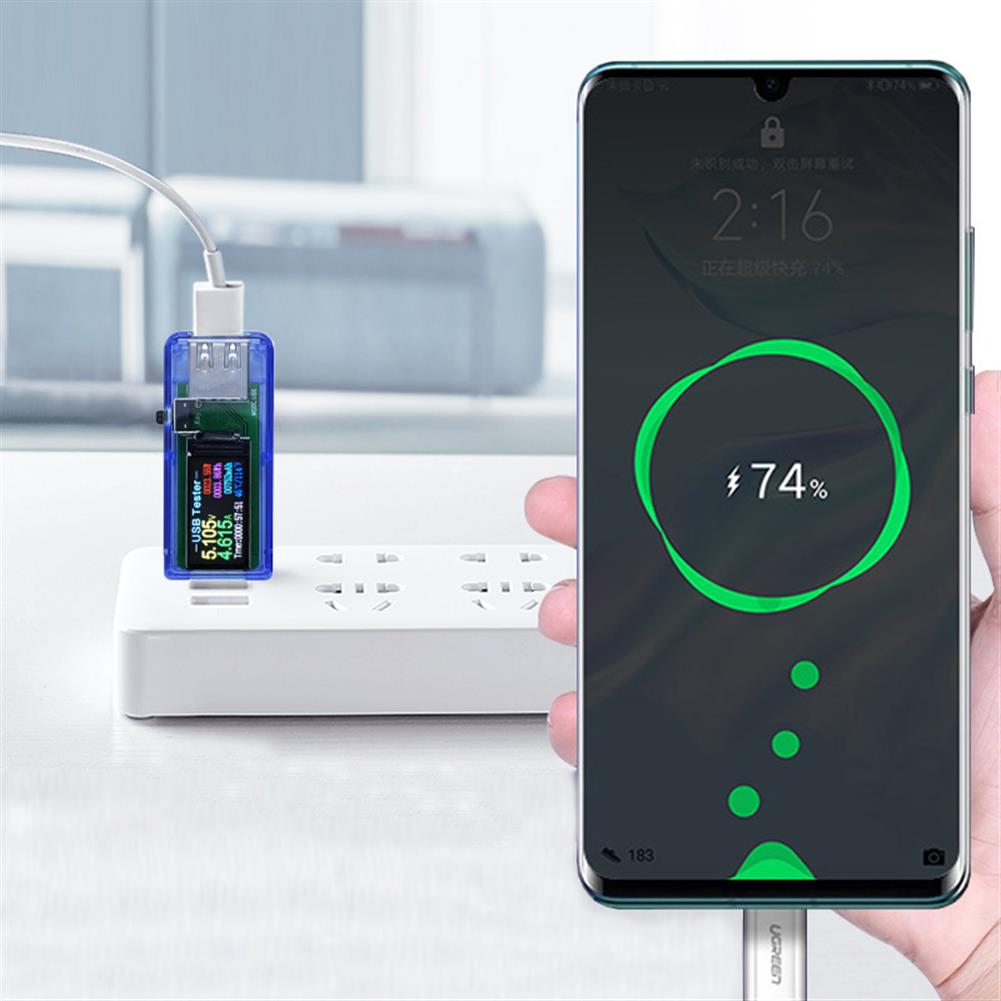
U96 USB Tester DC Digital Voltmeter Power Bank Charger indicator Voltage Current Meter Detector Blue
$18.58Test & Measuring ModuleAdd to cartU96 13 IN 1 Technical parametersVoltage measuring range:3.60V ~ 32.5 V Resolution precision:0.01 V Current measuring range:0.00A ~ 5.00 A Resolution precision:0.01 APower cumulative range:0 ~ 999999 WH Resolution precision:0.001 WhCapacity range:0 ~ 999999 mAH Resolution precision:0.001 AhTemperature:0 → ~ + 80 → Resolution precision:1 →D+ Voltage:0.000V ~ 2.999 V Resolution precision:0.001 VD- Voltage:0.000V ~ …
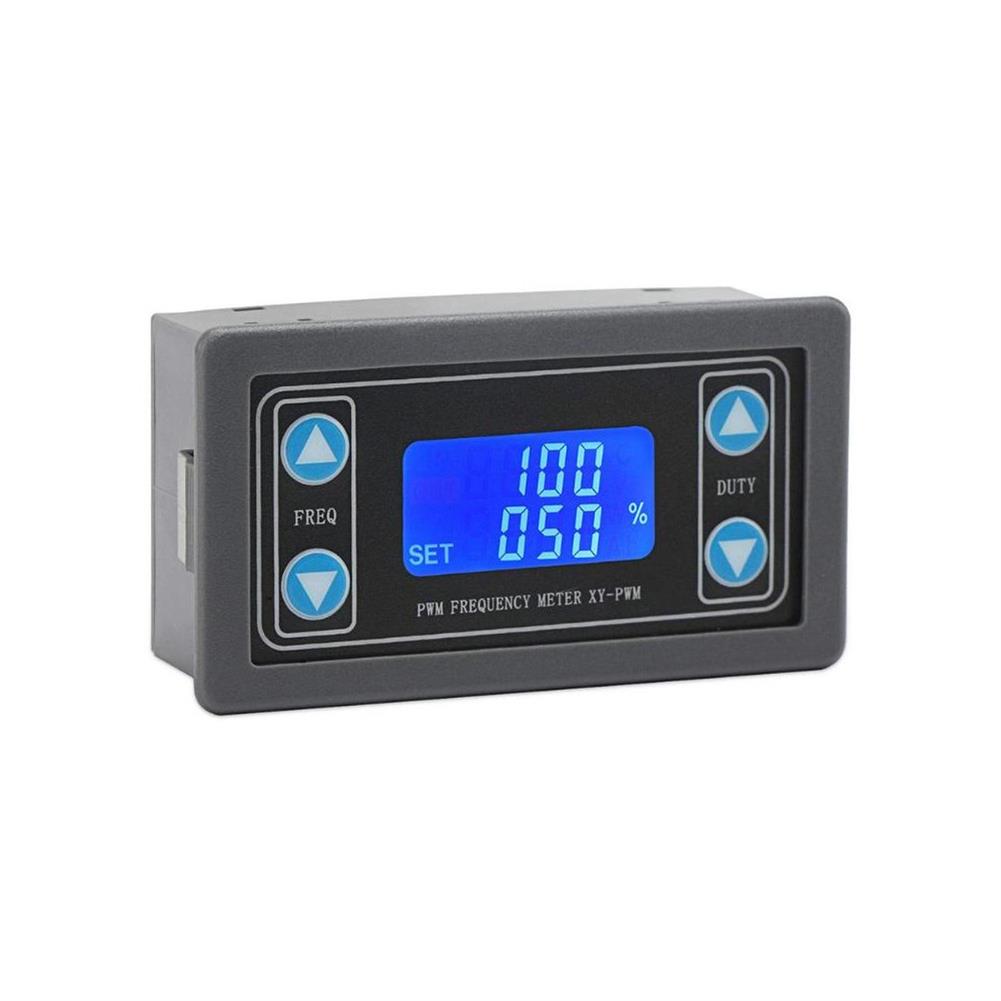
3pcs XY-PWM DC3.3-30V 1Hz~150KHz Digital Display Square Wave Rectangular Wave Pulse Signal Generator
$39.11Test & Measuring ModuleAdd to cartFunction1. Protective Shell2. LCD High Definition Display3. Support UART4. Supporting frequency adjustment5. Support duty cycle adjustment6. High accuracy detection7. Supporting POW ER-OFF memory function8. 0.1 Channel PWM Output9. Purpose:Device used as a signal source or excitation source in production practiceFeatureWorking voltage:3.3-30VFrequency ran ge:1Hz~150KHzFrequency accuracy:the accuracy in each range is about 2%Signal load capacity:output current can …
XY-WTH1 DC 6-30V Temperature and Humidity Controller Module Wet Control Switch Constant Sensor Dual Output thermostat
$43.73Test & Measuring ModuleAdd to cartFeatureModel:XY-WTH1Temperature range:-20 ° C ~ 60 ° CHumidity range:00%~100%RHControl accuracy:0.1 °C 0.1% RHDetection probe:integrated sensorOutput type:relay outputOutput capacity:up to 10AFunctionProduct features are two main types of classification:the functions of temperature and humidity.The function of temperature are as follows1. The automatic identification of work modeThe system automatically according to the start/stop temperature, identify work mode;Start temperature …

Customers Also Viewed
2000PCS 1 Pin Header Connector Housing for Dupont Wire Jumper Compact
$31.63Electronic Accessories & SuppliesAdd to cartFeatures2.54mm Single-row strip Dupont Wire Jumper.Professional and compact, light weight.Material:PlasticSize:14 x 2.5mm/ 0.55 x 0.1inch (L x W)Color:BlackPackage includes2000 x 1Pin Header Connector
HIFI 2.0 Stereo bluetooth 5.0 Lossless Decoding 27W*2 Digital Class D Car Speaker Audio Power Amplifier Board
$8.73Amplifier BoardAdd to cartDescriptionAVN-302 is a low EMI, no filter, Class D Bluetooth audio decoding power amplifier, with an internal protection mechanism for overcurrent, undervoltage, short circuit and overheating automatic shutdown.SpecificationModel:AVN-302Power:7.4V-14.4VSize:55*50mmOutput power:27W*2Boot instructions1. Insert the U disk, load the file (reading completed) automatically enter the playback, the red indicator flashes2. In the playback state, short press the ‘P/P’ …
CJMCU-1286 PIC16F1823 Microcontroller Development Board
$8.73Motherboard & Development BoardAdd to cartDescriptionCJMCU-1286 is a PIC microcontroller minimum system, running stability and high reliability,internal resources are relatively small, so the microcontroller is simple and convenient to use.The operating voltage is 1.8V – 5.5V.Package included1 x CJMCU-1286 PIC16F1823 Microcontroller Development Board
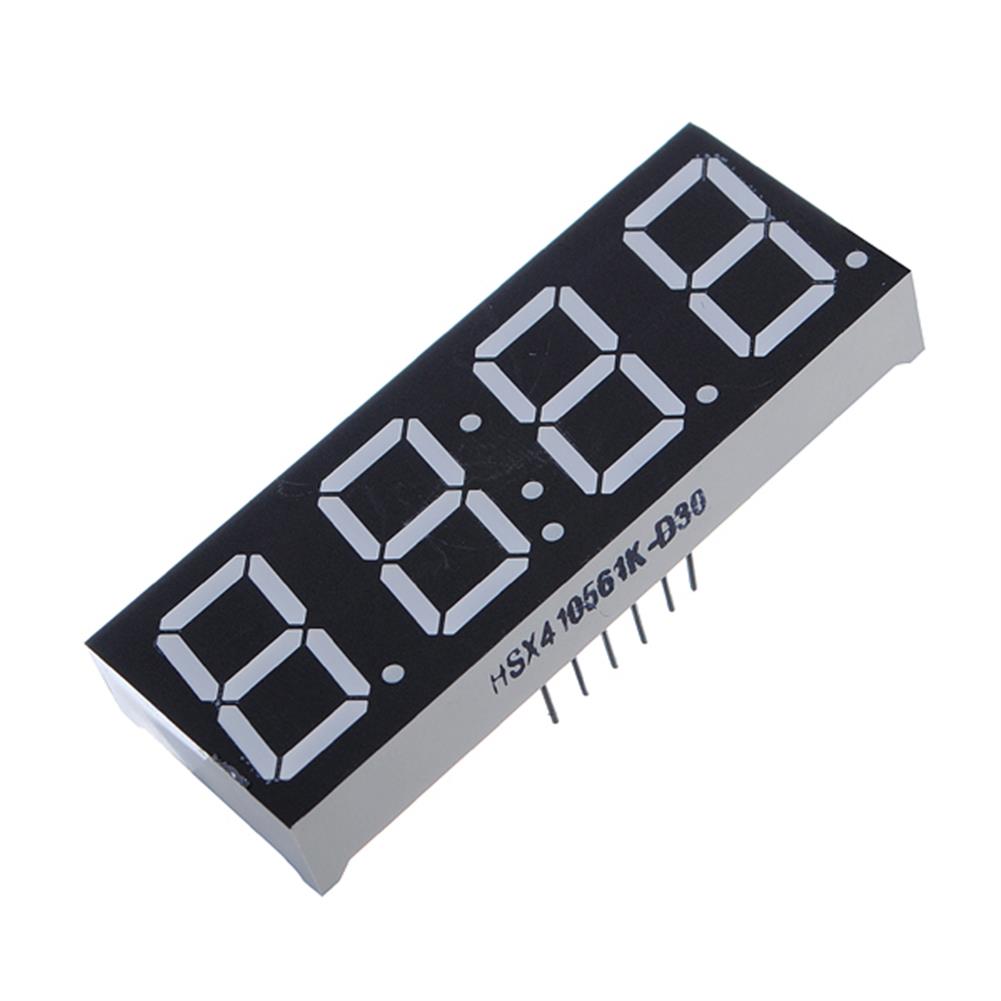
4Pcs 7-Segment 0.56 inch 4 Digit 12 Pins Red LED Display
$8.38Display ScreenAdd to cart4Pcs 7-Segment 0.56 Inch 4 Digit 12 Pins Red LED DisplayDescriptionWith time displayCommon anodePin Number:12 pinsDigit Number:4 digitsDigit Height:0.56 inch / 1.4 cmSize (L x W ):2 x 0.75 inch / 5 x 1.9 cmColor:RedPackage included4 x 0.56’inch 4 Digit LED Display
3pcs M5Stack StickC Pro to Plus Hat Prototype Diy Protoboard Breadboard PCB Universal Board
$31.71Expansion Board & ShieldAdd to cartProduct FeaturesHole Size:0.039inch 1mm (CNC Drilled)Hole Pitch:0.1 in – (2.54 mm)Entire Hole Quantity:168 HolesPackage Included3 x PRO TO PLUS HAT3 x 8 pin header ( 90° )


Reviews
There are no reviews yet.