


3pcs 24V XH-W3002 Micro Digital thermostat High Precision Temperature Control Switch Heating and Cooling Accuracy 0.1
$34.33
Shipping:Standard Shipping about 10-25 business days
Secure Payment:Paypal,VISA,MasterCard
Feature
Product Name:Microcomputer Temperature Controller
Product model:XH-W3002
Temperature range:-50~110°C
Temperature control range:-50~110°C
Temperature measurement accuracy:+-0.2 °C
Temperature control accuracy:+-0.1 °C
Temperature probe:NTC10K (B3950) 1 meter waterproof probe
Supply voltage:DC12V/DC24V/AC220V
Output power:DC24V:240W
Output type:direct output
Appearance size:60 x 45 x 31mm
Opening size:73mm (aperture 4mm)
Package includes
3 x Microcomputer Temperature Controller
Wiring
Key Description
Up key:Short press to display the starting temperature, long press to set the starting temperature.
Down button:short press to display the stop temperature, long press to set the stop temperature.
Shutdown button:Press to turn off the thermostat, and then press to turn on the thermostat.
Code:Code description:Setting range:Factory setting
P0:Starting temperature:-50~110°C:25
P1:Stop temperature:-50~110°C:40
P2:Temperature correction:-10~10°C:0°C
P3:Delayed start:0-10 minutes:0
P0. Set the startup temperature
Press the Setup button to enter the internal menu. The default display is P0. Press the Setup button again and set the desired startup temperature by pressing the up and down buttons.
P1. Set the stop temperature
Press the setup button to enter the internal menu, the display is P0, switch to P1 by the up and down keys, press the setup button again, and set the required stop temperature by the up and down buttons.
P2. Set the temperature correction
In the same way, enter the internal menu, switch to P2 by pressing the up and down buttons, press the setting button again, and set the required calibration temperature by pressing the up and down buttons. (Note:In the setting, if the detected temperature value is 0.5 °C larger than the actual temperature value, then the calibration temperature to be set is -0.5 ° C. If the detected value is 1 ° C smaller than the actual temperature value, the set calibration temperature is required. It is 1 ° C. Detection temperature + correction temperature = actual temperature.)
P3. Set the delay start
In the same way, enter the internal menu, switch to P3 by pressing the up and down buttons, press the setting button again, and set the required delay time by the up and down buttons, the unit is minute. (Note:Delay start is generally used for compressor refrigeration. If it is used in refrigerator freezer, this value needs to be set. According to compressor back pressure, the general setting is 3-6 minutes, if you are not using it for control or doesn’t need delay function, skip directly.
Instructions
Start temperature
Start temperature > stop temperature = cooling mode (output is connected to the cooling unit)
1. Connect the power supply and heating or cooling equipment according to the wiring diagram above (note the positive and negative poles)
2. Press and hold the up key to set the starting temperature. When the screen number flashes, press the up and down keys to set the starting temperature you want. After setting, wait for 5 seconds to brake the system.
3. Press and hold the key to set the stop temperature. When the screen number flashes, press the up and down keys to set the desired stop temperature. After setting, wait for 5 seconds to automatically save the data.
4. Restore the factory:Colleagues press and hold the up and down keys for 5 seconds, when the screen displays 888, the factory is restored.
5. Press the power off button to turn off the thermostat and press to turn on the thermostat.
Tips
888:In the case of power-on, press and hold the up and down keys for about 3 seconds, the digital tube displays 888, and automatically jumps to the detection temperature, that is, the factory settings are restored successfully.
LLL:Describe the sensor is open circuit, repair the sensor, or replace the sensor
HHH:The sensor is short circuit.
| Weight | 0.165 kg |
|---|
Related products
DC 5-5.5V Light Source Tracking PCB Board Solar Automatic Tracker Light Seeking Module Ray Tracing
$13.11Sensor & Detector ModuleAdd to cartSpecificationsVoltage:5-5.5V DCCurrentPrinciple:Use a covering on the photosensitive nozzle, when the light is shining on the obstruction to form a shadow, the light on one sideWhen the difference is formed with the other side, the motor is controlled to find the balance point, that is, the center of the light source.Size:35x16x12 mmLine length:15cmAperture:3mmNote1. The power supply …
6mA 3-100CM Adjustable infrared Digital Obstacle Avoidance Sensor Module
$8.37Sensor & Detector ModuleAdd to cartSpecificationsWorking voltage:DC 3.8V-5.5VWorking current (5V):typical current 6mAInput and output signals (3 lines):GND, VCC is power, and VCC is 3.8V-5.5VObstacle detection time (range from obstacle-free to obstacle-free or obstacle-free to obstacle-free)Working Principle:Sensors actively emit infrared light, according to reflected light detection, if detected obstacles, OUT foot output 0, otherwise 1.Detection distance (test environment, indoor, maximum power, …
6mA 3-100CM Adjustable infrared Digital Obstacle Avoidance Sensor ModuleRead More


Customers Also Viewed
2000PCS 1 Pin Header Connector Housing for Dupont Wire Jumper Compact
$31.63Electronic Accessories & SuppliesAdd to cartFeatures2.54mm Single-row strip Dupont Wire Jumper.Professional and compact, light weight.Material:PlasticSize:14 x 2.5mm/ 0.55 x 0.1inch (L x W)Color:BlackPackage includes2000 x 1Pin Header Connector
HIFI 2.0 Stereo bluetooth 5.0 Lossless Decoding 27W*2 Digital Class D Car Speaker Audio Power Amplifier Board
$8.73Amplifier BoardAdd to cartDescriptionAVN-302 is a low EMI, no filter, Class D Bluetooth audio decoding power amplifier, with an internal protection mechanism for overcurrent, undervoltage, short circuit and overheating automatic shutdown.SpecificationModel:AVN-302Power:7.4V-14.4VSize:55*50mmOutput power:27W*2Boot instructions1. Insert the U disk, load the file (reading completed) automatically enter the playback, the red indicator flashes2. In the playback state, short press the ‘P/P’ …
CJMCU-1286 PIC16F1823 Microcontroller Development Board
$8.73Motherboard & Development BoardAdd to cartDescriptionCJMCU-1286 is a PIC microcontroller minimum system, running stability and high reliability,internal resources are relatively small, so the microcontroller is simple and convenient to use.The operating voltage is 1.8V – 5.5V.Package included1 x CJMCU-1286 PIC16F1823 Microcontroller Development Board
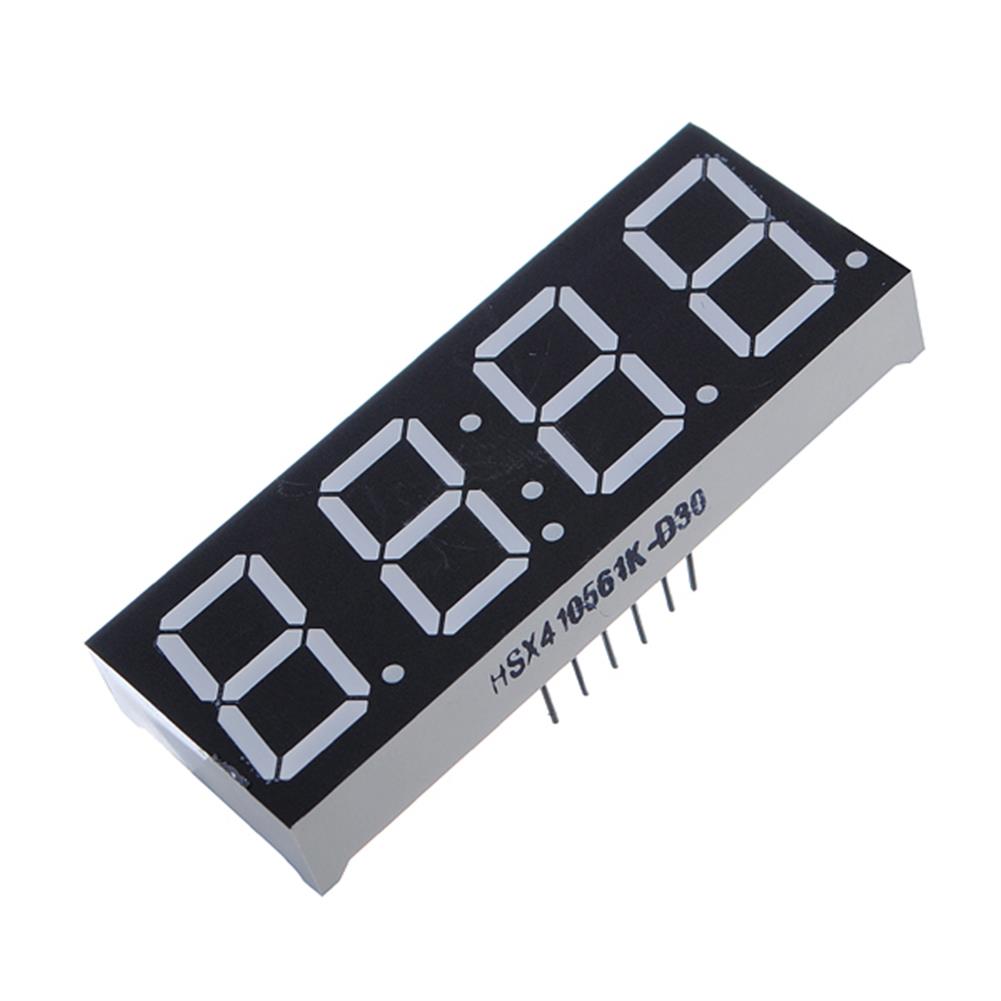
4Pcs 7-Segment 0.56 inch 4 Digit 12 Pins Red LED Display
$8.38Display ScreenAdd to cart4Pcs 7-Segment 0.56 Inch 4 Digit 12 Pins Red LED DisplayDescriptionWith time displayCommon anodePin Number:12 pinsDigit Number:4 digitsDigit Height:0.56 inch / 1.4 cmSize (L x W ):2 x 0.75 inch / 5 x 1.9 cmColor:RedPackage included4 x 0.56’inch 4 Digit LED Display
3pcs M5Stack StickC Pro to Plus Hat Prototype Diy Protoboard Breadboard PCB Universal Board
$31.71Expansion Board & ShieldAdd to cartProduct FeaturesHole Size:0.039inch 1mm (CNC Drilled)Hole Pitch:0.1 in – (2.54 mm)Entire Hole Quantity:168 HolesPackage Included3 x PRO TO PLUS HAT3 x 8 pin header ( 90° )


Reviews
There are no reviews yet.