


3pcs XH-W1321 0.1 Digital thermostat Mini Embedded Red Digital Display Switch Temperature Controller with Waterproof NTC Sensor Meter
$30.89
Shipping:Standard Shipping about 10-25 business days
Secure Payment:Paypal,VISA,MasterCard
Specifications
Product Name:Miniature embedded digital display thermostat
Product Model:XH-1321
Material:ABS
Case Color:White
LED Color:Red
Input Voltage:DC12V
Temperature Measurement Range:-50-110→
Temperature Control Range:-50-110→
Control Accuracy:0.1→
Display Accuracy:0.1→
Measuring Input:NTC10K Waterproof Probe L=1 Meter
Output Type:Relay Output(Output Switch)
Output Capacity:10A
Size (Length x Width x Height):about 56 x 38 x 32mm (2.17 x 1.50 x 1.26 Inch )
Opening hole size:46 x 34mm
Key Function
SET:Press once during normal use, directly enter the stop temperature setting state, use the up and down keys to set the required stop temperature, long press to enter the internal setting menu.
UP:After long press the setting button to enter the internal setting, increase the value setting by the up button.
DOWN:After long press the setting button to enter the internal setting, use the up button to decrease the value setting.
Code:Description:Setting range (method):Factory settings
P0:Operating mode:H/C:C
P1:Backlash setting:0.1-50:2
P2:Temperature correction:-9.9~+9.9°C:0
P3:Delayed start:0-9:0
Detailed Code Descriptions
P0:Working mode:This value must be set when the thermostat is used for the first time. If it is used for heating heating, set to H, if it is used for cooling cooling, set to C.
P1:Hypothesis setting:Press and hold the setting button for 3 seconds to enter the internal menu, select P1, and press the setting button again to enter the hysteresis value setting state. The hysteresis is the difference required when the thermostat reaches the set temperature and stops working again. For example, it is set to the heating mode. When it is heated to 40 degrees, it stops at 35 degrees and starts to return. The difference is 5
P2:Temperature correction:Press and hold the setting button for 3 seconds to enter the internal menu. Press the up and down keys to select P2, press the setting button again, and set the required calibration temperature by the up and down keys. In the setting, if the detected temperature value is 0.5 °C larger than the actual temperature value, the calibration temperature to be set is -0.5 °C. If the detected temperature value is 1 °C smaller than the actual temperature value, the calibration temperature to be set is 1 °C, and the detection temperature +-calibration temperature = actual temperature.
P3:Delay start:Press and hold the setting button for 3 seconds to enter the internal menu, select P3 by the up and down keys, press the setting button again, and set the required delay time (minutes) by the up and down keys. The delay start is generally used for compressor refrigeration. If it is used in the refrigerator freezer, this value needs to be set. According to the compressor back pressure, the set value is usually 3-6 minutes, if it is not used to control the compressor or no delay. Function, skip this item directly.
Instructions
Set the difference back:Why set the backlash setting When you control the device, the temperature will rise or fall back. How many degrees does the temperature change If you want the temperature to change by 10°, the device needs to set the difference back to 10. By setting the difference back, the device can cycle through the temperature range.
Set the stop temperature:press the set button once in the normal display state to stop the temperature value flashing. You can set the desired stop temperature value by using the up and down keys.
How to set factory settings are restored:Press and hold the up and down keys while the power is on, the digital tube display 888 will then automatically jump to the detection temperature.
Heating mode setting method
Setup steps
The first step is to set P0=H
The second step sets the stop temperature
The third step sets the hysteresis value
Setting method
1. Press and hold the setting button to enter the internal menu and set P0 to H.
2. Press the setting button to stop the temperature flashing, and the up and down keys to set the temperature.
3. Press and hold the setting button to enter the internal menu and set the P1 hysteresis setting.
Use Cases
Control the water heater, heat it to 65 ° C to stop, the temperature drops back to 50 ° C and start heating again, how to set
Step 1:Determine the working mode as heating mode and set P0 to H
Step 2:Press the setting button to stop the temperature flashing. Set the starting temperature to 50 °C with the up and down keys.
The third step:stop at 65 °C, start again at 50 °C, so the return difference needs to be set to 65-50=15, enter the internal menu and set P1 to 15, the heating case is set!
Cooling mode setting mode
Setup steps
The first step is to set P0=C
The second step sets the stop temperature
The third step sets the hysteresis value
Setting method
Press and hold the setting button to enter the internal menu and set P0 to C.
Press the setting button to stop the temperature flashing, and the up and down keys to set the temperature.
Long press the setting button to enter the internal menu, set the P1 backlash setting
Use Cases
Control the farm, ventilate to 26 ° C to stop, the temperature rises to 28 ° C to start the refrigeration again, how to set up
The first step:determine the working mode is cooling mode, set P0 to C
Step 2:Press the SET button to stop the temperature flashing. Set the stop temperature to 28 °C with the up and down keys.
The third step:stop at 26 ° C, start again at 28 ° C, so the return difference needs to be set to 28-26 = 2, enter the internal menu to set P1 to 2, the cooling case is set!
Package includes
3 x Miniature embedded digital display thermostat
| Weight | 0.138 kg |
|---|
Related products
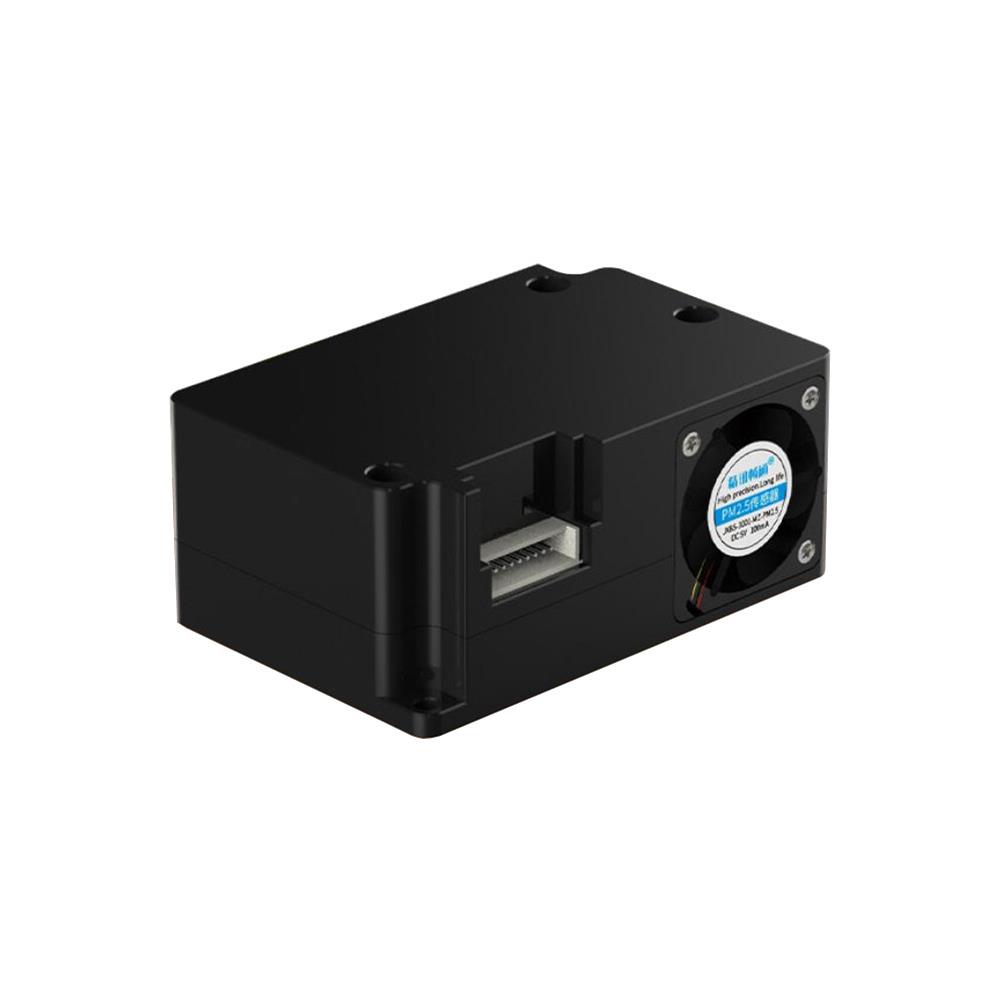
PM2.5 Laser Particulate Matter Sensor PM1.0 PM10 Air Quality Detection Sensor Monitoring Particulate Matter Sensor Module
$39.35Sensor & Detector ModuleAdd to cartTechnical ParametersPM2.5/PM10 measuring range:0-999ug/m3PM2.5/PM10 resolution:lug/m3PM2.5/PM10 accuracyConsistency of particle concentration:0-100ug/m3:÷10%;100-500ug/m3:÷10%Minimum detectable particle diameter:0.3umPower supply voltage:5V÷0.1VMaximum working current:100mAOperating temperature range:-10~60CWorking humidity range:0-95%RHStorage temperature:-30~70CResponse speedProduct appearance size:53x35x23mmApplication areasAir Purifier / Air Quality Detector / Fresh Air Ventilation SystemSupporting air-conditioning / cars with air purification function and consumer electronicsAgricultural greenhouse / environmental monitoring of outdoor breeding placesKitchen and bathroom …
3pcs 6mA 3-100CM Adjustable infrared Digital Obstacle Avoidance Sensor Module
$20.45Sensor & Detector ModuleAdd to cartSpecificationsWorking voltage:DC 3.8V-5.5VWorking current (5V):typical current 6mAInput and output signals (3 lines):GND, VCC is power, and VCC is 3.8V-5.5VObstacle detection time (range from obstacle-free to obstacle-free or obstacle-free to obstacle-free)Working Principle:Sensors actively emit infrared light, according to reflected light detection, if detected obstacles, OUT foot output 0, otherwise 1.Detection distance (test environment, indoor, maximum power, …
3pcs 6mA 3-100CM Adjustable infrared Digital Obstacle Avoidance Sensor ModuleRead More
Stepless Dimmable Touch Sensor Switch DC 5V 12V 24V Sensor Touch Detector Dimmer Switch for LED Strip Light
$10.92Sensor & Detector ModuleAdd to cartSpecificationsType:Touch DimmerMaterial:MetalVoltage:5-30VOutput Current:2AQuiescent CurrentWorking Temperature:-20-50Service time:>80000hOutput Mode:Sensor output, input is outputSwitch mode:Touch sensor on/off switchInstallation:Recessed installationLightweight and compact sizeApplication:LED light, LED strip, cabinet kicthen light, kinds of electric applicationsPackage Included1 x Stepless Dimmable Touch Sensor Switch DC 5V 12V 24V
30pcs thermal Sensor Module Temperature Switch thermistor Sensor Board
$27.45Sensor & Detector ModuleAdd to cartUsesTemperature detection, temperature control sensors , ambient temperature detectionFeatures1. Using the NTC thermistor sensor, good sensitivity2. The comparator output signal is clean, good waveform, driving ability, more than 15mA.3. Adjust the temperature distribution position detection threshold4. The working voltage 3.3V-5V5. The output format:digital switching outputs ( 0 and 1 )6. Fixed bolt holes for easy …
30pcs thermal Sensor Module Temperature Switch thermistor Sensor BoardRead More


Customers Also Viewed
3Pcs RobotDyn RTC DS1307 Real Time Clock Battery Shield with Pin Headers Set
$18.67Expansion Board & ShieldAdd to cartPINOUT:http://img.staticbg.com/file/products/20171226001032PINOUT-RTCDS1307.pdfSchematic:http://img.staticbg.com/file/products/20171226001140Schematic-RTCDS1307.pdfFeatureType:Logic ICsPackage includes3 x RTC DS1307 (real time clock) + battery3 x Wemos D1 mini shield6 x Male Pin Header 8pins6 x Female Pin Header -BLACK 8pins6 x Stackable Header – BLACK 8pins
110V Electric Pet Heating Mat Winter Heated Blanket 2 Speeds Waterproof Cat Dog Heater Pads Bed Bite Resistant
$40.49Laboratory Heating EquipmentsAdd to cartSpecificationsType:CushionRated voltage:110V 50HzRated power:20WPlug:US Plug(We will provide adapter according to delivery country)Material:Polyester + cottonSize:45cmx45cm/17.7inchx17.7inchFeature-Soft cotton texture and vivid prints attract pets’ attention.-Two-speed temperature adjustment (high temperature 50 °C,low temperature 30 °C),can be adjust the temperature level.-The heating rate is fast, warm and comfortable,overheat protection.-Scratch and bite resistant,not easily damaged,thick and durable.-Keep warmer in winter,safe and …
Geekcreit UNO+WiFi R3 ATmega328P+ESP8266 32Mb Memory USB-TTL CH340G Module
$19.67Motherboard & Development BoardAdd to cartDescriptionFull integration on one board:Uno R3 ATmega 328 and WiFi ESP8266 with memory 32Mb (MegaByte). All of the modules can work together or each separately. And everyone has their own pinout headers.The convenient solution for the development of new projects requiring Uno and WiFi.Via USB you can update sketches and firmvare for ATmega328 and for …
Geekcreit UNO+WiFi R3 ATmega328P+ESP8266 32Mb Memory USB-TTL CH340G ModuleRead More
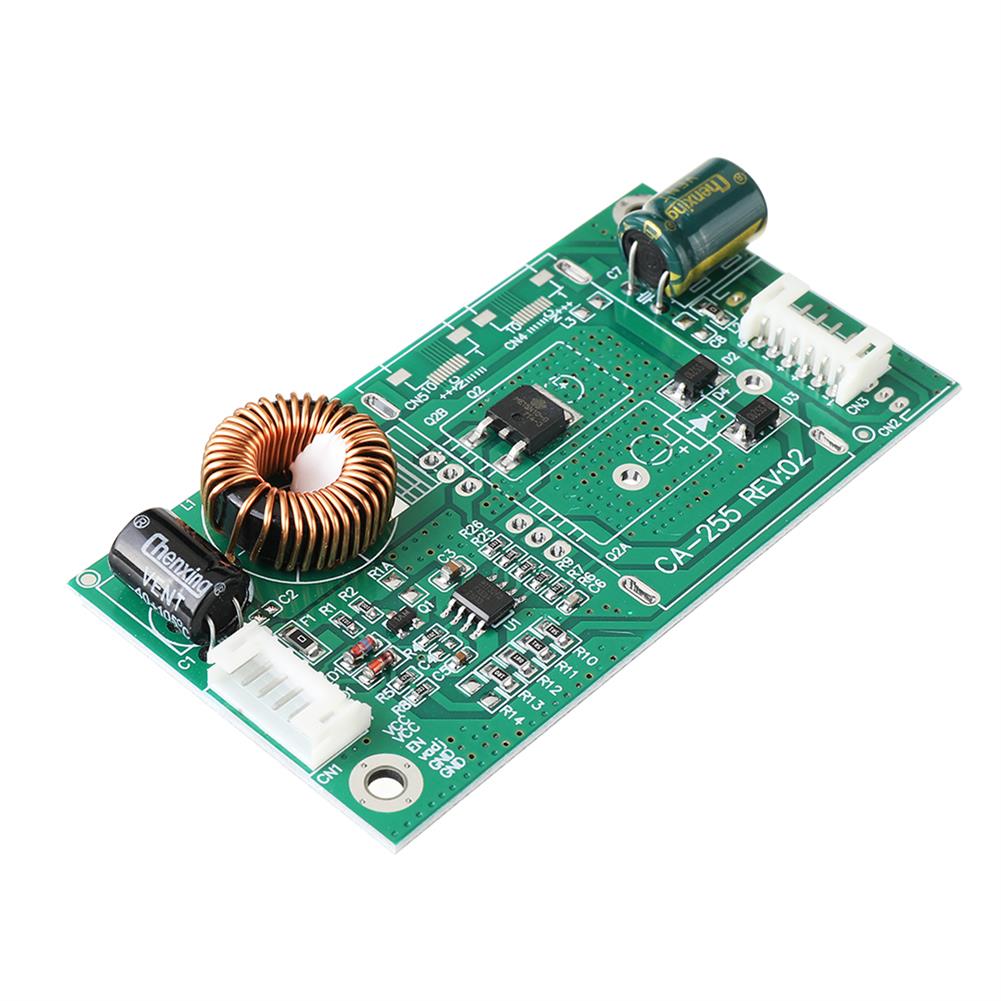
3pcs CA-255 10-42inch LED TV Constant Current Board Universal inverte LED TV Backlight Driver Board
$16.47Driver ModuleAdd to cartSpecificationInput Vol:10.8-28VOutput Vol:15-88vsize:8.5×4.5CM1.VCC:power supply and voltage positive, circuit voltage (The voltage is usually 12V or 24V)2.ON / OFF, ON, EN, ON_BL etc:switch foot, foot switch signal (The voltage range is between 2.5V-5V)3. PWM, PDIM, VDAJ, BL-PWM et al:brightness adjustable feet (Dimming have two modes, one is in digital mode -PWM, one is analog dimming -DC4.The …
30pcs A4988 Driver Module Stepper Motor Driver Board with Heatsink
$54.70Motor PWM Speed ControllerAdd to cartFeature1. It is suitable for driving stepper motors of 8V~35V 2A or less2. Only simple step and direction control interface3. Five different stepping modes:full, half, 1/4, 1/8 and 1/164. The adjustable potentiometer can adjust the maximum current output to obtain a higher step rate5. Automatic current decay mode detection/selection6. Overheat shutdown circuit, under-voltage lockout, cross-current …
30pcs A4988 Driver Module Stepper Motor Driver Board with HeatsinkRead More
10pcs 801S Vibration Shock Sensor Control Module Sensitivity Adjustable Board
$79.70Sensor & Detector ModuleAdd to cartSize ConversionInchesCentimetersPlease according to your own measurements to choose your suitable size. The tags inside the items will show in our Asian (Type) size.Features1. having a signal output instruction;2. with a TTL level signal, and the analog output signal;3. the output valid signal is high, the light goes out;4. the sensitivity is adjustable (fine-tuning);5. wide …
10pcs 801S Vibration Shock Sensor Control Module Sensitivity Adjustable BoardRead More
5pcs W3231 incubator Temperature Controller thermometer Cool/Heat Digital Dual Display with NTC Sensor DC12V
$41.22Sensor & Detector ModuleAdd to cartSize ConversionInchesCentimetersPlease according to your own measurements to choose your suitable size. The tags inside the items will show in our Asian (Type) size.DescriptionTemperature Control:-55C~120C/-67F~ 248FTemperature Control Accuracy:0.1 C / 0.1 FDisplay Color:Red + BlueWorking Power Supply:DC12VTemperature Sensor:1M NTC 10K Product Size:79.2mm≠41.9mm≠26.3mmHole Size:72.1mm≠39.2mmOperation and Display PanelWarning codeCodeReason for errorSolutionHHHTemperature exceeds alarm temperatureThe temperature drops below …
CO2 System Pro Tube Air Valve Guage Bottle Cap Kit for DIY Aquarium Planted Tank
$68.84ConnectorsAdd to cartTechnical SpecificationsColor:WhiteMaterial:ABS and MetalTube Inner Size:4mmFeatures and Benefits Easy to set up CO2 system is designed for low cost planted tank use. 2 air-pipe locks on the bottle cap, prevent the air-pipe get loose ABS bottle caps, good pressure resistance, NO deformation Specialized pressure gauge, build-in automatic safe valve,Keeps pressure in the safe level, never …
CO2 System Pro Tube Air Valve Guage Bottle Cap Kit for DIY Aquarium Planted TankRead More


Reviews
There are no reviews yet.