


3pcs XH-W1321 0.1 Digital thermostat Mini Embedded Red Digital Display Switch Temperature Controller with Waterproof NTC Sensor Meter
$30.89
Shipping:Standard Shipping about 10-25 business days
Secure Payment:Paypal,VISA,MasterCard
Specifications
Product Name:Miniature embedded digital display thermostat
Product Model:XH-1321
Material:ABS
Case Color:White
LED Color:Red
Input Voltage:DC12V
Temperature Measurement Range:-50-110→
Temperature Control Range:-50-110→
Control Accuracy:0.1→
Display Accuracy:0.1→
Measuring Input:NTC10K Waterproof Probe L=1 Meter
Output Type:Relay Output(Output Switch)
Output Capacity:10A
Size (Length x Width x Height):about 56 x 38 x 32mm (2.17 x 1.50 x 1.26 Inch )
Opening hole size:46 x 34mm
Key Function
SET:Press once during normal use, directly enter the stop temperature setting state, use the up and down keys to set the required stop temperature, long press to enter the internal setting menu.
UP:After long press the setting button to enter the internal setting, increase the value setting by the up button.
DOWN:After long press the setting button to enter the internal setting, use the up button to decrease the value setting.
Code:Description:Setting range (method):Factory settings
P0:Operating mode:H/C:C
P1:Backlash setting:0.1-50:2
P2:Temperature correction:-9.9~+9.9°C:0
P3:Delayed start:0-9:0
Detailed Code Descriptions
P0:Working mode:This value must be set when the thermostat is used for the first time. If it is used for heating heating, set to H, if it is used for cooling cooling, set to C.
P1:Hypothesis setting:Press and hold the setting button for 3 seconds to enter the internal menu, select P1, and press the setting button again to enter the hysteresis value setting state. The hysteresis is the difference required when the thermostat reaches the set temperature and stops working again. For example, it is set to the heating mode. When it is heated to 40 degrees, it stops at 35 degrees and starts to return. The difference is 5
P2:Temperature correction:Press and hold the setting button for 3 seconds to enter the internal menu. Press the up and down keys to select P2, press the setting button again, and set the required calibration temperature by the up and down keys. In the setting, if the detected temperature value is 0.5 °C larger than the actual temperature value, the calibration temperature to be set is -0.5 °C. If the detected temperature value is 1 °C smaller than the actual temperature value, the calibration temperature to be set is 1 °C, and the detection temperature +-calibration temperature = actual temperature.
P3:Delay start:Press and hold the setting button for 3 seconds to enter the internal menu, select P3 by the up and down keys, press the setting button again, and set the required delay time (minutes) by the up and down keys. The delay start is generally used for compressor refrigeration. If it is used in the refrigerator freezer, this value needs to be set. According to the compressor back pressure, the set value is usually 3-6 minutes, if it is not used to control the compressor or no delay. Function, skip this item directly.
Instructions
Set the difference back:Why set the backlash setting When you control the device, the temperature will rise or fall back. How many degrees does the temperature change If you want the temperature to change by 10°, the device needs to set the difference back to 10. By setting the difference back, the device can cycle through the temperature range.
Set the stop temperature:press the set button once in the normal display state to stop the temperature value flashing. You can set the desired stop temperature value by using the up and down keys.
How to set factory settings are restored:Press and hold the up and down keys while the power is on, the digital tube display 888 will then automatically jump to the detection temperature.
Heating mode setting method
Setup steps
The first step is to set P0=H
The second step sets the stop temperature
The third step sets the hysteresis value
Setting method
1. Press and hold the setting button to enter the internal menu and set P0 to H.
2. Press the setting button to stop the temperature flashing, and the up and down keys to set the temperature.
3. Press and hold the setting button to enter the internal menu and set the P1 hysteresis setting.
Use Cases
Control the water heater, heat it to 65 ° C to stop, the temperature drops back to 50 ° C and start heating again, how to set
Step 1:Determine the working mode as heating mode and set P0 to H
Step 2:Press the setting button to stop the temperature flashing. Set the starting temperature to 50 °C with the up and down keys.
The third step:stop at 65 °C, start again at 50 °C, so the return difference needs to be set to 65-50=15, enter the internal menu and set P1 to 15, the heating case is set!
Cooling mode setting mode
Setup steps
The first step is to set P0=C
The second step sets the stop temperature
The third step sets the hysteresis value
Setting method
Press and hold the setting button to enter the internal menu and set P0 to C.
Press the setting button to stop the temperature flashing, and the up and down keys to set the temperature.
Long press the setting button to enter the internal menu, set the P1 backlash setting
Use Cases
Control the farm, ventilate to 26 ° C to stop, the temperature rises to 28 ° C to start the refrigeration again, how to set up
The first step:determine the working mode is cooling mode, set P0 to C
Step 2:Press the SET button to stop the temperature flashing. Set the stop temperature to 28 °C with the up and down keys.
The third step:stop at 26 ° C, start again at 28 ° C, so the return difference needs to be set to 28-26 = 2, enter the internal menu to set P1 to 2, the cooling case is set!
Package includes
3 x Miniature embedded digital display thermostat
| Weight | 0.138 kg |
|---|
Related products
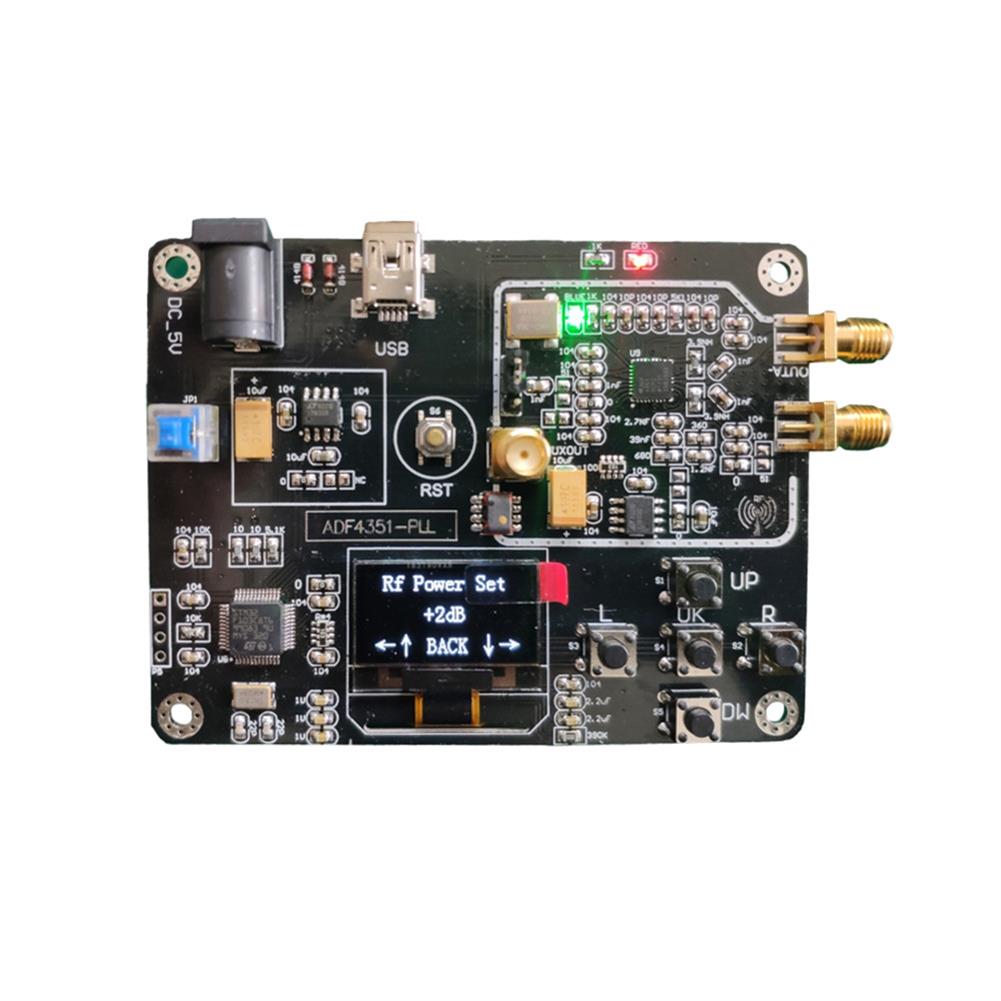
Geekcreit Signal Generator Module 35M-4.4GHz RF Signal Source Frequency Synthesizer ADF4351 Development Board
$54.66Sensor & Detector ModuleAdd to cartThe Source code:Click here to openSchematic:Click here to openHighlightsWith OLED displayHost computer USB & serial portIntegrated key operationWide range voltage supplyGood man-machine interface Many improvements on the phase noise, phase spurious and loop filterMuch enhancement on the power filter and ground processingModule can achieve 35MHz – 4.4GHz frequency output, point frequency, sweep, frequency hopping and …
Keyes Brick Tilt Module Sensor(Pad hole) with Pin Header Digital Signal
$4.36Sensor & Detector ModuleAdd to cartSpecificationsWorking voltage:DC 3.3-5VPositioning hole size:3mm in diameterControl signal:digital signalSize:34 x 22 x 9mmPackage included1 x Module BoardWiring, the UNO board is not includes.
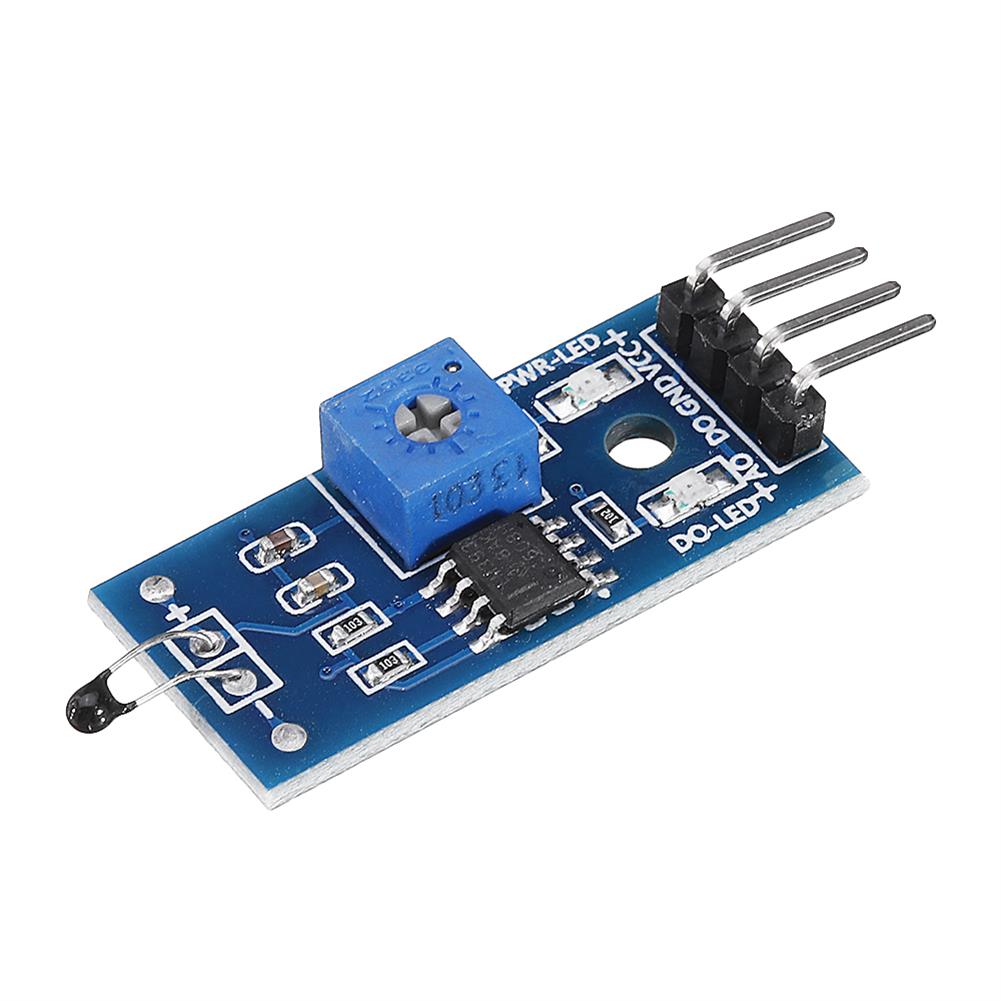
20pcs thermal Sensor Module Temperature Switch thermistor Sensor Board
$20.28Sensor & Detector ModuleAdd to cartUsesTemperature detection, temperature control sensors , ambient temperature detectionFeatures1. Using the NTC thermistor sensor, good sensitivity2. The comparator output signal is clean, good waveform, driving ability, more than 15mA.3. Adjust the temperature distribution position detection threshold4. The working voltage 3.3V-5V5. The output format:digital switching outputs ( 0 and 1 )6. Fixed bolt holes for easy …
20pcs thermal Sensor Module Temperature Switch thermistor Sensor BoardRead More

Customers Also Viewed
50Pcs 12V Female DC Power Socket Jack Plug Wire Connector Cable CCTV DC 5.5 x 2.1mm
$32.76Module ComponentsAdd to cartFeaturesDC 5.5 x 2.1mm.Wire Specification:0.15mm²Length:Approx. 27cmMax Current Rating:2AMax Power Rating:60WTransmission voltage:1V~38VUsage temperature:-50→~65→Material:Copper WireUse for:Led Driver/ Strip connector/ CCTV Camera.Package Included50 x 12V DC Connector Cables
EMC EMI Low Noise Pre-RF Amplifier 20dB 5MHz-5GHz RFamp002
$87.30RF amplifierAdd to cartParameter1. Power supply voltage:11V-15V DC2. Gain:greater than 20DB in the 30MHz-1GHz frequency band3. Input and output impedance:50┯4. Maximum output power:10dBm5. Input signal:-10DBm6. Bandwidth:30MHz to 3GHz (gain is different under different frequencies)Measured gain (prototype)F=5.0MHZ GAIN=13.15DBF=10.0MHZ GAIN=23.89DBF=30.0MHZ GAIN=27.06DBF=50.0MHZ GAIN=27.92DBF=500.0MHZ GAIN=24.84DBF=1.0GHZ GAIN=22.01DBF=1.5GHZ GAIN=20.72DBF=2.5GHZ GAIN=17.65DBF=3.5GHZ GAIN=10.06DBF=4.0GHZ GAIN=9.09DBF=5.0GHZ GAIN=8.90DB7. Noise figure NF (theoretical value)500MHz@ 0.6dB1GHz@ 0.7dB2GHz@ 0.7dB3GHz@ 1.1dB4GHz@ 1.6dB5GHz@ 2.1dBComparison …
EMC EMI Low Noise Pre-RF Amplifier 20dB 5MHz-5GHz RFamp002Read More
RX24 100W 30R 30RJ Metal Aluminum Case High Power Resistor Golden Metal Shell Case Heatsink Resistance Resistor
$6.55Electronic Accessories & SuppliesAdd to cartFeaturesIt has the characteristics of small size, high power and high precision.It is sealed by professional technology.It has the advantages of stronger heat resistance, higher temperature resistance, moisture resistance, high anti-vibration and explosion protection.Scope of application:Testing power supply, frequency converter, automobile LED lamp, automation equipment, audio, frequency divider, servo industry and other harsh industrial control …
5pcs SRX882 433/315MHz Superheterodyne Receiver Module Board for ASK Transmitter Module
$16.71Smart ModuleAdd to cartItem OverviewThe SRX882 is a super-heterodyne receiver module with a micropower and strong driving force in conjunction with the ASK transmitter module. It has high stability, anti-interference and high cost performance, and also has a strong driving force, which can pass ROHS, FCC, CE and other certifications. The data port can be directly connected to …
5pcs SRX882 433/315MHz Superheterodyne Receiver Module Board for ASK Transmitter ModuleRead More
13.5mm Adjustable Laser Pointer Module Holder Mount Clamp 3 Axis
$42.51Engraving Parts & AccessoriesAdd to cartDescriptionMaterial:stainless steelColor:blackMount Inner Diameter:13.5mmSize:40X60mm/1.57X2.36inch(L*H)Feature1. Stainless steel laser moudle holder2. Professional angle and height adjustable design3. Installed on the laser module,it can become a professional laser pointer or laser locator4. Can also used a as a heatsink for the laser module,extend the laser module life time5. Fit for 12mm diameter laser modulePackage included1X Laser Module Holder
Mask Scary Glow Mask LED Mask for Halloween Mask Party Masks Neon Maske Skeleto Halloween Party Decor
$17.17EL ProductsAdd to cartColor. Red / Color. Orange / Color. Yellow / Color. Blue / Color. Blue / Color. Purple / Color. White / Color. Pink / Color. Fluorescent Green / Color. Green / Color. Transparent Blue /


Reviews
There are no reviews yet.