


3pcs XH-W1321 0.1 Digital thermostat Mini Embedded Red Digital Display Switch Temperature Controller with Waterproof NTC Sensor Meter
$30.89
Shipping:Standard Shipping about 10-25 business days
Secure Payment:Paypal,VISA,MasterCard
Specifications
Product Name:Miniature embedded digital display thermostat
Product Model:XH-1321
Material:ABS
Case Color:White
LED Color:Red
Input Voltage:DC12V
Temperature Measurement Range:-50-110→
Temperature Control Range:-50-110→
Control Accuracy:0.1→
Display Accuracy:0.1→
Measuring Input:NTC10K Waterproof Probe L=1 Meter
Output Type:Relay Output(Output Switch)
Output Capacity:10A
Size (Length x Width x Height):about 56 x 38 x 32mm (2.17 x 1.50 x 1.26 Inch )
Opening hole size:46 x 34mm
Key Function
SET:Press once during normal use, directly enter the stop temperature setting state, use the up and down keys to set the required stop temperature, long press to enter the internal setting menu.
UP:After long press the setting button to enter the internal setting, increase the value setting by the up button.
DOWN:After long press the setting button to enter the internal setting, use the up button to decrease the value setting.
Code:Description:Setting range (method):Factory settings
P0:Operating mode:H/C:C
P1:Backlash setting:0.1-50:2
P2:Temperature correction:-9.9~+9.9°C:0
P3:Delayed start:0-9:0
Detailed Code Descriptions
P0:Working mode:This value must be set when the thermostat is used for the first time. If it is used for heating heating, set to H, if it is used for cooling cooling, set to C.
P1:Hypothesis setting:Press and hold the setting button for 3 seconds to enter the internal menu, select P1, and press the setting button again to enter the hysteresis value setting state. The hysteresis is the difference required when the thermostat reaches the set temperature and stops working again. For example, it is set to the heating mode. When it is heated to 40 degrees, it stops at 35 degrees and starts to return. The difference is 5
P2:Temperature correction:Press and hold the setting button for 3 seconds to enter the internal menu. Press the up and down keys to select P2, press the setting button again, and set the required calibration temperature by the up and down keys. In the setting, if the detected temperature value is 0.5 °C larger than the actual temperature value, the calibration temperature to be set is -0.5 °C. If the detected temperature value is 1 °C smaller than the actual temperature value, the calibration temperature to be set is 1 °C, and the detection temperature +-calibration temperature = actual temperature.
P3:Delay start:Press and hold the setting button for 3 seconds to enter the internal menu, select P3 by the up and down keys, press the setting button again, and set the required delay time (minutes) by the up and down keys. The delay start is generally used for compressor refrigeration. If it is used in the refrigerator freezer, this value needs to be set. According to the compressor back pressure, the set value is usually 3-6 minutes, if it is not used to control the compressor or no delay. Function, skip this item directly.
Instructions
Set the difference back:Why set the backlash setting When you control the device, the temperature will rise or fall back. How many degrees does the temperature change If you want the temperature to change by 10°, the device needs to set the difference back to 10. By setting the difference back, the device can cycle through the temperature range.
Set the stop temperature:press the set button once in the normal display state to stop the temperature value flashing. You can set the desired stop temperature value by using the up and down keys.
How to set factory settings are restored:Press and hold the up and down keys while the power is on, the digital tube display 888 will then automatically jump to the detection temperature.
Heating mode setting method
Setup steps
The first step is to set P0=H
The second step sets the stop temperature
The third step sets the hysteresis value
Setting method
1. Press and hold the setting button to enter the internal menu and set P0 to H.
2. Press the setting button to stop the temperature flashing, and the up and down keys to set the temperature.
3. Press and hold the setting button to enter the internal menu and set the P1 hysteresis setting.
Use Cases
Control the water heater, heat it to 65 ° C to stop, the temperature drops back to 50 ° C and start heating again, how to set
Step 1:Determine the working mode as heating mode and set P0 to H
Step 2:Press the setting button to stop the temperature flashing. Set the starting temperature to 50 °C with the up and down keys.
The third step:stop at 65 °C, start again at 50 °C, so the return difference needs to be set to 65-50=15, enter the internal menu and set P1 to 15, the heating case is set!
Cooling mode setting mode
Setup steps
The first step is to set P0=C
The second step sets the stop temperature
The third step sets the hysteresis value
Setting method
Press and hold the setting button to enter the internal menu and set P0 to C.
Press the setting button to stop the temperature flashing, and the up and down keys to set the temperature.
Long press the setting button to enter the internal menu, set the P1 backlash setting
Use Cases
Control the farm, ventilate to 26 ° C to stop, the temperature rises to 28 ° C to start the refrigeration again, how to set up
The first step:determine the working mode is cooling mode, set P0 to C
Step 2:Press the SET button to stop the temperature flashing. Set the stop temperature to 28 °C with the up and down keys.
The third step:stop at 26 ° C, start again at 28 ° C, so the return difference needs to be set to 28-26 = 2, enter the internal menu to set P1 to 2, the cooling case is set!
Package includes
3 x Miniature embedded digital display thermostat
| Weight | 0.138 kg |
|---|
Related products
Keyes Brick Tilt Module Sensor(Pad hole) with Pin Header Digital Signal
$4.36Sensor & Detector ModuleAdd to cartSpecificationsWorking voltage:DC 3.3-5VPositioning hole size:3mm in diameterControl signal:digital signalSize:34 x 22 x 9mmPackage included1 x Module BoardWiring, the UNO board is not includes.
6mA 3-100CM Adjustable infrared Digital Obstacle Avoidance Sensor Module
$8.37Sensor & Detector ModuleAdd to cartSpecificationsWorking voltage:DC 3.8V-5.5VWorking current (5V):typical current 6mAInput and output signals (3 lines):GND, VCC is power, and VCC is 3.8V-5.5VObstacle detection time (range from obstacle-free to obstacle-free or obstacle-free to obstacle-free)Working Principle:Sensors actively emit infrared light, according to reflected light detection, if detected obstacles, OUT foot output 0, otherwise 1.Detection distance (test environment, indoor, maximum power, …
6mA 3-100CM Adjustable infrared Digital Obstacle Avoidance Sensor ModuleRead More
Waterproof Ultrasonic Sensor Module integrated Ranging Sensor Reversing Radar Measuring Distance
$24.04Sensor & Detector ModuleAdd to cartThis module is easy to use. A control port sends a high level above 10US, so you can wait for the high level output at the receiving port. You can turn on the timer when there is an output. When this port goes low, you can read it. The value of the timer, at this …
10pcs thermal Sensor Module Temperature Switch thermistor Sensor Board
$10.88Sensor & Detector ModuleAdd to cartUsesTemperature detection, temperature control sensors , ambient temperature detectionFeatures1. Using the NTC thermistor sensor, good sensitivity2. The comparator output signal is clean, good waveform, driving ability, more than 15mA.3. Adjust the temperature distribution position detection threshold4. The working voltage 3.3V-5V5. The output format:digital switching outputs ( 0 and 1 )6. Fixed bolt holes for easy …
10pcs thermal Sensor Module Temperature Switch thermistor Sensor BoardRead More


Customers Also Viewed
3pcs L298N Motor Driver Module 4 Chaneel Motor Drive Smart Car Module
$41.54Driver ModuleAdd to cartDescriptionThe four channel L298N motor drive module integrates two L298N chips and can drive four DC motors to realize the control of forward and backward rotation and motor speed. The module is equipped with LM2596S step-down chip. If the motor with 7V voltage or more is driven, 5V power can be output to the control …
3pcs L298N Motor Driver Module 4 Chaneel Motor Drive Smart Car ModuleRead More
Geekcreit D1 Mini ESP32 ESP-32 WiFi+bluetooth internet of Things Development Board Based ESP8266 Module
$21.86Motherboard & Development BoardAdd to cartMore informations:https://github.com/LilyGO/ESP32-MINI-32-V2.0DescriptionThis is D1 Mini ESP32 ESP-32 WiFi+bluetooth Internet Of Things Development Board.Use exampleit can also match the next productPackage included4 x Long female pins4 x short female pins4 x Normal pins1 x mini D1 ESP32
AF1020 Dust-proof Probe Super-stable Pipe-type Current-type Temperature and Humidity Transmitter Temperature Senor Humidity Sensor
$176.16Solar CollectorsAdd to cartSpecificationModel:AF1020 Type Temperature and Humidity TransmitterTemperature measurement range:- 40 ~+80 (℃)Measurement accuracy:+-0.5 (℃)Working Voltage 15-36 (V)Humidity accuracy:+-3% RHHumidity measurement range:0-99.9% RHCurrent output:4-20 m AInstructions1. Power cord positive DC18~36V (red wire)2. Power ground wire GND (black wire)3. Humidity current output 4~20MA (yellow line)4. Temperature current output 4~20MA (white line)Installation sequence1. Connect the red, black, yellow and …
3Pcs 5M Meter thermometer Electronic Digital Display FY10 Embedded thermometer indoor and Outdoor Temperature Measurement
$20.72Test & Measuring ModuleAdd to cartFunction introductionOverall size:48*28*15mmInserted hole size:46*27mmLCD temperature display-50→ to 110→ temperature measurement, 0.1 degree resolution.C and F display versions are availableStandard 0.8m waterproof probeCable length:5 meterPackage includes3 x Thermometer
Peacefair PZEM-028 AC Digital Multifunction Meter Voltmeter Ammeter 0~100A/400V Power Factor Meter
$27.97Electronic Accessories & SuppliesAdd to cartError adjustmentThe product is 100% calibrated before leaving the factory, and the user can also manually adjust the error by himself. The method is as followsStep 1:Long press the button (about 3 seconds) until the digital digit on the screen flashes, then release the button;Step 2:Digital flashing means entering the error adjustment state, the digits …
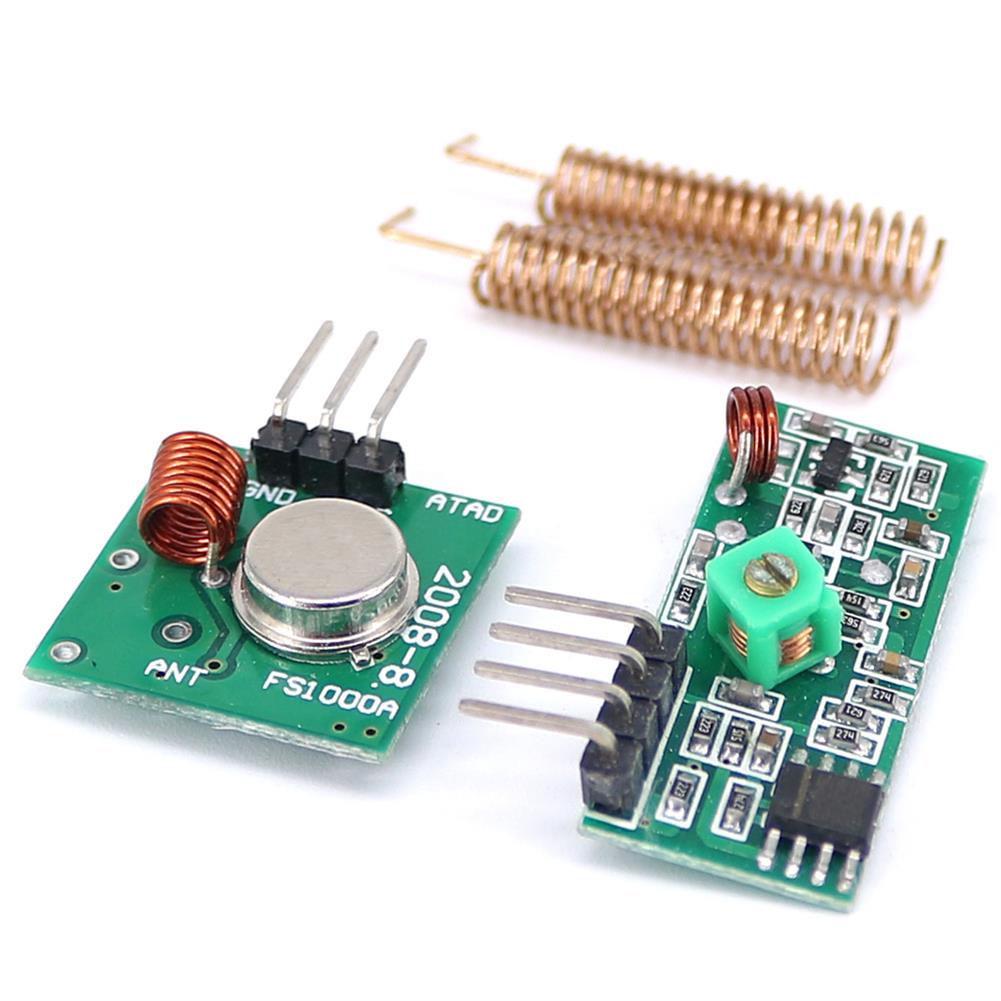
3pcs 433MHz RF Wireless Receiver Module Transmitter kit + 2PCS RF Spring Antenna OPEN-SMART for Arduino – products that work with official for Arduino boards
$12.11Smart ModuleAdd to cartSize ConversionInchesCentimetersPlease according to your own measurements to choose your suitable size. The tags inside the items will show in our Asian (Type) size.DescriptionThe kit includes one pair of transmitter and receiver modules and one pair of spring antennas for increasing the communication distance. And the frequency is 433MHz. It is very popular for remote …
10pcs DC 3.7-6V To 400KV Boost Step Up Power Module High Voltage Generator
$55.81Power Supply ModuleAdd to cartFeatureThe high-voltage module uses the principle Tesla coil is made of high-voltage pulse output voltage current, small size, high efficiency, simple external circuit(just plug in the switch, the battery can be) discharge intensity violent.SpecificationModel:MC-105Volume:Length 65mm Diameter 24mm, Diameter of cut surface 22mmVoltage:Input DC3.7-6V, output DC200-400KVCurrent:Input 4A, output 0.5ALength:Input 10 cm or so, the output is …
10pcs DC 3.7-6V To 400KV Boost Step Up Power Module High Voltage GeneratorRead More


Reviews
There are no reviews yet.