


3pcs XH-W1321 0.1 Digital thermostat Mini Embedded Red Digital Display Switch Temperature Controller with Waterproof NTC Sensor Meter
$30.89
Shipping:Standard Shipping about 10-25 business days
Secure Payment:Paypal,VISA,MasterCard
Specifications
Product Name:Miniature embedded digital display thermostat
Product Model:XH-1321
Material:ABS
Case Color:White
LED Color:Red
Input Voltage:DC12V
Temperature Measurement Range:-50-110→
Temperature Control Range:-50-110→
Control Accuracy:0.1→
Display Accuracy:0.1→
Measuring Input:NTC10K Waterproof Probe L=1 Meter
Output Type:Relay Output(Output Switch)
Output Capacity:10A
Size (Length x Width x Height):about 56 x 38 x 32mm (2.17 x 1.50 x 1.26 Inch )
Opening hole size:46 x 34mm
Key Function
SET:Press once during normal use, directly enter the stop temperature setting state, use the up and down keys to set the required stop temperature, long press to enter the internal setting menu.
UP:After long press the setting button to enter the internal setting, increase the value setting by the up button.
DOWN:After long press the setting button to enter the internal setting, use the up button to decrease the value setting.
Code:Description:Setting range (method):Factory settings
P0:Operating mode:H/C:C
P1:Backlash setting:0.1-50:2
P2:Temperature correction:-9.9~+9.9°C:0
P3:Delayed start:0-9:0
Detailed Code Descriptions
P0:Working mode:This value must be set when the thermostat is used for the first time. If it is used for heating heating, set to H, if it is used for cooling cooling, set to C.
P1:Hypothesis setting:Press and hold the setting button for 3 seconds to enter the internal menu, select P1, and press the setting button again to enter the hysteresis value setting state. The hysteresis is the difference required when the thermostat reaches the set temperature and stops working again. For example, it is set to the heating mode. When it is heated to 40 degrees, it stops at 35 degrees and starts to return. The difference is 5
P2:Temperature correction:Press and hold the setting button for 3 seconds to enter the internal menu. Press the up and down keys to select P2, press the setting button again, and set the required calibration temperature by the up and down keys. In the setting, if the detected temperature value is 0.5 °C larger than the actual temperature value, the calibration temperature to be set is -0.5 °C. If the detected temperature value is 1 °C smaller than the actual temperature value, the calibration temperature to be set is 1 °C, and the detection temperature +-calibration temperature = actual temperature.
P3:Delay start:Press and hold the setting button for 3 seconds to enter the internal menu, select P3 by the up and down keys, press the setting button again, and set the required delay time (minutes) by the up and down keys. The delay start is generally used for compressor refrigeration. If it is used in the refrigerator freezer, this value needs to be set. According to the compressor back pressure, the set value is usually 3-6 minutes, if it is not used to control the compressor or no delay. Function, skip this item directly.
Instructions
Set the difference back:Why set the backlash setting When you control the device, the temperature will rise or fall back. How many degrees does the temperature change If you want the temperature to change by 10°, the device needs to set the difference back to 10. By setting the difference back, the device can cycle through the temperature range.
Set the stop temperature:press the set button once in the normal display state to stop the temperature value flashing. You can set the desired stop temperature value by using the up and down keys.
How to set factory settings are restored:Press and hold the up and down keys while the power is on, the digital tube display 888 will then automatically jump to the detection temperature.
Heating mode setting method
Setup steps
The first step is to set P0=H
The second step sets the stop temperature
The third step sets the hysteresis value
Setting method
1. Press and hold the setting button to enter the internal menu and set P0 to H.
2. Press the setting button to stop the temperature flashing, and the up and down keys to set the temperature.
3. Press and hold the setting button to enter the internal menu and set the P1 hysteresis setting.
Use Cases
Control the water heater, heat it to 65 ° C to stop, the temperature drops back to 50 ° C and start heating again, how to set
Step 1:Determine the working mode as heating mode and set P0 to H
Step 2:Press the setting button to stop the temperature flashing. Set the starting temperature to 50 °C with the up and down keys.
The third step:stop at 65 °C, start again at 50 °C, so the return difference needs to be set to 65-50=15, enter the internal menu and set P1 to 15, the heating case is set!
Cooling mode setting mode
Setup steps
The first step is to set P0=C
The second step sets the stop temperature
The third step sets the hysteresis value
Setting method
Press and hold the setting button to enter the internal menu and set P0 to C.
Press the setting button to stop the temperature flashing, and the up and down keys to set the temperature.
Long press the setting button to enter the internal menu, set the P1 backlash setting
Use Cases
Control the farm, ventilate to 26 ° C to stop, the temperature rises to 28 ° C to start the refrigeration again, how to set up
The first step:determine the working mode is cooling mode, set P0 to C
Step 2:Press the SET button to stop the temperature flashing. Set the stop temperature to 28 °C with the up and down keys.
The third step:stop at 26 ° C, start again at 28 ° C, so the return difference needs to be set to 28-26 = 2, enter the internal menu to set P1 to 2, the cooling case is set!
Package includes
3 x Miniature embedded digital display thermostat
| Weight | 0.138 kg |
|---|
Related products
30pcs thermal Sensor Module Temperature Switch thermistor Sensor Board
$27.45Sensor & Detector ModuleAdd to cartUsesTemperature detection, temperature control sensors , ambient temperature detectionFeatures1. Using the NTC thermistor sensor, good sensitivity2. The comparator output signal is clean, good waveform, driving ability, more than 15mA.3. Adjust the temperature distribution position detection threshold4. The working voltage 3.3V-5V5. The output format:digital switching outputs ( 0 and 1 )6. Fixed bolt holes for easy …
30pcs thermal Sensor Module Temperature Switch thermistor Sensor BoardRead More
Tilt Angle Sensor Module with Cable STM32 AVR
$4.36Sensor & Detector ModuleAdd to cartTilt Angle Sensor Module With Cable For STM32 AVR Raspberry Pi Specification Working Voltage:3.3V ~ 12V Location hole diam:3.1mm PCB board size:16 x 14mm With 2pcs 20cm cable Package included 1 x Tilt angle sensor module 2 x 20cm cable
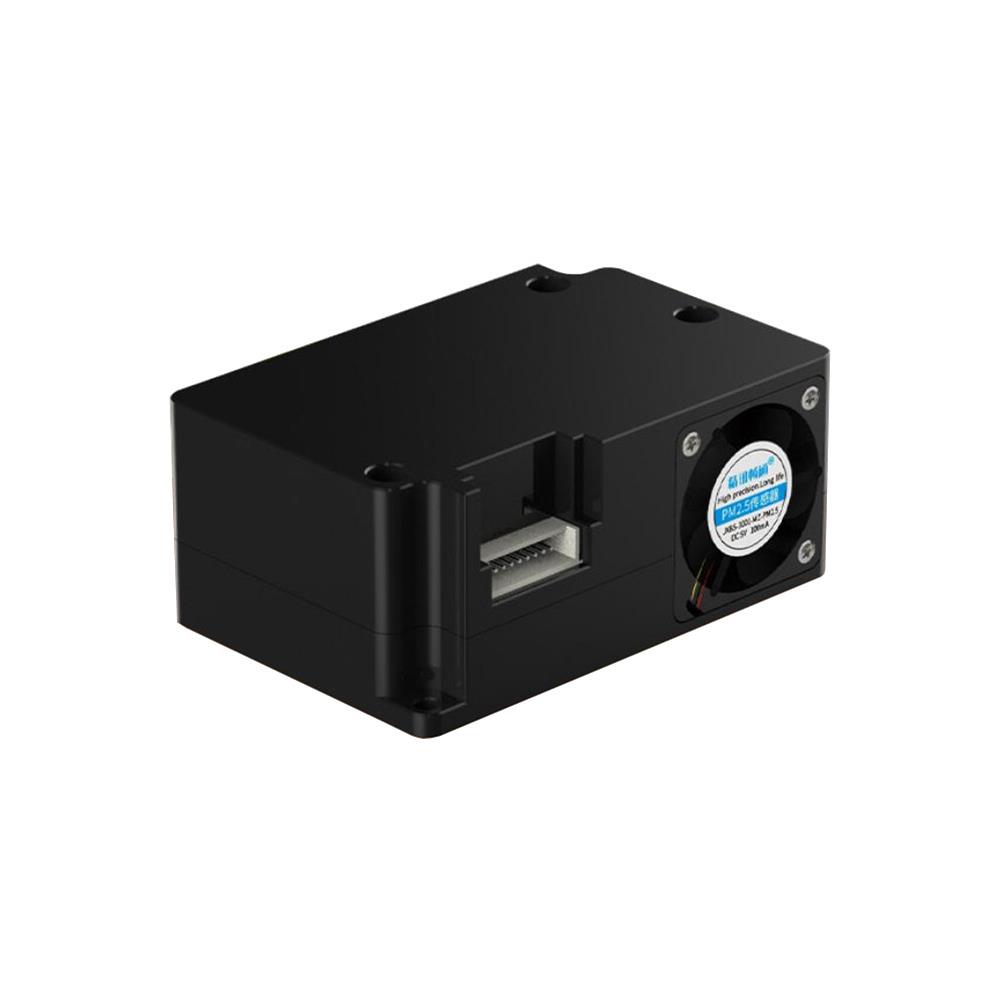
PM2.5 Laser Particulate Matter Sensor PM1.0 PM10 Air Quality Detection Sensor Monitoring Particulate Matter Sensor Module
$39.35Sensor & Detector ModuleAdd to cartTechnical ParametersPM2.5/PM10 measuring range:0-999ug/m3PM2.5/PM10 resolution:lug/m3PM2.5/PM10 accuracyConsistency of particle concentration:0-100ug/m3:÷10%;100-500ug/m3:÷10%Minimum detectable particle diameter:0.3umPower supply voltage:5V÷0.1VMaximum working current:100mAOperating temperature range:-10~60CWorking humidity range:0-95%RHStorage temperature:-30~70CResponse speedProduct appearance size:53x35x23mmApplication areasAir Purifier / Air Quality Detector / Fresh Air Ventilation SystemSupporting air-conditioning / cars with air purification function and consumer electronicsAgricultural greenhouse / environmental monitoring of outdoor breeding placesKitchen and bathroom …
Waterproof Ultrasonic Sensor Module integrated Ranging Sensor Reversing Radar Measuring Distance
$24.04Sensor & Detector ModuleAdd to cartThis module is easy to use. A control port sends a high level above 10US, so you can wait for the high level output at the receiving port. You can turn on the timer when there is an output. When this port goes low, you can read it. The value of the timer, at this …


Customers Also Viewed
Solar Powered Floating Bird Bath Water Fountain Pump Pond Pool Water Pump
$42.51Electrical Pump & ValveAdd to cartDescriptionThis product is solar-powered decorative fountain.It is made up of highly efficient solar panel and new brushless pump.IT is start-up fast,efficient and strong stability.In addition,it has no electric outlet or external battery,so it’s not only easy to use,but also safe.This product is suitable for bird bath,fish tank,small pond,garden decoration,water circulation for oxygen,etc.FeatureSolar panel:7V/1.4WBrushless pump input:DC4.5-10VMaximum …
Solar Powered Floating Bird Bath Water Fountain Pump Pond Pool Water PumpRead More
Vibration Switch Sensor Module Vibration Sensor Alarm Module Smart Car Accessories
$4.36Sensor & Detector ModuleAdd to cartFeatures 1. Onboard LM393 voltage comparator chip and vibration sensing probe2. Support 5V/3.3V voltage input3. Onboard signal output indication, the output valid signal is low level and the indicator light is on, the output signal can be directly connected with the single chip IO4. The sensitivity of signal detection can be adjusted5. With 3mm screw …
Vibration Switch Sensor Module Vibration Sensor Alarm Module Smart Car AccessoriesRead More
TPA3116 Dual Channel 50Wx2 Digital Amplifier Board
$23.15Amplifier BoardAdd to cartSpecificationPower amplifier chip:TPA3116Power supply voltage:11 ~ 26VDC DC input with limit reverse polarity protection(Recommended DC 24V current 3A and above switching power supply)Output power:stereo 50W + 50W, PBTL monaural 100WLoad impedance:4 to 8 ohms (horn speaker impedance)Audio input:2.54mm3 pin seatPackage Included1 x Digital Amplifier Board
5pcs Geekcreit 3 in 1 AC 60-500V 100A Square Yellow LED Digital Voltmeter Ammeter Hertz Meter Signal Lights Voltage Current Frequency Combo Meter indicator Tester with Round CT
$48.24Electronic Accessories & SuppliesAdd to cartDescriptionDisplay:Voltage, current, frequencyDisplay color:YellowMeasuring voltage range:60~500V AMeasuring current range:6~100AMeasuring frequency range:20-70HzSize:2.8*5cm/1.10inch*1.97inch (D*H)Note:Due to the difference between different monitors, the picture may not reflect the actual color of the item. Thank you!!Package included5 x 22MM Indicator5 x Round CT
5pcs Nano V3.0 Terminal Adapter AVR ATMEGA328P without NRF2401+ Expansion interface DC Power Board
$38.18Expansion Board & ShieldAdd to cartFeature1. The item is a terminal expansion adapter, working very well for prototyping Nano projects2. There are pins expansion hole for the NANO board, which can directly lead the pins; With DC power supply interface, you can directly add external power or battery to supply power3. With NRF2401+ expansion interface, you can insert NRF2401+ to …


Reviews
There are no reviews yet.