


3pcs XH-W1321 0.1 Digital thermostat Mini Embedded Blue Digital Display Switch Temperature Controller with Waterproof NTC Sensor Meter
$30.89
Shipping:Standard Shipping about 10-25 business days
Secure Payment:Paypal,VISA,MasterCard
Specifications
Product Name:Miniature embedded digital display thermostat
Product Model:XH-1321
Material:ABS
Case Color:White
LED Color:Blue
Input Voltage:DC12V
Temperature Measurement Range:-50-110→
Temperature Control Range:-50-110→
Control Accuracy:0.1→
Display Accuracy:0.1→
Measuring Input:NTC10K Waterproof Probe L=1 Meter
Output Type:Relay Output(Output Switch)
Output Capacity:10A
Size (Length x Width x Height):about 56 x 38 x 32mm (2.17 x 1.50 x 1.26 Inch )
Opening hole size:46 x 34mm
Key Function
SET:Press once during normal use, directly enter the stop temperature setting state, use the up and down keys to set the required stop temperature, long press to enter the internal setting menu.
UP:After long press the setting button to enter the internal setting, increase the value setting by the up button.
DOWN:After long press the setting button to enter the internal setting, use the up button to decrease the value setting.
Code:Description:Setting range (method):Factory settings
P0:Operating mode:H/C:C
P1:Backlash setting:0.1-50:2
P2:Temperature correction:-9.9~+9.9°C:0
P3:Delayed start:0-9:0
Detailed Code Descriptions
P0:Working mode:This value must be set when the thermostat is used for the first time. If it is used for heating heating, set to H, if it is used for cooling cooling, set to C.
P1:Hypothesis setting:Press and hold the setting button for 3 seconds to enter the internal menu, select P1, and press the setting button again to enter the hysteresis value setting state. The hysteresis is the difference required when the thermostat reaches the set temperature and stops working again. For example, it is set to the heating mode. When it is heated to 40 degrees, it stops at 35 degrees and starts to return. The difference is 5
P2:Temperature correction:Press and hold the setting button for 3 seconds to enter the internal menu. Press the up and down keys to select P2, press the setting button again, and set the required calibration temperature by the up and down keys. In the setting, if the detected temperature value is 0.5 °C larger than the actual temperature value, the calibration temperature to be set is -0.5 °C. If the detected temperature value is 1 °C smaller than the actual temperature value, the calibration temperature to be set is 1 °C, and the detection temperature +-calibration temperature = actual temperature.
P3:Delay start:Press and hold the setting button for 3 seconds to enter the internal menu, select P3 by the up and down keys, press the setting button again, and set the required delay time (minutes) by the up and down keys. The delay start is generally used for compressor refrigeration. If it is used in the refrigerator freezer, this value needs to be set. According to the compressor back pressure, the set value is usually 3-6 minutes, if it is not used to control the compressor or no delay. Function, skip this item directly.
Instructions
Set the difference back:Why set the backlash setting When you control the device, the temperature will rise or fall back. How many degrees does the temperature change If you want the temperature to change by 10°, the device needs to set the difference back to 10. By setting the difference back, the device can cycle through the temperature range.
Set the stop temperature:press the set button once in the normal display state to stop the temperature value flashing. You can set the desired stop temperature value by using the up and down keys.
How to set factory settings are restored:Press and hold the up and down keys while the power is on, the digital tube display 888 will then automatically jump to the detection temperature.
Heating mode setting method
Setup steps
The first step is to set P0=H
The second step sets the stop temperature
The third step sets the hysteresis value
Setting method
1. Press and hold the setting button to enter the internal menu and set P0 to H.
2. Press the setting button to stop the temperature flashing, and the up and down keys to set the temperature.
3. Press and hold the setting button to enter the internal menu and set the P1 hysteresis setting.
Use Cases
Control the water heater, heat it to 65 ° C to stop, the temperature drops back to 50 ° C and start heating again, how to set
Step 1:Determine the working mode as heating mode and set P0 to H
Step 2:Press the setting button to stop the temperature flashing. Set the starting temperature to 50 °C with the up and down keys.
The third step:stop at 65 °C, start again at 50 °C, so the return difference needs to be set to 65-50=15, enter the internal menu and set P1 to 15, the heating case is set!
Cooling mode setting mode
Setup steps
The first step is to set P0=C
The second step sets the stop temperature
The third step sets the hysteresis value
Setting method
Press and hold the setting button to enter the internal menu and set P0 to C.
Press the setting button to stop the temperature flashing, and the up and down keys to set the temperature.
Long press the setting button to enter the internal menu, set the P1 backlash setting
Use Cases
Control the farm, ventilate to 26 ° C to stop, the temperature rises to 28 ° C to start the refrigeration again, how to set up
The first step:determine the working mode is cooling mode, set P0 to C
Step 2:Press the SET button to stop the temperature flashing. Set the stop temperature to 28 °C with the up and down keys.
The third step:stop at 26 ° C, start again at 28 ° C, so the return difference needs to be set to 28-26 = 2, enter the internal menu to set P1 to 2, the cooling case is set!
Package includes
3 x Miniature embedded digital display thermostat
| Weight | 0.132 kg |
|---|
Related products
DC 5-5.5V Light Source Tracking PCB Board Solar Automatic Tracker Light Seeking Module Ray Tracing
$13.11Sensor & Detector ModuleAdd to cartSpecificationsVoltage:5-5.5V DCCurrentPrinciple:Use a covering on the photosensitive nozzle, when the light is shining on the obstruction to form a shadow, the light on one sideWhen the difference is formed with the other side, the motor is controlled to find the balance point, that is, the center of the light source.Size:35x16x12 mmLine length:15cmAperture:3mmNote1. The power supply …
10pcs thermal Sensor Module Temperature Switch thermistor Sensor Board
$10.88Sensor & Detector ModuleAdd to cartUsesTemperature detection, temperature control sensors , ambient temperature detectionFeatures1. Using the NTC thermistor sensor, good sensitivity2. The comparator output signal is clean, good waveform, driving ability, more than 15mA.3. Adjust the temperature distribution position detection threshold4. The working voltage 3.3V-5V5. The output format:digital switching outputs ( 0 and 1 )6. Fixed bolt holes for easy …
10pcs thermal Sensor Module Temperature Switch thermistor Sensor BoardRead More
3pcs 6mA 3-100CM Adjustable infrared Digital Obstacle Avoidance Sensor Module
$20.45Sensor & Detector ModuleAdd to cartSpecificationsWorking voltage:DC 3.8V-5.5VWorking current (5V):typical current 6mAInput and output signals (3 lines):GND, VCC is power, and VCC is 3.8V-5.5VObstacle detection time (range from obstacle-free to obstacle-free or obstacle-free to obstacle-free)Working Principle:Sensors actively emit infrared light, according to reflected light detection, if detected obstacles, OUT foot output 0, otherwise 1.Detection distance (test environment, indoor, maximum power, …
3pcs 6mA 3-100CM Adjustable infrared Digital Obstacle Avoidance Sensor ModuleRead More
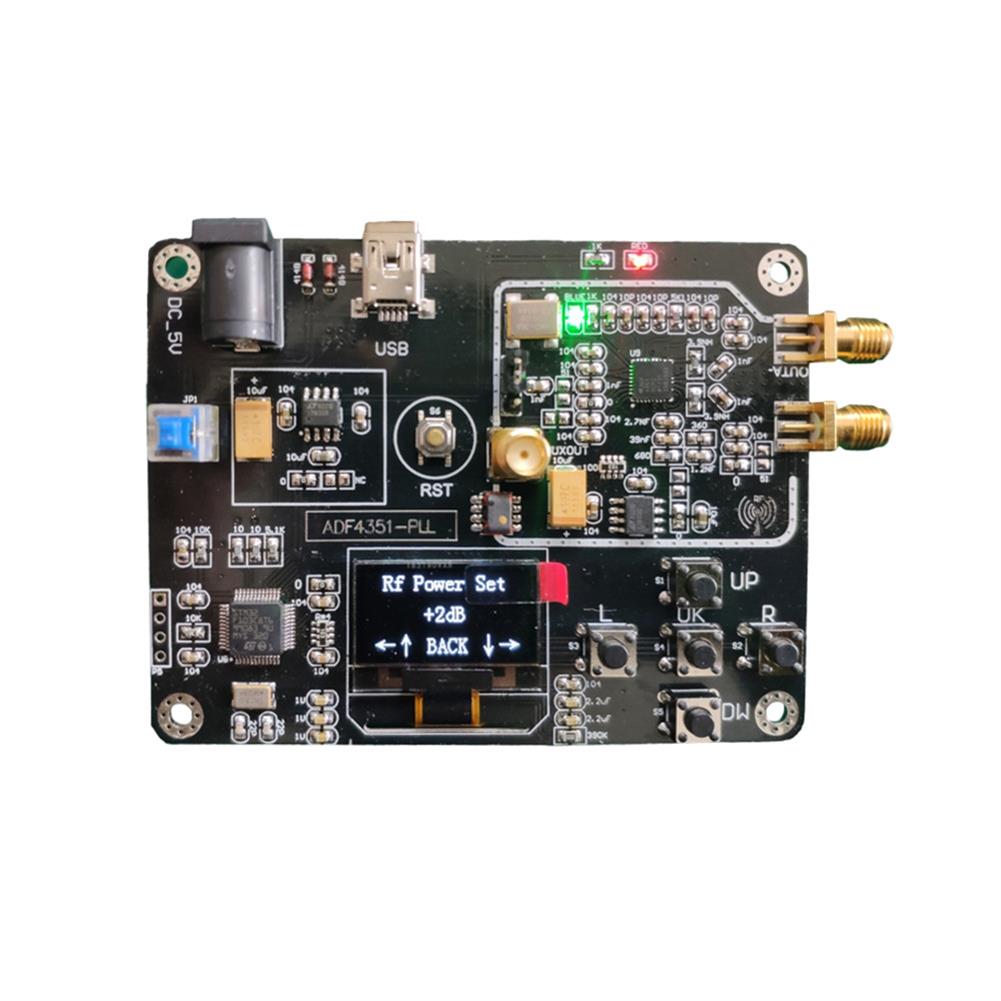
Geekcreit Signal Generator Module 35M-4.4GHz RF Signal Source Frequency Synthesizer ADF4351 Development Board
$54.66Sensor & Detector ModuleAdd to cartThe Source code:Click here to openSchematic:Click here to openHighlightsWith OLED displayHost computer USB & serial portIntegrated key operationWide range voltage supplyGood man-machine interface Many improvements on the phase noise, phase spurious and loop filterMuch enhancement on the power filter and ground processingModule can achieve 35MHz – 4.4GHz frequency output, point frequency, sweep, frequency hopping and …


Customers Also Viewed
5pcs Electronic DIY LED Dimming Lights Series and Parallel Circuit Technology Small Production Kit
$16.60DIY Electronic KitsAdd to cartDescriptionThe purpose of the experiment1. Understand and recognize the light-emitting diodes and illuminate the light-emitting diodes (LEDs);2. Understand the role of understanding resistance, series and parallel resistance;3. Understand the self-locking switch;4. Understand and recognize adjustable resistors and use adjustable resistors;Experimental stepsStep 1:The long leg of the light-emitting diode (LED) is the positive pole, and the …
50pcs Universal PCB Board 7x9cm 2.54mm Hole Pitch DIY Prototype Paper Printed Circuit Board Panel Single Sided Board
$32.93Electronic Accessories & SuppliesAdd to cartFeaturesPremium one side prototype PCB printed circuit board, universal strip breadboard.All holes are plated through, smooth and clear.Sturdy and easy to use, the plated holes are very solid which makes it very easy to solder components on and they can hold up well and handle reasonable heat levels and dwell times.A good assortment of quality …
50mm Submersible Bore 0.5 HP Water Farm Garden Deep Well Pump 220V 180ft 8GPM
$340.19Electrical Pump & ValveAdd to cartFeatures-2inch deep well submersible pump, fits in the 2inch well casing.-Patented impeller design provides extended pump life and heavy flow under the severe circumstances.-This pump has a much longer pump life than the all-plastic-bottom-suction pump.-Solid 304 stainless steel body with heavy duty cast iron discharge.-Industrial grade heavy duty, also good for home usage.-Built in 1/2 …
50mm Submersible Bore 0.5 HP Water Farm Garden Deep Well Pump 220V 180ft 8GPMRead More
1Hz-150Khz 3.3V-30V Signal Generator PWM Pulse Frequency Duty Cycle Adjustable Module LCD Display
$22.06Other Module BoardAdd to cartParameter settingsThe module has four independent keys, used to set the frequency and duty cycle, support short press (increase or decrease a unit)and long press (fast increase or decrease), very simple, set the parameters automatically save, power failure Lost.Module parameters1. Working voltage:3.3 ~ 30V;2. Frequency range:1Hz ~ 150KHz;3. Frequency accuracy:the accuracy in each range is …
5pcs LCD1602 LCD Shell for 1602 Blue/Yellow And I2C 1602 Blue/Yellow Green Backlight LCD Module Case
$17.73Electronic Accessories & SuppliesAdd to cartDescription Screen size:2.5 inches Material:acrylic Application 1602 Blue Backlight LCD Display Module:https://www.hobbyant.com/1Pc-1602-Character-LCD-Display-Module-Blue-Backlight-p-978160.htmlrmmds=search 1602 Yellow Backlight LCD Display Module:https://www.hobbyant.com/1Pc-1602-Character-LCD-Display-Module-Yellow-Backlight-For–p-978155.htmlrmmds=search I2C 1602 Blue Backlight LCD Display Module:https://www.hobbyant.com/IIC-I2C-1602-Blue-Backlight-LCD-Display-Module-For–p-950726.htmlrmmds=search I2C 1602 Yellow Green Backlight LCD Display Module:https://www.hobbyant.com/IICI2C-1602-Yellow-Green-Backlight-LCD-Display-Module-For–p-950728.htmlrmmds=search Package included 5 x LCD1602 LCD shell


Reviews
There are no reviews yet.