


3pcs XH-W1321 0.1 Digital thermostat Mini Embedded Red Digital Display Switch Temperature Controller with Waterproof NTC Sensor Meter
$30.89
Shipping:Standard Shipping about 10-25 business days
Secure Payment:Paypal,VISA,MasterCard
Specifications
Product Name:Miniature embedded digital display thermostat
Product Model:XH-1321
Material:ABS
Case Color:White
LED Color:Red
Input Voltage:DC12V
Temperature Measurement Range:-50-110→
Temperature Control Range:-50-110→
Control Accuracy:0.1→
Display Accuracy:0.1→
Measuring Input:NTC10K Waterproof Probe L=1 Meter
Output Type:Relay Output(Output Switch)
Output Capacity:10A
Size (Length x Width x Height):about 56 x 38 x 32mm (2.17 x 1.50 x 1.26 Inch )
Opening hole size:46 x 34mm
Key Function
SET:Press once during normal use, directly enter the stop temperature setting state, use the up and down keys to set the required stop temperature, long press to enter the internal setting menu.
UP:After long press the setting button to enter the internal setting, increase the value setting by the up button.
DOWN:After long press the setting button to enter the internal setting, use the up button to decrease the value setting.
Code:Description:Setting range (method):Factory settings
P0:Operating mode:H/C:C
P1:Backlash setting:0.1-50:2
P2:Temperature correction:-9.9~+9.9°C:0
P3:Delayed start:0-9:0
Detailed Code Descriptions
P0:Working mode:This value must be set when the thermostat is used for the first time. If it is used for heating heating, set to H, if it is used for cooling cooling, set to C.
P1:Hypothesis setting:Press and hold the setting button for 3 seconds to enter the internal menu, select P1, and press the setting button again to enter the hysteresis value setting state. The hysteresis is the difference required when the thermostat reaches the set temperature and stops working again. For example, it is set to the heating mode. When it is heated to 40 degrees, it stops at 35 degrees and starts to return. The difference is 5
P2:Temperature correction:Press and hold the setting button for 3 seconds to enter the internal menu. Press the up and down keys to select P2, press the setting button again, and set the required calibration temperature by the up and down keys. In the setting, if the detected temperature value is 0.5 °C larger than the actual temperature value, the calibration temperature to be set is -0.5 °C. If the detected temperature value is 1 °C smaller than the actual temperature value, the calibration temperature to be set is 1 °C, and the detection temperature +-calibration temperature = actual temperature.
P3:Delay start:Press and hold the setting button for 3 seconds to enter the internal menu, select P3 by the up and down keys, press the setting button again, and set the required delay time (minutes) by the up and down keys. The delay start is generally used for compressor refrigeration. If it is used in the refrigerator freezer, this value needs to be set. According to the compressor back pressure, the set value is usually 3-6 minutes, if it is not used to control the compressor or no delay. Function, skip this item directly.
Instructions
Set the difference back:Why set the backlash setting When you control the device, the temperature will rise or fall back. How many degrees does the temperature change If you want the temperature to change by 10°, the device needs to set the difference back to 10. By setting the difference back, the device can cycle through the temperature range.
Set the stop temperature:press the set button once in the normal display state to stop the temperature value flashing. You can set the desired stop temperature value by using the up and down keys.
How to set factory settings are restored:Press and hold the up and down keys while the power is on, the digital tube display 888 will then automatically jump to the detection temperature.
Heating mode setting method
Setup steps
The first step is to set P0=H
The second step sets the stop temperature
The third step sets the hysteresis value
Setting method
1. Press and hold the setting button to enter the internal menu and set P0 to H.
2. Press the setting button to stop the temperature flashing, and the up and down keys to set the temperature.
3. Press and hold the setting button to enter the internal menu and set the P1 hysteresis setting.
Use Cases
Control the water heater, heat it to 65 ° C to stop, the temperature drops back to 50 ° C and start heating again, how to set
Step 1:Determine the working mode as heating mode and set P0 to H
Step 2:Press the setting button to stop the temperature flashing. Set the starting temperature to 50 °C with the up and down keys.
The third step:stop at 65 °C, start again at 50 °C, so the return difference needs to be set to 65-50=15, enter the internal menu and set P1 to 15, the heating case is set!
Cooling mode setting mode
Setup steps
The first step is to set P0=C
The second step sets the stop temperature
The third step sets the hysteresis value
Setting method
Press and hold the setting button to enter the internal menu and set P0 to C.
Press the setting button to stop the temperature flashing, and the up and down keys to set the temperature.
Long press the setting button to enter the internal menu, set the P1 backlash setting
Use Cases
Control the farm, ventilate to 26 ° C to stop, the temperature rises to 28 ° C to start the refrigeration again, how to set up
The first step:determine the working mode is cooling mode, set P0 to C
Step 2:Press the SET button to stop the temperature flashing. Set the stop temperature to 28 °C with the up and down keys.
The third step:stop at 26 ° C, start again at 28 ° C, so the return difference needs to be set to 28-26 = 2, enter the internal menu to set P1 to 2, the cooling case is set!
Package includes
3 x Miniature embedded digital display thermostat
| Weight | 0.138 kg |
|---|
Related products
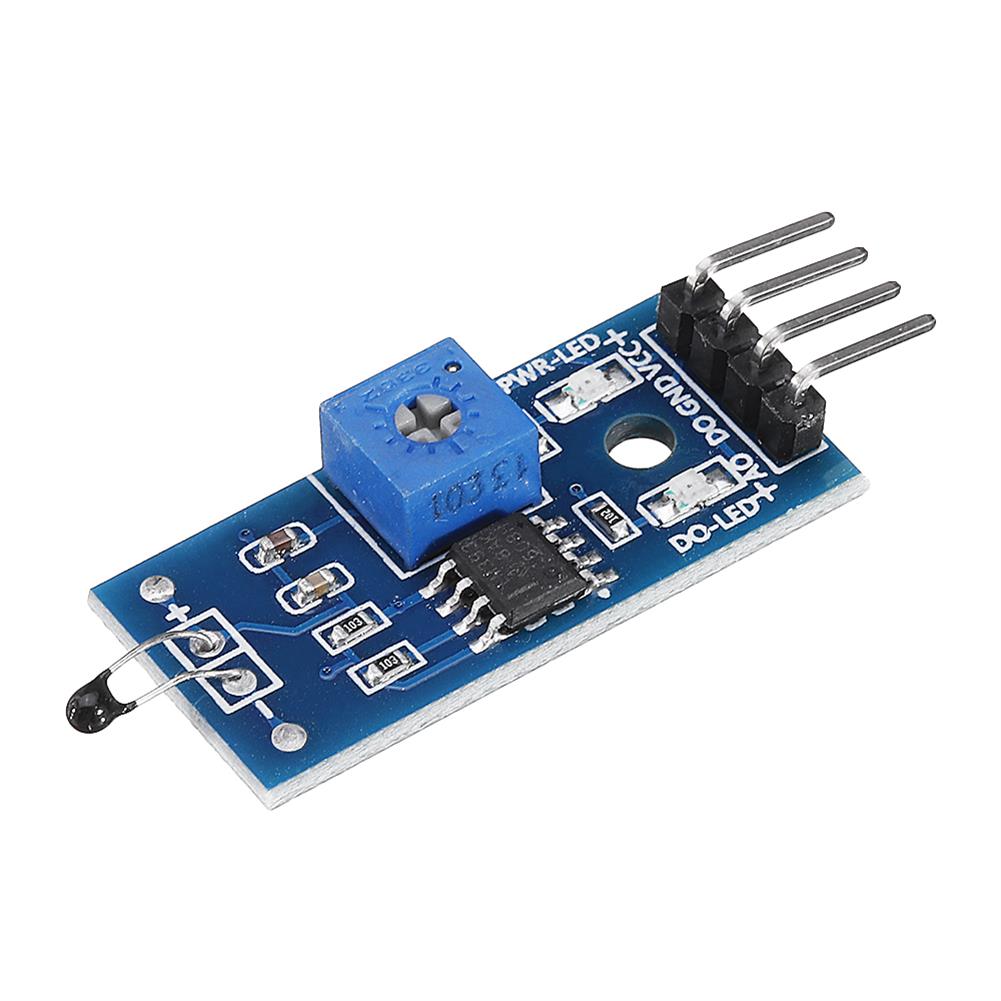
3pcs thermal Sensor Module Temperature Switch thermistor Sensor Board
$5.49Sensor & Detector ModuleAdd to cartUsesTemperature detection, temperature control sensors , ambient temperature detectionFeatures1. Using the NTC thermistor sensor, good sensitivity2. The comparator output signal is clean, good waveform, driving ability, more than 15mA.3. Adjust the temperature distribution position detection threshold4. The working voltage 3.3V-5V5. The output format:digital switching outputs ( 0 and 1 )6. Fixed bolt holes for easy …
3pcs thermal Sensor Module Temperature Switch thermistor Sensor BoardRead More
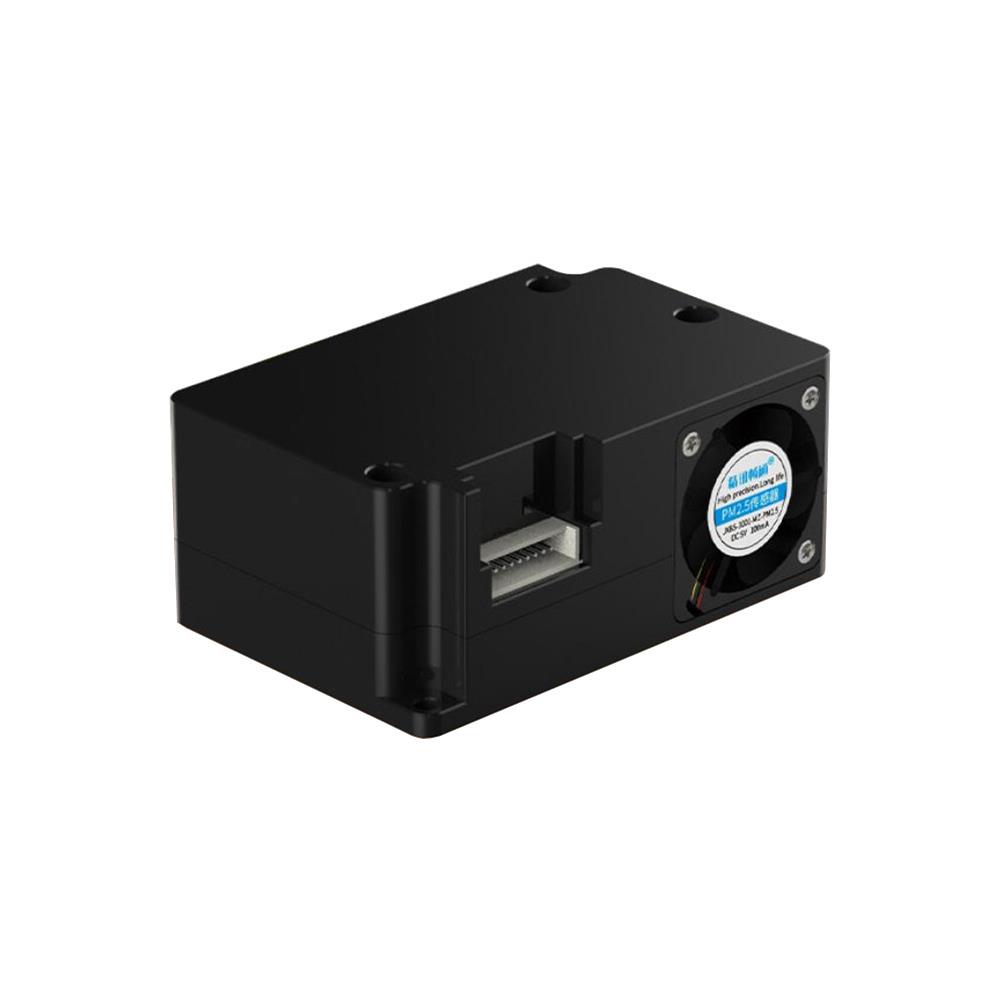
PM2.5 Laser Particulate Matter Sensor PM1.0 PM10 Air Quality Detection Sensor Monitoring Particulate Matter Sensor Module
$39.35Sensor & Detector ModuleAdd to cartTechnical ParametersPM2.5/PM10 measuring range:0-999ug/m3PM2.5/PM10 resolution:lug/m3PM2.5/PM10 accuracyConsistency of particle concentration:0-100ug/m3:÷10%;100-500ug/m3:÷10%Minimum detectable particle diameter:0.3umPower supply voltage:5V÷0.1VMaximum working current:100mAOperating temperature range:-10~60CWorking humidity range:0-95%RHStorage temperature:-30~70CResponse speedProduct appearance size:53x35x23mmApplication areasAir Purifier / Air Quality Detector / Fresh Air Ventilation SystemSupporting air-conditioning / cars with air purification function and consumer electronicsAgricultural greenhouse / environmental monitoring of outdoor breeding placesKitchen and bathroom …
5pcs 6mA 3-100CM Adjustable infrared Digital Obstacle Avoidance Sensor Module
$36.94Sensor & Detector ModuleAdd to cartSpecificationsWorking voltage:DC 3.8V-5.5VWorking current (5V):typical current 6mAInput and output signals (3 lines):GND, VCC is power, and VCC is 3.8V-5.5VObstacle detection time (range from obstacle-free to obstacle-free or obstacle-free to obstacle-free)Working Principle:Sensors actively emit infrared light, according to reflected light detection, if detected obstacles, OUT foot output 0, otherwise 1.Detection distance (test environment, indoor, maximum power, …
5pcs 6mA 3-100CM Adjustable infrared Digital Obstacle Avoidance Sensor ModuleRead More
50pcs thermal Sensor Module Temperature Switch thermistor Sensor Board
$44.79Sensor & Detector ModuleAdd to cartUsesTemperature detection, temperature control sensors , ambient temperature detectionFeatures1. Using the NTC thermistor sensor, good sensitivity2. The comparator output signal is clean, good waveform, driving ability, more than 15mA.3. Adjust the temperature distribution position detection threshold4. The working voltage 3.3V-5V5. The output format:digital switching outputs ( 0 and 1 )6. Fixed bolt holes for easy …
50pcs thermal Sensor Module Temperature Switch thermistor Sensor BoardRead More


Customers Also Viewed
30pcs EQKIT Electronic Funny Kits Voice Control LED Melody Light DIY Kits Production Suite Small Electronic Learning Electronic Kits
$56.32DIY Electronic KitsAdd to cartDescriptionVoltage:3-4 .5 VPCB material:FR-4 fiberglass boardDimensions:34 * 34MMPackage included30 x Voice Control LED Melody Light DIY Kits
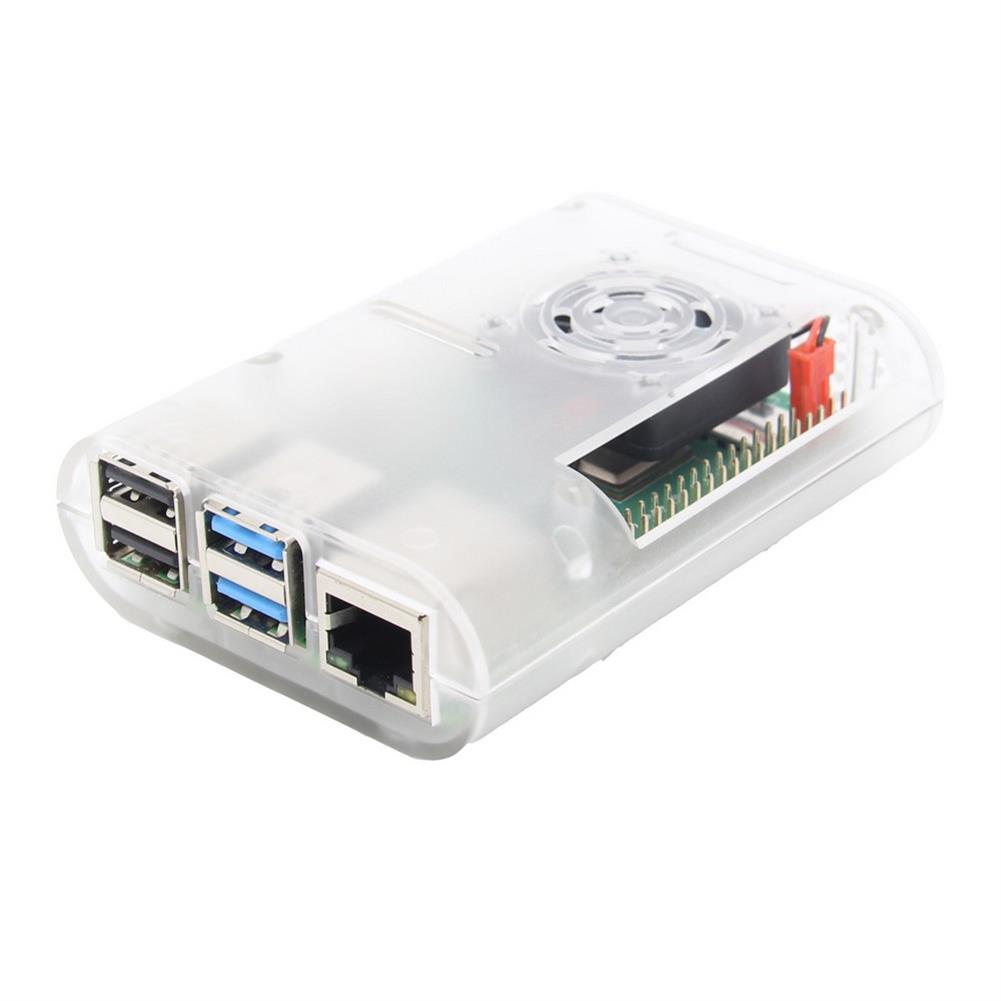
10pcs Transparent Protective ABS Case Support Cooling Fan for Raspberry Pi 4 Model B
$58.27Raspberry Pi & Orange PiAdd to cartOverviewThis is a new design ABS case to protect your Raspberry Pi 4 Model B computer, and it is only comepatible with your Raspberry Pi 4 Model B, not support other versions. Also support install a dc 5v cooling fan. The GPIO pin interface is available to us if you do not install the cooling …
10pcs Transparent Protective ABS Case Support Cooling Fan for Raspberry Pi 4 Model BRead More
10pcs Roller Lever Arm Micro Switch AC 250V HV-156-1C25
$13.11Electronic Accessories & SuppliesAdd to cart10pcs Roller Lever Arm Micro Switch AC 250V HV-156-1C25DescriptionSize:27.8 x 10.3 x 15.9mmRoller Diameter:4.75mmLever Length:28mmRating:15A AC250VWithstand Voltage:AC1, 0000V 1 MinuteInsulation Resistance:100mΩ DC500VContact ResistanceSoldering Temperature:250°C Max 3 sec.Ambient Temperature used:-25°C to +80°CAmbient Humidity UsedOperating Force:160Part number is HV-156-1C25Package included10 x Micro Switch
Solar TPMS LED Wireless Tire Pressure Monitoring System with 4 internal Sensor
$168.06SwitchesAdd to cartFeatures-This wireless tire pressure monitoring system comes with four built-in sensors and a digital monitor to monitor the tire pressure/temperature-By employing the advanced wireless sensors which highly integrated pressure and temperature sensor, we provide the amazing and reliable TPMS for you-Oil will be decreased when tires work under lower pressure, this item can reduce fuel …
Solar TPMS LED Wireless Tire Pressure Monitoring System with 4 internal SensorRead More
Deek-Robot W-1213 intelligent Digital Display Fish Tank Climbing Pet Greenhouse Planting Hatching and Breeding Temperature Controller
$26.23Test & Measuring ModuleAdd to cartProduct parameterProduct name:Intelligent temperature controllerProduct model:W-1213Power supply voltage:AC110-220VWorking frequency:50HZTemperature range:-40C~+120CTemperature measurement accuracy:÷0.5CSensor cable length:100CMSize:79.5*43*35mmShell material:surface shell ABS, bottom shell flame retardant ABSBattery:CR1220 3V button battery(not included)Display panel descriptionHeat (corresponding icon display):heating mode, in heating mode, heating the relay works.Cool (corresponding icon display):Cooling mode, in cooling mode, cooling the relay works.Timer:Timer switch, in timer mode, the …
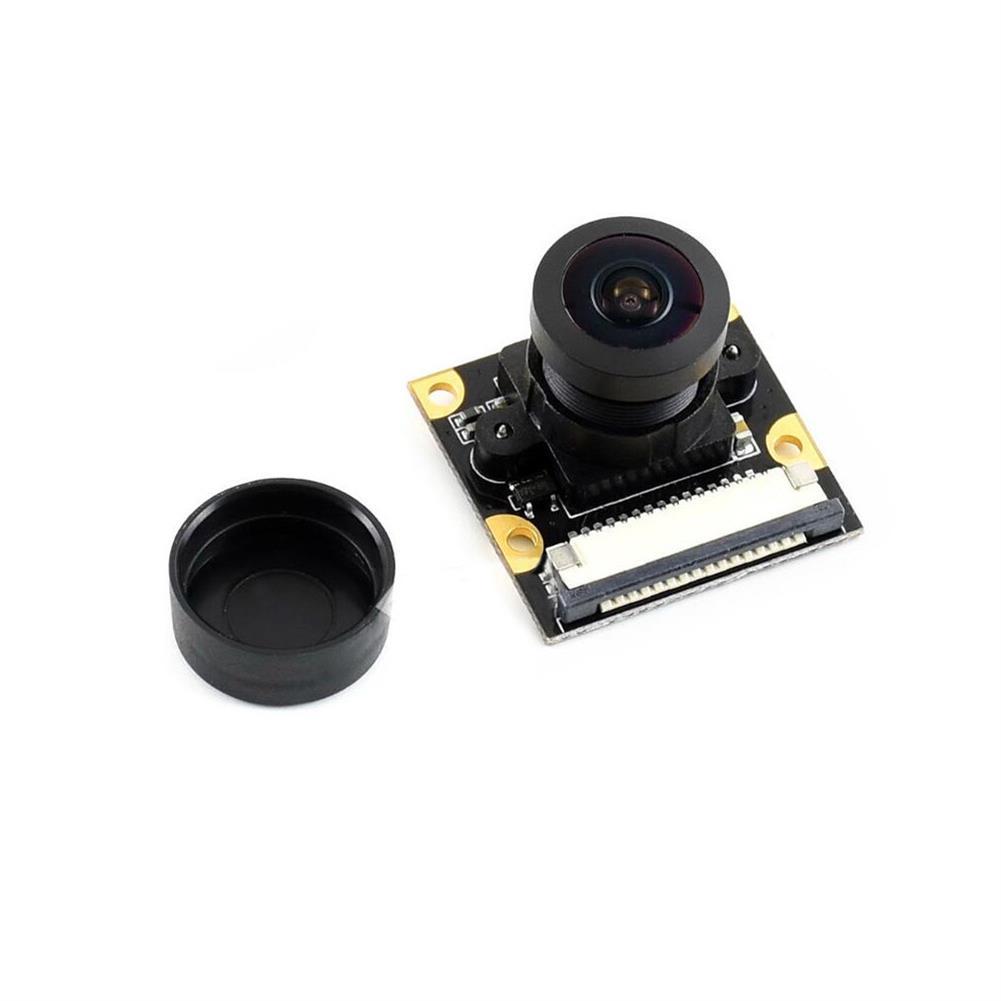
Waveshare IMX219-160 Camera 160 Degree Field of View 8 Million Pixels for Jetson Nano
$54.66Smart ModuleAdd to cartFeaturesSupports NVIDIA Jetson Nano Developer Kit, Compute Module 3/3+8 MegapixelsSensor:IMX219Resolution:3280 ≠ 2464Lens specificationsCMOS size:1/4inchAperture (F):2.35Focal Length:3.15mmAngle of View (diagonal):160 degreeDistortion4 screw holesUsed for attachmentProvides 3.3V power outputDimension:25mm ≠ 24mmApplicationsCombined with the Jetson Nano AI computer, this camera suits for AI projects such asFace recognitionRoad mark detectionLicense plate recognitionPackage includes:(the Jetson Nano does not includes)1 x …
Waveshare IMX219-160 Camera 160 Degree Field of View 8 Million Pixels for Jetson NanoRead More
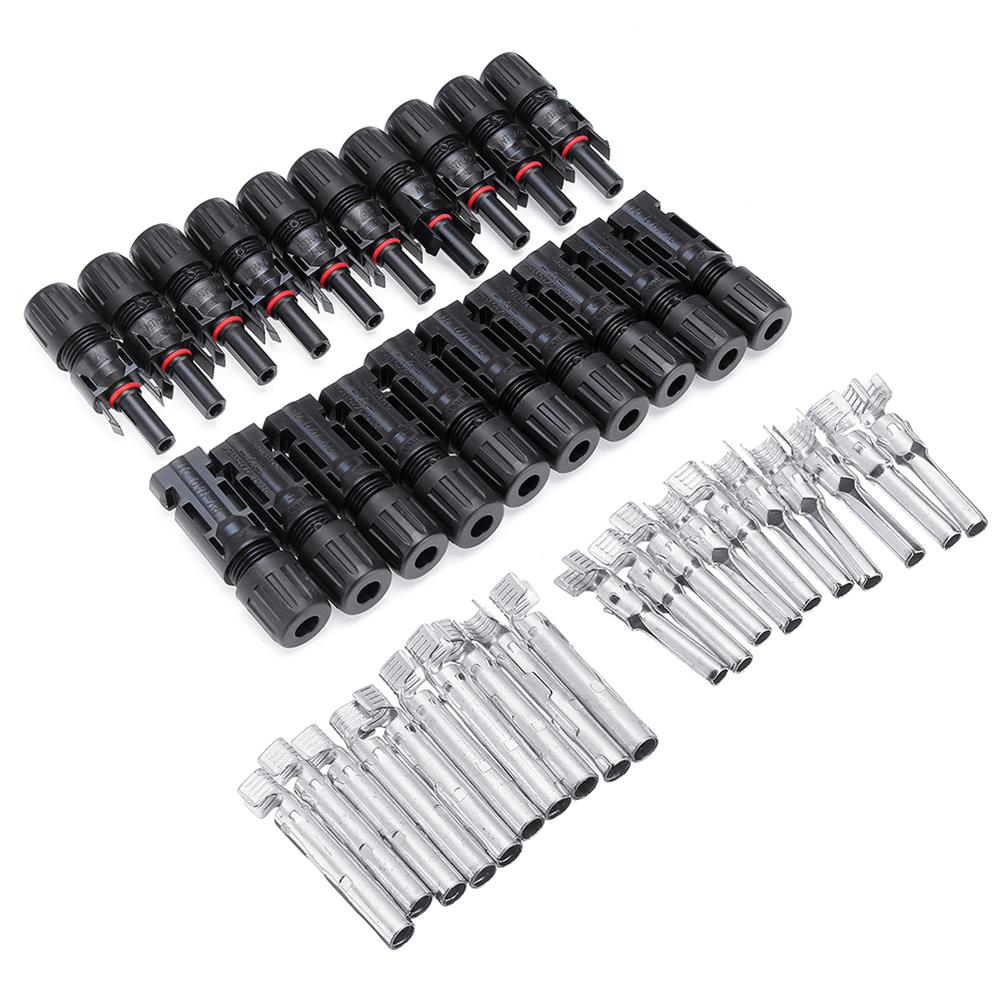
10Pairs MC4 Connector Male And Female MC4 Solar Panel Connector 30A 1000V for PV Cable 2.5/4/6mm Solar Panel Connect
$26.23Electronic Accessories & SuppliesAdd to cartSpecificationArticle number:MC4Rated voltage 1000 VRated impulse voltage:1000 VTest voltage:6 kV (50Hz)Suitable for cables:10, 12, 14 AWG (2.5mm2 / 4mm2 / 6mm 2;)Rated current:24 A-14 AWG (2.5mm 2;), 30A-12 and 10 AWG (4mm 2; and 6mm 2;)Protection class:IP67Contact material:copper, silver platedInsulation material:PC / PAOperating temperature:-40 ° C + 90 ° CThe security class:IIFlame Class:UL94-V0Contact resistance:≤5mΩInsertion / …


Recently Viewed Products
-
 HORD 100Pcs 8mm Line Card Retainer Steel Nail Wire Card Nail Network Cable Phone Line Nail with Plastic Bag $4.40
 -
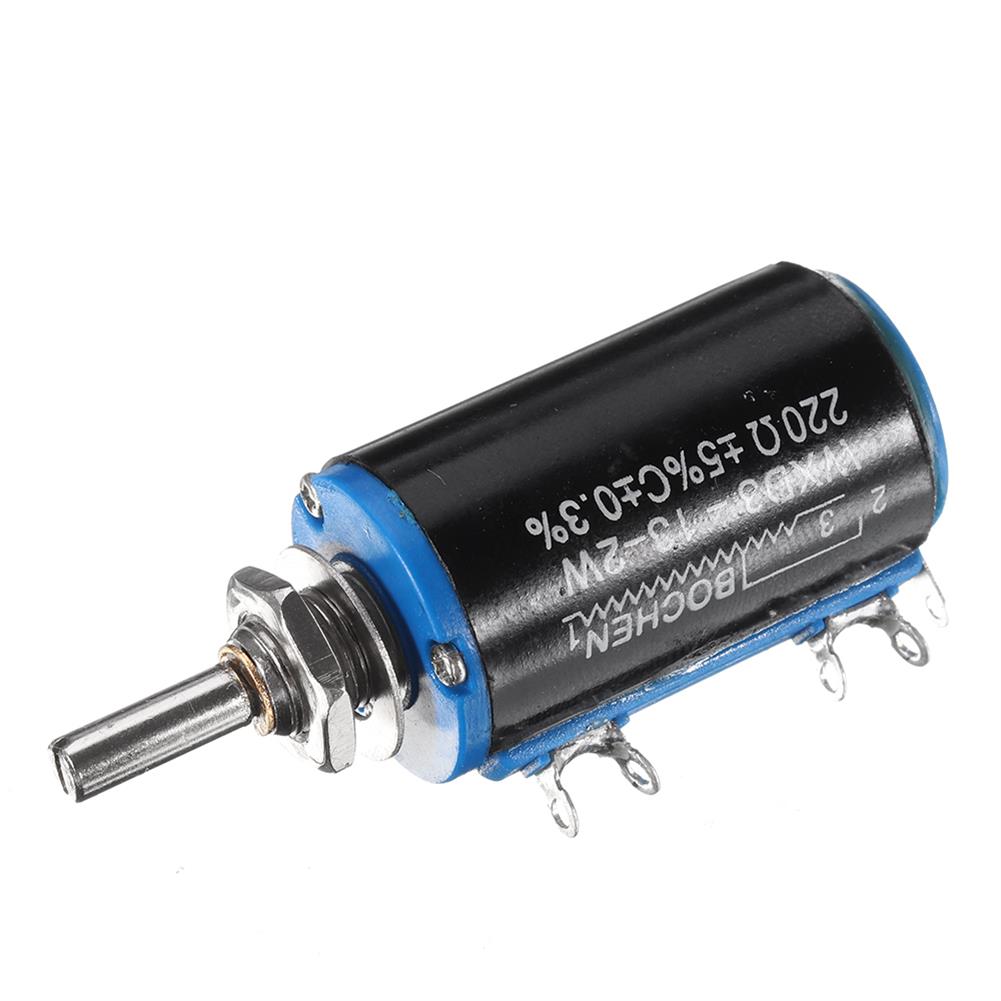 20pcs WXD3-13-2W Precision Potentiometer 220 220 Ohm Wirewound Multi-Turn Potentiometer $49.11
 -
 220V/380V 1.5KW/2.2KW Variable Frequency Drive VFD inverter $190.34
 -
 EQKIT AMP-1 TDA2822M Power Amplifier Amplify Module DIY Kit Electronic Production for Diy Kit Electronic PCB Board Module $13.11
 -
 100Pcs Black Mini Size SPDT Slide Switches on-off 100V 2A DIY Material Toggle Switch $24.53
 -
 100-240V 0.3A Charger Adapter for DYSON DC35 DC31 DC34 DC44 DC56 DC57 $40.49
 -
 10pcs XH-M226 USB bluetooth Audio Receiver Module Ultra Long Distance 4.0 Version for Wireless Speaker $53.97
 -
 BESTEP 1 Channel 5V Relay Module 30A with Optocoupler Isolation Support High And Low Level Trigger $8.73
 -
 SMATRUL H9 White 2Gang Wireless Smart Switch 433Mhz 300M White RF Remote Controller $23.96
 -
 7PCS Metal Polyhedral Dices Set for Dungeons and Dragons Dice Desktop RPG Game $34.41
Reviews
There are no reviews yet.