


3pcs 12V XH-W3002 Micro Digital thermostat High Precision Temperature Control Switch Heating and Cooling Accuracy 0.1
$32.52
Shipping:Standard Shipping about 10-25 business days
Secure Payment:Paypal,VISA,MasterCard
Feature
Product Name:Microcomputer Temperature Controller
Product model:XH-W3002
Temperature range:-50~110°C
Temperature control range:-50~110°C
Temperature measurement accuracy:+-0.2 °C
Temperature control accuracy:+-0.1 °C
Temperature probe:NTC10K (B3950) 1 meter waterproof probe
Supply voltage:DC12V/DC24V/AC220V
Output power:DC12V:120W
Output type:direct output
Appearance size:60 x 45 x 31mm
Opening size:73mm (aperture 4mm)
Package includes
3 x Microcomputer Temperature Controller
Wiring
Key Description
Up key:Short press to display the starting temperature, long press to set the starting temperature.
Down button:short press to display the stop temperature, long press to set the stop temperature.
Shutdown button:Press to turn off the thermostat, and then press to turn on the thermostat.
Code:Code description:Setting range:Factory setting
P0:Starting temperature:-50~110°C:25
P1:Stop temperature:-50~110°C:40
P2:Temperature correction:-10~10°C:0°C
P3:Delayed start:0-10 minutes:0
P0. Set the startup temperature
Press the Setup button to enter the internal menu. The default display is P0. Press the Setup button again and set the desired startup temperature by pressing the up and down buttons.
P1. Set the stop temperature
Press the setup button to enter the internal menu, the display is P0, switch to P1 by the up and down keys, press the setup button again, and set the required stop temperature by the up and down buttons.
P2. Set the temperature correction
In the same way, enter the internal menu, switch to P2 by pressing the up and down buttons, press the setting button again, and set the required calibration temperature by pressing the up and down buttons. (Note:In the setting, if the detected temperature value is 0.5 °C larger than the actual temperature value, then the calibration temperature to be set is -0.5 ° C. If the detected value is 1 ° C smaller than the actual temperature value, the set calibration temperature is required. It is 1 ° C. Detection temperature + correction temperature = actual temperature.)
P3. Set the delay start
In the same way, enter the internal menu, switch to P3 by pressing the up and down buttons, press the setting button again, and set the required delay time by the up and down buttons, the unit is minute. (Note:Delay start is generally used for compressor refrigeration. If it is used in refrigerator freezer, this value needs to be set. According to compressor back pressure, the general setting is 3-6 minutes, if you are not using it for control or doesn’t need delay function, skip directly.
Instructions
Start temperature
Start temperature > stop temperature = cooling mode (output is connected to the cooling unit)
1. Connect the power supply and heating or cooling equipment according to the wiring diagram above (note the positive and negative poles)
2. Press and hold the up key to set the starting temperature. When the screen number flashes, press the up and down keys to set the starting temperature you want. After setting, wait for 5 seconds to brake the system.
3. Press and hold the key to set the stop temperature. When the screen number flashes, press the up and down keys to set the desired stop temperature. After setting, wait for 5 seconds to automatically save the data.
4. Restore the factory:Colleagues press and hold the up and down keys for 5 seconds, when the screen displays 888, the factory is restored.
5. Press the power off button to turn off the thermostat and press to turn on the thermostat.
Tips
888:In the case of power-on, press and hold the up and down keys for about 3 seconds, the digital tube displays 888, and automatically jumps to the detection temperature, that is, the factory settings are restored successfully.
LLL:Describe the sensor is open circuit, repair the sensor, or replace the sensor
HHH:The sensor is short circuit.
| Weight | 0.162 kg |
|---|
Related products
Keyes Brick Tilt Module Sensor(Pad hole) with Pin Header Digital Signal
$4.36Sensor & Detector ModuleAdd to cartSpecificationsWorking voltage:DC 3.3-5VPositioning hole size:3mm in diameterControl signal:digital signalSize:34 x 22 x 9mmPackage included1 x Module BoardWiring, the UNO board is not includes.
10pcs 6mA 3-100CM Adjustable infrared Digital Obstacle Avoidance Sensor Module
$64.02Sensor & Detector ModuleAdd to cartSpecificationsWorking voltage:DC 3.8V-5.5VWorking current (5V):typical current 6mAInput and output signals (3 lines):GND, VCC is power, and VCC is 3.8V-5.5VObstacle detection time (range from obstacle-free to obstacle-free or obstacle-free to obstacle-free)Working Principle:Sensors actively emit infrared light, according to reflected light detection, if detected obstacles, OUT foot output 0, otherwise 1.Detection distance (test environment, indoor, maximum power, …
10pcs 6mA 3-100CM Adjustable infrared Digital Obstacle Avoidance Sensor ModuleRead More
5pcs 6mA 3-100CM Adjustable infrared Digital Obstacle Avoidance Sensor Module
$36.94Sensor & Detector ModuleAdd to cartSpecificationsWorking voltage:DC 3.8V-5.5VWorking current (5V):typical current 6mAInput and output signals (3 lines):GND, VCC is power, and VCC is 3.8V-5.5VObstacle detection time (range from obstacle-free to obstacle-free or obstacle-free to obstacle-free)Working Principle:Sensors actively emit infrared light, according to reflected light detection, if detected obstacles, OUT foot output 0, otherwise 1.Detection distance (test environment, indoor, maximum power, …
5pcs 6mA 3-100CM Adjustable infrared Digital Obstacle Avoidance Sensor ModuleRead More
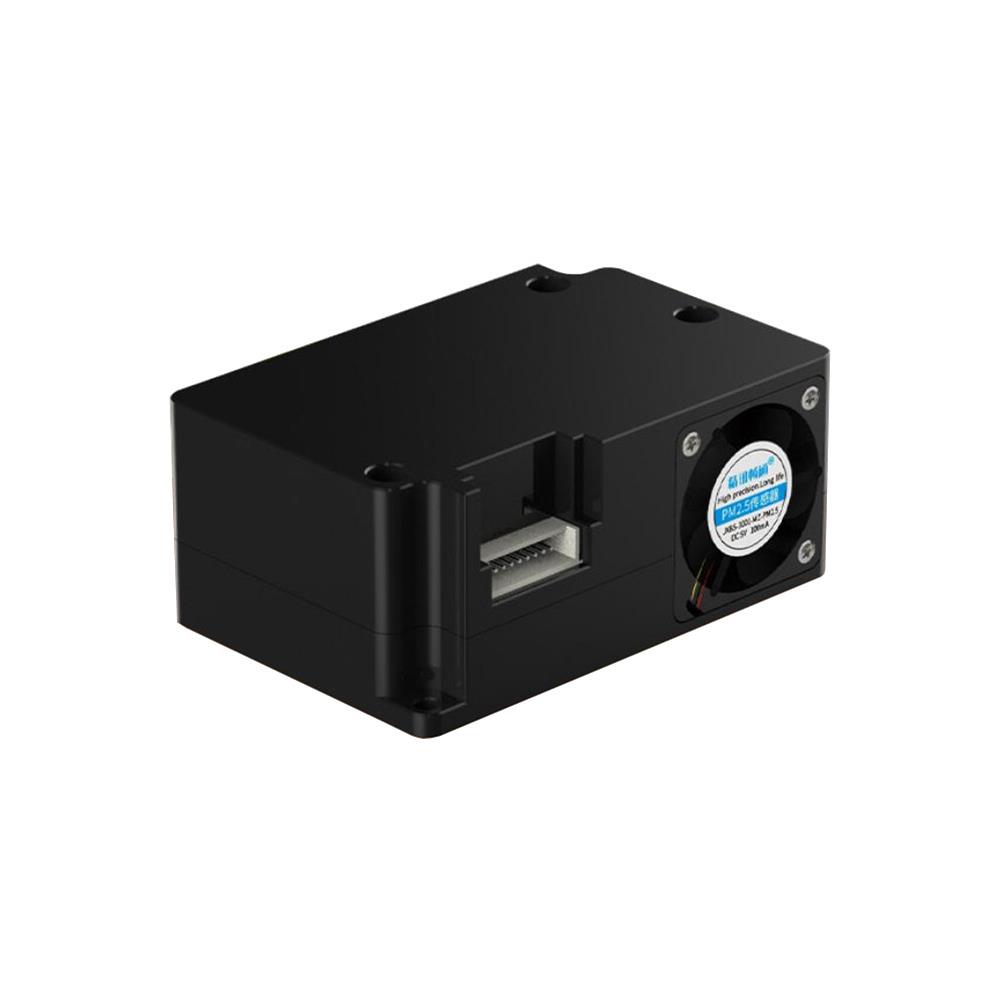
PM2.5 Laser Particulate Matter Sensor PM1.0 PM10 Air Quality Detection Sensor Monitoring Particulate Matter Sensor Module
$39.35Sensor & Detector ModuleAdd to cartTechnical ParametersPM2.5/PM10 measuring range:0-999ug/m3PM2.5/PM10 resolution:lug/m3PM2.5/PM10 accuracyConsistency of particle concentration:0-100ug/m3:÷10%;100-500ug/m3:÷10%Minimum detectable particle diameter:0.3umPower supply voltage:5V÷0.1VMaximum working current:100mAOperating temperature range:-10~60CWorking humidity range:0-95%RHStorage temperature:-30~70CResponse speedProduct appearance size:53x35x23mmApplication areasAir Purifier / Air Quality Detector / Fresh Air Ventilation SystemSupporting air-conditioning / cars with air purification function and consumer electronicsAgricultural greenhouse / environmental monitoring of outdoor breeding placesKitchen and bathroom …


Customers Also Viewed
LED Cool Light Egg Candler Tester Ultra Bright Pocket Poultry Egg Lamp incubator
$56.69Switch AccessoriesAdd to cartFeatures– Made of high quality ABS material, insulating, stable and durable.– LED lamp head, high power, strong light source, can clearly detect the hatching of eggs.– Using high-quality materials, safe and durable, with buttons that are easy to open and close.– Suitable for hatching eggs, but also for children and students to learn the process …
LED Cool Light Egg Candler Tester Ultra Bright Pocket Poultry Egg Lamp incubatorRead More
5pcs 2 Channel PWM Generator Module Pulse Frequency Duty Cycle Adjustable
$34.82Other Module BoardAdd to cartProduct Introduction1. Operating Voltage:5-30V,support micro USB 5.0V power supply2. Frequency Range:1Hz~150KHz3. Frequency Precision:2%4. Signal Load Capacity:output current is within 8–30mA5. Output Range:default 5V V-pp (can be changed by external power)6. Ambient Temperature:-30 Celsius ~70 Celsius Application Fields1. As square wave generator to generate square wave for experiment development2. Used to drive steeping motor driver’s square …
5pcs 2 Channel PWM Generator Module Pulse Frequency Duty Cycle AdjustableRead More
3.7V Lithium Battery 4 Paragraph Power indicator Module
$4.36Test & Measuring ModuleAdd to cartDescription1, onboard high precision voltage detection chip and power supply voltage chip2, onboard four power indicator LED lights, three kinds of color display, red, yellow, yellow, green,representing 20%, 50%, 80%, 100% of the battery3, set aside a battery testing interface and two positioning hole4, PCB size:22.2 (mm) x17.2 (mm)Package included1 x 3.7V Lithium Battery 4 …
3.7V Lithium Battery 4 Paragraph Power indicator ModuleRead More
YAHBOOM High-quality T-shape Expansion Board + 40Pin GPIO Flat Rainbow Ribbon Cable for Raspberry 4B/3B+/ZERO/W
$10.21Raspberry Pi & Orange PiAdd to cartDescriptionThis high-quality T-shape expansion board allows you to connect the Raspberry Pi GPIO port for breadboard experiments. We will provide a 40Pin soft cable for you to connect the Raspberry Pi board to the breadboard.FeaturesSpecifically designed for Raspberry Pi 4B/3B, Raspberry Pi 2B, Raspberry Pi 1B+, Raspberry pi 1A+, Raspberry Pi zero W, Raspberry Pi …
10pcs LM3915 10-segment Audio Level indicator Kit Electronic Soldering Training experiment DIY Parts
$33.89DIY Electronic KitsAdd to cartFeatrurePower supply:DC9-12VPCB size:62*27mm1 audio cable is needed. One end is subtracted and connected to the audio input port. The red cable is connected to AUDIO +, the green cable is connected to ADUIO-, and the blue cable is subtracted, do not need to solder.Package included10 x LM3915 10-segment Audio Level Indicator Kit
10pcs 40x40mm thermoelectric Power Generator Peltier Module TEG High Temperature 150 Degree
$55.12Electronic Accessories & SuppliesAdd to cartFeatureColding side posts with the wordsHeating side is emptyRed wire to positive, black wire to the negative, it generate electricity when the temperature difference happenedSpecificationModel:SP1848-27145 Color:whiteLead Length:about 30CMSize:40MM x 40MM x 3.4MM20 degree temperature difference:open-circuit voltage 0.97V, generated current:225MA40 degree temperature difference:open circuit voltage 1.8V, generated current:368MA60 degree temperature difference:open circuit voltage 2.4V, generated current:469MA80 …
10pcs 40x40mm thermoelectric Power Generator Peltier Module TEG High Temperature 150 DegreeRead More


Reviews
There are no reviews yet.